Herbed Blackened Salmon Fillets

You know you’re in trouble when you can’t zip your jeans !!  And you know you’re in trouble when your doctor tells you that you’ve gained 13 pounds in three months !!  POSSIBLE REASONS FOR THIS WEIGHT GAIN.  1. Trip to ‘all-inclusive’ resort in Cancun in October.   2.  Holiday Eating… beginning with Thanksgiving and ending with a two-week trip to Florida during Christmas and the New Year.   3.  Copious amounts of cooking during said trip, which meant copious amounts of eating – not to mention copious amounts of white wine and just lazing around like a nice, warm happy slug in the sunshine.  Oh, I forgot to mention Margaritas in both Mexico and Florida… yes… copious amounts!

I refuse give in and buy new jeans, so I’ve decided to begin taking care of myself and eating right. My guideline for this new endeavor is the Mayo Clinic’s ‘Dash Diet Program’ which is NOT a diet.  Rather, it’s an excellent guide to eating well.  And by eating well you lose weight, have more energy and also lower your blood pressure and possibly your cholesterol.

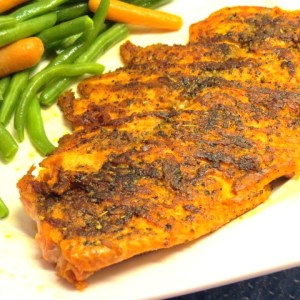
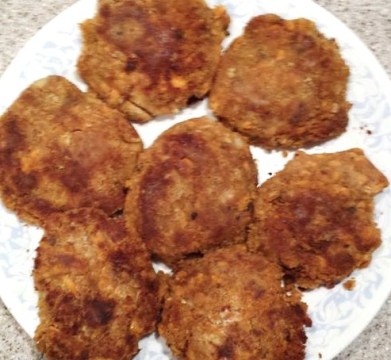
Herbed Blackened Salmon Fillets is the first of several posts which will feature delicious, healthy recipes.  I do hope you come along on this new journey with me.  If you’re already eating healthy, you might find a few new ideas.  Or, if you’re like me and need to lose some weight to improve your life, you may discover recipes to inspire you.  ++ I’ll keep you all informed as to my ‘progress’ with the too-small jeans!

1 - Herbed Blackened Salmon - My Yellow Farmhouse.com

2 - organic salmon steak - courtesy of Graig Farm -

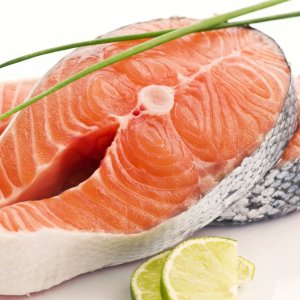
Salmon Fillet = uneven thickness                           Salmon Steaks = even throughout.

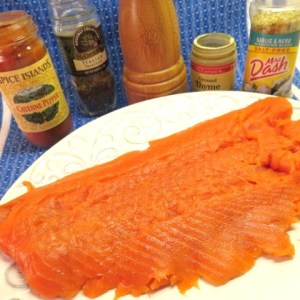
INGREDIENTS            ++ Enough salmon for 2 servings

  • 1 lb. salmon fillet   OR   1 lb. salmon steak
  •           Blackening Seasoning
  • 1/4  to  1/8 tsp. cayenne pepper
  • 1/4 tsp. freshly ground pepper
  • 3/4 tsp. paprika
  • 1/2 tsp. Mrs. Dash ‘Garlic & Herbs’    ++  Contains no salt !
  • 1/2  tsp. Italian Seasoning

3 - Blackened Salmon - My Yellow Farmhouse.com

METHOD

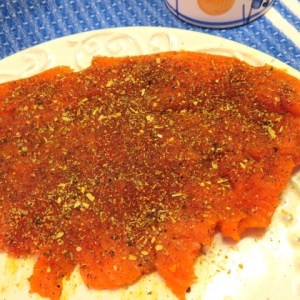
Rinse salmon and pat dry with paper towels.  Place salmon on a plate.  In a small bowl, mix blackening seasoning  ingredients .

++ For salmon fillet with skin on one side, rub blackening seasoning on the flesh side of the fillet only.   (You won’t need all the seasoning.)       ++ Allow fish to rest for 10 minutes.

++  For skinless salmon fillet  OR  salmon steak, rub 1/2 the blackening seasoning on one side of fish.  Repeat on other side.                      ++ Allow fish to rest for 10 minutes.

Drizzle about 2 Tbs. olive oil in large, heavy skillet. Heat skillet over medium-high heat.  (Skillet is hot enough when a bit of water, sprinkled onto heated skillet, ‘dances’.)

Lower heat to medium.

4 - possible - Salmon (2)

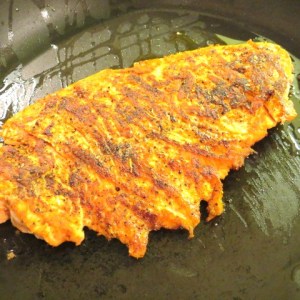
++  For Salmon Fillet

  • Place salmon fillet, skin side down, in center of heated skillet.
  • Cook for about 3 minutes, depending upon thickness of fillet.   ++ Cooked skin should peel right off !!
  • Flip fish and continue cooking for another  3 minutes or so.

++  Cooking time will depend upon the thickness of the fillet.  My fillet was rather thin, so I cooked it for 3 minutes on the first side and only 2 minutes on the second side.

++ Cooked salmon will be lighter in color and should look opaque.  Use your best judgement.  It’s actually better to undercook fish slightly than to overcook it.

++  For Salmon Steak

  • Place salmon steak in center of heated skillet.
  • Due to the thicker nature of salmon steaks, they take just a bit longer to cook.
  • Turn the fish when the bottom half looks opaque.
  • Continue cooking another 5 – 8 minutes.

++  Cooking time will depend upon the thickness of the salmon steak.

++  Cooked salmon will be lighter in color and should look opaque.  Use your best judgement.  It’s actually better to undercook fish slightly than to overcook it !

Herbed Blackened Salmon - My Yellow Farmhouse.com.

Recipe adapted from ‘The DASH Diet for Beginners’.

Photo of organic salmon steak courtesy of ‘Graig Farm’.

Crispy Tuna Patties

I’ve been making Tuna Patties for a long time – I’ve even cooked them on a wood stove! But I’d never written down the recipe before. You know… it’s like making meatloaf or meatballs – a bit of this & a bit of that…. until it just feels right.

Crispy Tuna Patties are crispy on the outside and creamy on the inside – rather like a good crab cake! This recipe comes together quickly, so it’s good for lunch as a sandwich with tartar sauce and crispy lettuce. Or as a quick dinner, if served with a veggie or salad. Enjoy!

 My friend Naomi substituted canned salmon for tuna when she prepared these patties and, for an extra ‘taste sensation’, she served them with a delicious  remoulade sauce.  Sounds like a great idea to me!

Click here for ‘AnnaShortcakes’ terrific recipe for Remoulade Sauce!

small red heart

Ingredients           Makes 4 Crispy Tuna Patties

  • 2 (5 oz.) cans solid white Albacore tuna
  • 1/2 tsp. Old Bay Seasoning
  • 4 Tbs. minced Bermuda onion
  • 1 cup fresh bread crumbs (If you don’t have a food process or blender, mince some fresh bread, minus the crusts.)
  • 4 Tbs. mayonnaise
  • 1/4 – 1/2 tsp. salt
  • a few shakes pepper
  • flour – for dredging tuna patties
  • 4 Tbs. olive oil – for frying

Method

In a medium-sized bowl, mix 2 (5 oz.) cans solid white Albacore tuna, 2 tsp. Old Bay Seasoning, 4 Tbs. minced Bermuda onion, 1 cup fresh bread crumbs (If you don’t have a food process or blender, mince some fresh bread), 4 Tbs. mayonnaise, 1/8 tsp. salt – or ‘to taste’ – and a few shakes pepper.

(Today I made half the recipe (two tuna patties) and used only one can of tuna.)

Crispy Tuna Patties - My Yellow Farmhouse

Form into 4 patties – each about 1/3″ thick. Place some flour on a plate and ‘dredge’ both sides of each tuna patty in the flour.

Crispy Tuna Patties -dredged in flour

Heat a skillet over medium heat and add 4 Tbs. olive oil. Gently place the four tuna patties into the frying pan. Cook a few minutes (or until the patties are golden brown & crispy). Turn and cook on the other side until golden brown & crispy.

++ Makes sure your skillet is good and hot before you add the tuna patties! 

++ If tuna patties don’t seem to be browning enough, raise the heat a bit!

You may want to consider serving Crispy Tuna Patties with my Oven Roasted Parmesan Potatoes. With the addition of fresh greens beans with almonds –  or a salad – you have a delicious and inexpensive meal!

Link to ‘Oven-Roasted Parmesan Potatoes’

Oven Roasted Parmesan Potatoes - My Yellow Farmhouse.com

My Friend Naomi’s ‘Crispy Salmon Patties’

Naomi's Salmon Patties - My Yellow Farmhouse

Creamy Warm Crab and Artichoke Dip

++ Update     ‘Warm Crab and Artichoke Dip’ is, by far, my favorite version of this recipe. We served it at the Cookie Swap today with some of the hostess’ fresh homemade Italian bread.  (I had brought along crackers, but loved it with the crusty bread!)  

Someone gave me the basic recipe for this appetizer years and years ago but I’m constantly changing it.  This particular recipe is simply its ‘latest incarnation’ – and it might just be my absolute favorite!

It’s so easy to make – you mix everything in the same casserole you’re going to bake it in. If you chose, you can make this dip with just artichokes – or with crab or shrimp.

I’m going to a Cookie Swap tomorrow & haven’t baked a single cookie yet… However, my Creamy and Rich Warm Crab and Artichoke Dip is prepared – and I’m having a hard time not diving into it with a bunch of crackers. 

Warm Artichoke and Crab Dip and Xmas Angel 002                                 This is the bottom of the casserole I used, – isn’t it cute !

Ingredients & Method                  Bake at 350F for 25 – 30 minutes, until bubbly

  • 1 small jar (6 oz.) artichokes – DRAINED and chopped
  • 1 cup fresh crab, chopped, in necessary  (You can use canned crab or shrimp. However, I highly recommend buying fresh. I found canned FRESH crab at my local grocery store, in the seafood area. Of course, because it’s fresh – even though it’s in a can – it still has a ‘best eaten by’ date..)  
  • 2 garlic cloves, minced
  • 2 (8 oz.) packages cream cheese
  • 1/2 cup grated Parmesan or Romano cheese
  • 1 cup mayonnaise
  • 1 Tb. Worcestershire Sauce
  • 2 tsp. fresh minced parsley – plus a little to sprinkle on top   (Buy a bunch, chop it up & freeze it!!) 
  • paprika – to sprinkle on top

Method

Talk about simple… just mix all the ingredients – except the paprika – in a casserole. (I used a 8 1/2″ x 10 1/2″.)  Then sprinkle on a bit more parsley and some paprika for color.     ++Remember to wipe the sides of the casserole before putting it in the oven so your Creamy and Rich Warm Crab and Artichoke Dip  ‘looks it’s best’.

USE - uncooked - Warm Artichoke and Crab Dip and Xmas Angel

Bake, uncovered, at 350F for 20 – 30 minutes, until thoroughly heated.  Serve with an assortment of crackers and crusty bread.    Enjoy !!

USE 2 -  cooked - Warm Artichoke and Crab Dip and Xmas Angel

Cajun Garlic & Butter Broiled Shrimp

If you follow my blog, you might be aware that I love all things Cajun or Creole and pretty much anything having to do with Louisiana. This recipe for Cajun Butter and Garlic Shrimp comes together almost as quick as you can say, “C’est bon!”

Unlike many of my recipes, this feeds just two to three people – but it can easily be doubled. It’s so quick to prepare that you can make it after a long day and feel like you’re really treating yourself.

The final step entails melting, under the broiler, the grated Parmesan cheese which has been sprinkled on top of the shrimp, but, actually – if you’re starving – you can skip both the cheese and the “melting” part.

++ My sweet blogger friend, ChgoJohn, mentioned that the Cajun Garlic & Butter Shrimp would be good over pasta – what a great idea! Just double or triple the sauce.

++ Recipe adapted from Cajun Creole Cooking, Terry Thompson

Ingredients

  • 1 lb. large shrimp – –  31 – 40 count per lb.     (Remove tails if you wish . . . I didn’t.)
  • 1/4 cup butter
  • 1 Tb. olive oil
  • 1 green onion, chopped
  • 1 tsp. minced garlic
  • 1 tsp. Worcestershire Sauce
  • 3 good shakes of Tabasco sauce – or any hot sauce
  • 1/4 tsp. salt
  • 2 tsp. minced fresh parsley
  • 1/3 cup grated fresh Parmesan

In a medium size pan, heat butter & olive oil. Add the next 6 ingredients. Simmer slowly for 5 minutes, stirring. Add shrimp and cook, stirring, for another minute.

Cajun Butter and Garlic Broiled Shrimp

Pour shrimp and the garlic & butter mixture into a casserole big enough so your shrimp are “close to” one layer. It doesn’t have to be exactly “one layer” – some shrimp can overlap a bit.

Cajun Butter and Garlic Broiled Shrimp - My Yellow Farmhouse.com

Sprinkle on 1/3 cup grated fresh Parmesan. Broil 4 – 5 inches below heat until cheese melts and bubbles, about 2 – 3 minutes.    Enjoy & Bon appétit !!

 Cajun Garlic and Butter Broiled Shrimp - My Yellow Farmhouse.com

Historic and Unusual Recipes…Just for fun !!! —- How to Cook a Terrapin (or Turtle)

I’m fascinated with old recipes – old ways of baking and cooking – whether from the Renaissance, Victorian or Colonial times etc. If we think about it for a moment, it hasn’t been all that long since we cooked in stoves or chimneys over wood fires! In fact, it hasn’t been that long since we had to slaughter the animals we were going to prepare. Almost every part of the slaughtered animal was eaten.. the tail, the snout, the stomach lining, and (in the Middle East) the eyeballs, because if you’d put lots of time, effort and, perhaps, money into raising an animal, you didn’t want to waste a thing.

Piggy-Back Turtles!

We slaughtered and ate our animals when we owned our farm in Quebec, although, I must confess I couldn’t eat our pigs….I had given them names and they had come to trust me…

One time we barbequed one of our pigs. We basted it with our own maple syrup and garlic – oooh – did it smell good. But, when it came time to eat, I just couldn’t.

I was, though, able to eat the turkey and Guinea Fowl we raised. In fact, I cleaned and de-feathered a Guinea Fowl not long after we had slaughtered it. (Creepy…. the bird did flop around a good awhile without it’s head….) I’ve made delicious rabbit stews with some of our rabbits. In fact, now that I think of it, I once cooked a wild Snow Goose in some maple syrup and onions…it was really tasty, but a bit tough…(Same thing goes for the Guinea Fowl !)

So – here’s my first post in the “Historic and Unusual Recipes” category –  How to Cook Terrapin (Turtle) – from an old Fanny Farmer Cookbook  Enjoy – that is, if you enjoy reading about unusual recipes!I

In February 2013  I posted How to Cook a Terrapin (a.k.a.Turtle) just “for fun” and informational value because I love to see how (and what) people used to consider “delish” years ago, whether from the 1500s – or the 1900s!  But within a few months I realized many people were, in fact, using this recipe to prepare turtles for eating.

How to Cook a Terrapin (a.k.a. Turtle)
Red-Eared Pond Slider
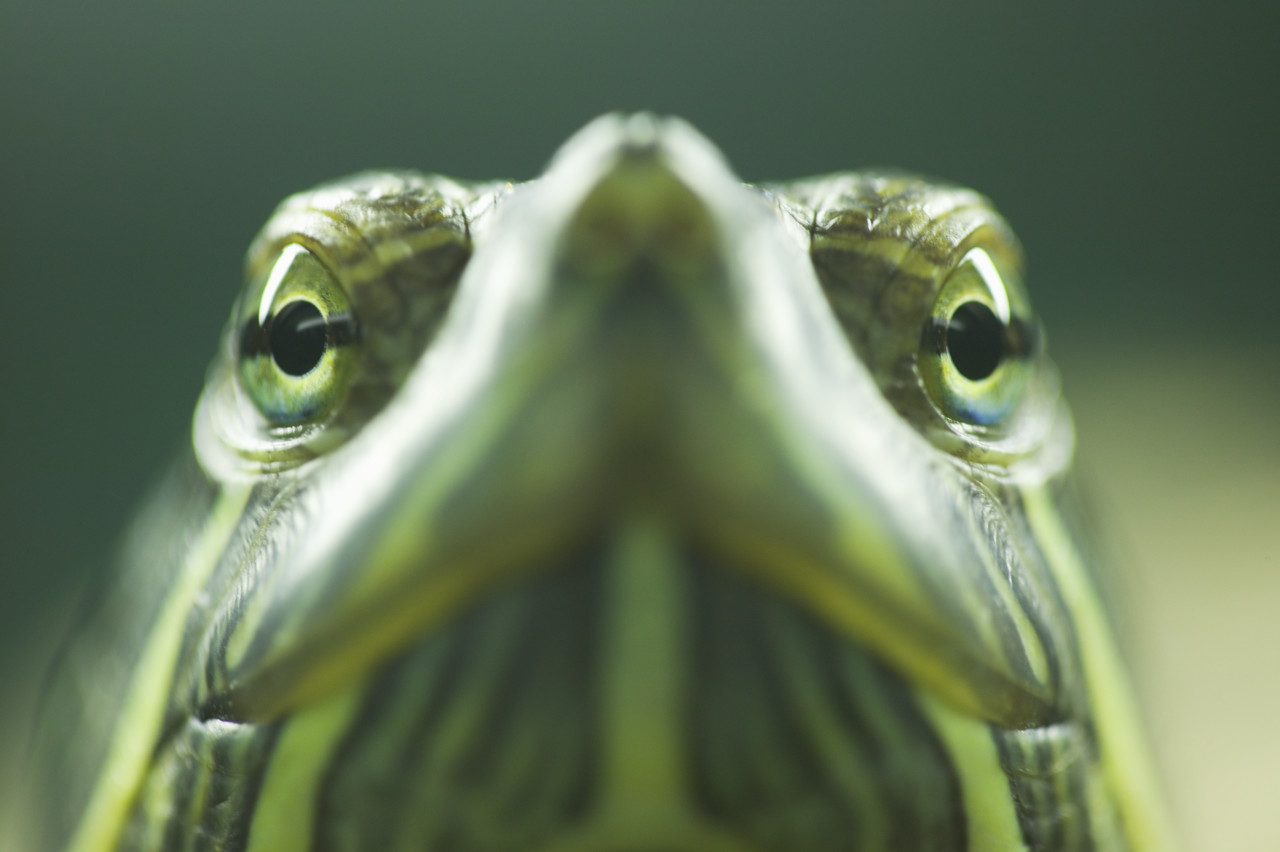
You will need:   One 6 – 7 inch LIVE terrapin   (Will be enough for two people.)    Plus one carrot, some sliced onion and 1 stalk celery.

In a large pot, plunge the terrapin into boiling salted water and boil for five minutes. Lift terrapin out of water with a skimmer. Remove skin by rubbing briskly with a towel. Pull out the head with a skewer and rub off skin. 

Return terrapin to pot. Add 1 carrot, some sliced onion and 1 stalk of celery. Simmer until feet fall off and shell cracks – about 1 to 1 1/2 hours.

Once more, remove terrapin from pot, lay it on it’s back and allow to cool only enough to handle. Pull out the nails from the feet.  Cut under the shell close to the upper shell and carefully remove upper shell.

Empty the upper shell and carefully remove and discard sand bags, gall bladder and thick, heavy part of intestines.

Cut terrapin meat  into pieces about 1 1/2′ long.

++  The Fannie Farmer Cookbook, the origin of this recipe, advises serving the liver and smaller part of the intestines, cut up small, plus any turtle eggs with the meat. However, you just might not choose to eat those parts…

++  According to Fannie Farmer, “Most terrapin gourmets make no attempt to remove the bones”.

To serve the terrapin “Washington Style”, make a white cream sauce by melting 1 1/2 Tbs. butter, add 1 1/2 Tbs. flour, stir until well mixed, then add 1 cup cream. Simmer mixture, using a whisk if you have one, until thickened.

Add cooked terrapin meat and 1/2 cup sauteed chopped mushrooms. Season to taste.

Just before serving, add two slightly beaten eggs & mix the eggs in well.  (Adding the eggs thickens the white cream sauce – but  – adding the eggs is NOT necessary.)

++  ++  If the sauce is too thick, add a bit more cream.

Three-Cheese Mac and Cheese with Shrimp

Always loved Mac ‘n Cheese… always have… always will. I’m really happy with how this Three-Cheese Mac ‘n Cheese with Shrimp turned out!!! It’s super creamy, and has the added treat of lightly marinated shrimp.

This recipe came about because of two experiences; one yucky, and one delicious. First, the yucky experience. Not long ago, I ordered Shrimp, Macaroni ‘n Cheese at a local chain restaurant. I usually enjoy their food but not this time. The Shrimp, Macaroni ‘n Cheese was so nasty that I couldn’t even eat it. It was a gooey mess that tasted like it’d been made with wallpaper paste. (The waitress saw my still-full plate and didn’t charge me for the meal. Of course, I still had my “bar bill” !)

Now, on to the “yummy” experience. This past October some good friends invited me over for drinks and a fire. Although I hadn’t expected a meal, my friend Sue cooked up a bunch of great dishes – my absolute favorite was her Three-Cheese Mac ‘n Cheese. When I asked her how she made it, she dug into her trash and pulled out the recipe, posted on our local supermarket’s (Big Y) bag of Mac & Cheese Blend. So, that’s the recipe I used as the basis for my Three-Cheese Mac ‘n Cheese with Shrimp. I love the addition of the marinated shrimp ’cause I’m a great believer that even a good thing can always be made better.

When you see the ingredients, you’re gonna think, “Heart Attack on a Plate”! Don’t let the ingredients scare you – it’s super rich, so you don’t need to eat a lot. And it’s great for guests – I know ’cause I’ve served it to guests and they loved it – and that was before I got the idea of adding the marinated shrimp.  Enjoy!!

Possible - auto adjusted

I feel I should warn you…. this makes A LOT … and it’s so rich that a bit goes a long way. This recipe is great for a family – or a crowd, so if you don’t need a HUGE amount, then divide the recipe in half !!

Oven at 350 F          Use at 10″ x 13″ casserole        Cook for about 25 minutes

    Ingredients

  • 16 oz. bag of medium-to-large PRECOOKED shrimp (I buy frozen.)
  • 2 tsp. Italian Dressing
  • 1 tsp. Worcestershire sauce
  • 16 oz. box of elbow macaroni – MINUS ONE CUP OF UNCOOKED MACARONI !!!
  • 6 Tbs. butter (3/4’s of a stick of butter)
  • 4 Tbs  flour
  • 1 1/2 cups whole milk
  • 3/4 cup light cream
  • 1 cup sour cream
  • 1 1/2 cups shredded Sharp Cheddar Cheese (Purchase an 8 oz bag)
  • 1/4 cups shredded Swiss Cheese
  • 1 1/4 cups cut-up American Cheese (I don’t think they sell it shredded. Just ask the deli for about 1/2 pound, and then cut it up to equal 1 1/4 cups.)
  • 1/2 tsp. garlic salt with parsley
  • 3/4 tsp. salt
  • 1 cup shredded Sharp Cheddar Cheese (The rest of the 8 oz. bag.)
  • 1 cup “smashed up” butter crackers…. such as Ritz

If, like me, you buy frozen precooked shrimp, make sure you allow the shrimp to drain in a colander for a while to remove any excess liquid. If the shrimp have tails, cut them off, then cut the shrimp into 2’s or 3’s, depending upon the size of the shrimp.(Shrimps for my European friends!) Place the shrimp in a medium-sized bowl, and mix in 2 tsp. Italian Dressing and 1 tsp. Worcestershire sauce – set shrimp aside.

Cook the elbow macaroni (minus the 1 cup) according to the package directions. While macaroni is cooking, start making the sauce. In a medium-sized pan, over medium heat, melt 6 Tbs. butter. Once butter is melted, add 4 Tbs. flour, and stir with a whisk (or spoon) until well-blended. (Mixture will be frothy.) Continue to cook, stirring, for another minute. Slowly add 1 1/2 cups whole milk and 3/4 cup light cream. Continue cooking and stirring for about three minutes – mixture will be slightly thickened.

Add 1 cup sour cream and mix until thoroughly blended, then add the Cheddar, Swiss and American cheeses. Remove from the heat. The sauce and cheese mixture is probably gonna look pretty thick and globby at this point – but that’s what you want. Add 1/2 tsp. garlic salt with parsley and 3/4 tsp. salt. If your pan is large enough, stir in the shrimp, but you’re gonna need a large bowl in order to mix the sauce & shrimp mixture with the macaroni.

Pour cheese sauce/shrimp/macaroni mixture into a large casserole. Sprinkle on 1 cup of shredded sharp cheddar cheese – which should finish the 8 oz. bag. Sprinkle 1 cup “smashed up” butter crackers over the cheese. (An easy way to break up the crackers is to put a bit more than half-a-sleeve into a gallon storage bag, then “smash” the crackers with your hand, a can or the side of a hammer.)

Cook in a 350 F oven for about 25 minutes – or until the edges of the casserole are slightly bubbly……… I think a nice baby spinach salad with sliced apples, walnuts, thinly sliced Bermuda onion and mushrooms would be great with this.   Enjoy!

Fish with Mushroom-Sherry Sauce & Redoing My Kitchen

Allow me to start this post with a disclaimer – of sorts. Although I made fettuccine tonight to serve with the Fish in Mushroom Sherry Sauce ’cause I just had a real hankerin’ for fettuccine – I honestly believe it might be better with baked potatoes or rice. Also, the recipe looks so much more yummy photographed with fettuccine than with a baked potato! So, you decide…!!

Right now I’m in the midst of having my kitchen redone by two of my brother-in-laws, which is another whole story in itself !! Actually, I really did love my kitchen the way it was, but it was just too dark and dated with the cherry cupboards etc. And my kitchen doesn’t have lots of sunlight, so it really needed some “lightening up”. (This photo is minus “Objects d’Art” plus my usual clutter!!)

100_0450

My plan is to make my kitchen reminiscent of what a kitchen might look like in Provence, France, complete with white walls with touches of yellow and this fabric (from Provence) made into curtains.

Provence - sunflowersThis is how my kitchen looks at this moment. And all my cooking things are strewn all around the living room!!

2nd day2Therefore, anytime I need ANYTHING – I have to run into the living room to dig it out of a box!! So, it’s been an interesting evening of cooking. And you’ll just LOVE this!  The background for the photo at the top is this page is paper my brother-in-laws laid down so my counter wouldn’t get paint on it….  I think the photo of Fish with Mushroom-Sherry Sauce turned out pretty well…. considering!

++  To see photos of my finished kitchen, here’s the link:  https://myyellowfarmhouse.com/2013/02/10/im-loving-my-new-kitchen/

Ingredients

Oven at 350    30 minutes   10″ x 13″ pan – or slightly smaller –  or a casserole dish

  • ALMOST any kind of white-fleshed fish –  I don’t recommend Talapia since the cooked fish falls apart too easily.  I used Flounder myself for this recipe.  I suggest buying 6 – 10 pieces if using Flounder because the pieces tend to be small.
  • 4 Tbs. butter
  • 3 Tbs. flour
  • 1 1/4 cups water
  • 1 cup heavy cream
  • 1 Knorr bouillon cube OR 2 cubes, if using another brand
  • 2 cups sliced fresh mushroom – I recommend Baby Bella – which are brown on top
  • 1/2 cup chopped celery
  • 1/4 cup chopped fresh parsley
  • 1/3 cup cooking sherry
  • 1/4 tsp. salt
  • 1/4 tsp. pepper
  • 2 Tbs. butter, melted
  • 2 cups FRESH white bread crumbs
  • paprika – for color

Over medium heat, in a medium-sized pan, melt 4 Tbs. butter. Watching carefully, allow the butter to brown slightly. (Have the flour nearby, so you can add it the minute the butter is slightly browned.) Add 3 Tbs. flour, and cook – stirring constantly – for about 1 1/2 minutes. (The mixture will be foamy in the beginning.)

Add 1 1/4 cups water, 1 cup heavy cream and the Knorr bouillon cube. (I HIGHLY advise having a whisk. It’s invaluable when sauces turn “lumpy”!) Whisk the butter/flour and liquid mixture for about 1 1/2 to 2 minutes, until sauce thickens.

Add 1/2 cup chopped celery, 1/4 cup chopped fresh parsley, 1/3 cup cooking sherry, 1/4 tsp. salt and 1/4 tsp. pepper, and simmer, stirring occasionally, for a few minutes.

USE FOR BLOG - raw fish

Lay the fish at the bottom of your pan/casserole, and pour the sauce over it. Basically, you’re done, except for the buttery bread crumb topping. (I use my little food processor and make up bread crumbs from left-over bread, then put them in a baggie in the freezer so I always have fresh breadcrumbs.)

Melt 2 Tbs butter in a skillet. Add 2 cups fresh white bread crumbs and stir until all the breadcrumbs are coated. Sprinkle the buttered bread crumbs on top of the fish, then sprinkle on a bit of paprika for color. Bake at 350 for about 30 minutes.

I would suggest serving this recipe with a bright, green veggie like stir-fried broccoli or green beans. Enjoy!

Fish with Mushroom Sherry Sauce - My Yellow Farmhouse