Mini Shepherd’s Pies (Also known as Cottage Pies)

Mini Shepherds Pies - - and I do mean 'pies'!  www.myyellowfarmhouse.com

If you have parchment paper, place a strip, long enough so that it hangs out on each side, in each section of the muffin tin.  This will help when you remove the mini pies.

I had planned to share these with my neighbors…. but ended up eating them all – that’s how much I love them!  I based both the ground beef filling and creamy mashed potatoes on my recipe for Shepherds Pie, with a few adjustments.   – –  https://myyellowfarmhouse.com/2013/01/10/shepherds-pie/

Mini Shepherds Pies are easy to make!  The recipe calls for purchased pie crust and – if you’re short on time – a 24 oz. container of ready-to-eat mashed potatoes can be used.  Making these mini pies is fun and easy – and so is eating them.

Ingredients and Method
  • 1 box refrigerated pie crusts
  • 24 oz. refrigerated mashed potatoes  –  OR  –  homemade mashed potatoes
  • Homemade Mashed Potatoes
  • 5 cups cubed Yukon Gold potatoes   ++ Peeled and cut into 2″ chunks
  •  3/4 tsp. salt
  • 1/4 tsp. pepper
  • 2 – 3 Tbs. butter
  • 1/3+ cup milk or Half and Half     ++  I used Half and Half
  • Ground Beef & Vegetable Filling
  • 1 Tbs. butter or olive oil
  • 1/2 medium-sized onion, chopped  ++ About 1/3 cup
  • 1/2 lb. ground (minced) beef  ++ I used 80%
  • 3/4 cup frozen corn     ++ No need to thaw
  • 3/4 cup frozen peas    ++ No need to thaw
  • 1 Tbs. tomato paste    ++ Freeze tomato paste in 1 Tbs. portions in a ziploc bag. 
  • 1 beef or chicken bouillon cube
  • 1/3 cup water
  • 3/4 tsp. salt
  • 1/3 tsp. pepper

Place 5 cups chopped, peeled Yukon Gold potatoes in a medium-sized saucepan.  Add enough cold water to cover.  Bring to a boil over medium-high heat.  Lower heat and cover saucepan. Allow potatoes to simmer for 25 – 30 minutes or until potatoes can easily be pierced with a sharp knife.  ++  It’s better to cook the potatoes longer than end up with lumpy potatoes!!  I know – Been There – Done That!

Mini Shepherds Pies - My Yellow Farmhouse.com

While potatoes are cooking, begin beef/veggie filling.  Place 1 Tbs. butter In a large non-stick skillet.  Add 1/3 cup chopped onion. Cook onions, stirring often, over medium heat until they soften.  Add 1/2 pound chopped (minced) beef.  Continue to cook until beef loses its pink color.  ++ Break up any large chunks of beef.   ++  Remove any extra grease, although I leave about 2 Tbs. – for the flavor.

Add 3/4 cup still-frozen corn and 3/4 cup still-frozen peas, 1/3 cup water, 1 Tbs. tomato paste, 3/4 tsp. salt, 1/3 tsp. pepper and either a chicken or beef bouillon cube.

Mini Shepherds (Cottage) Pies - myyellowfarmhouse.com (2)

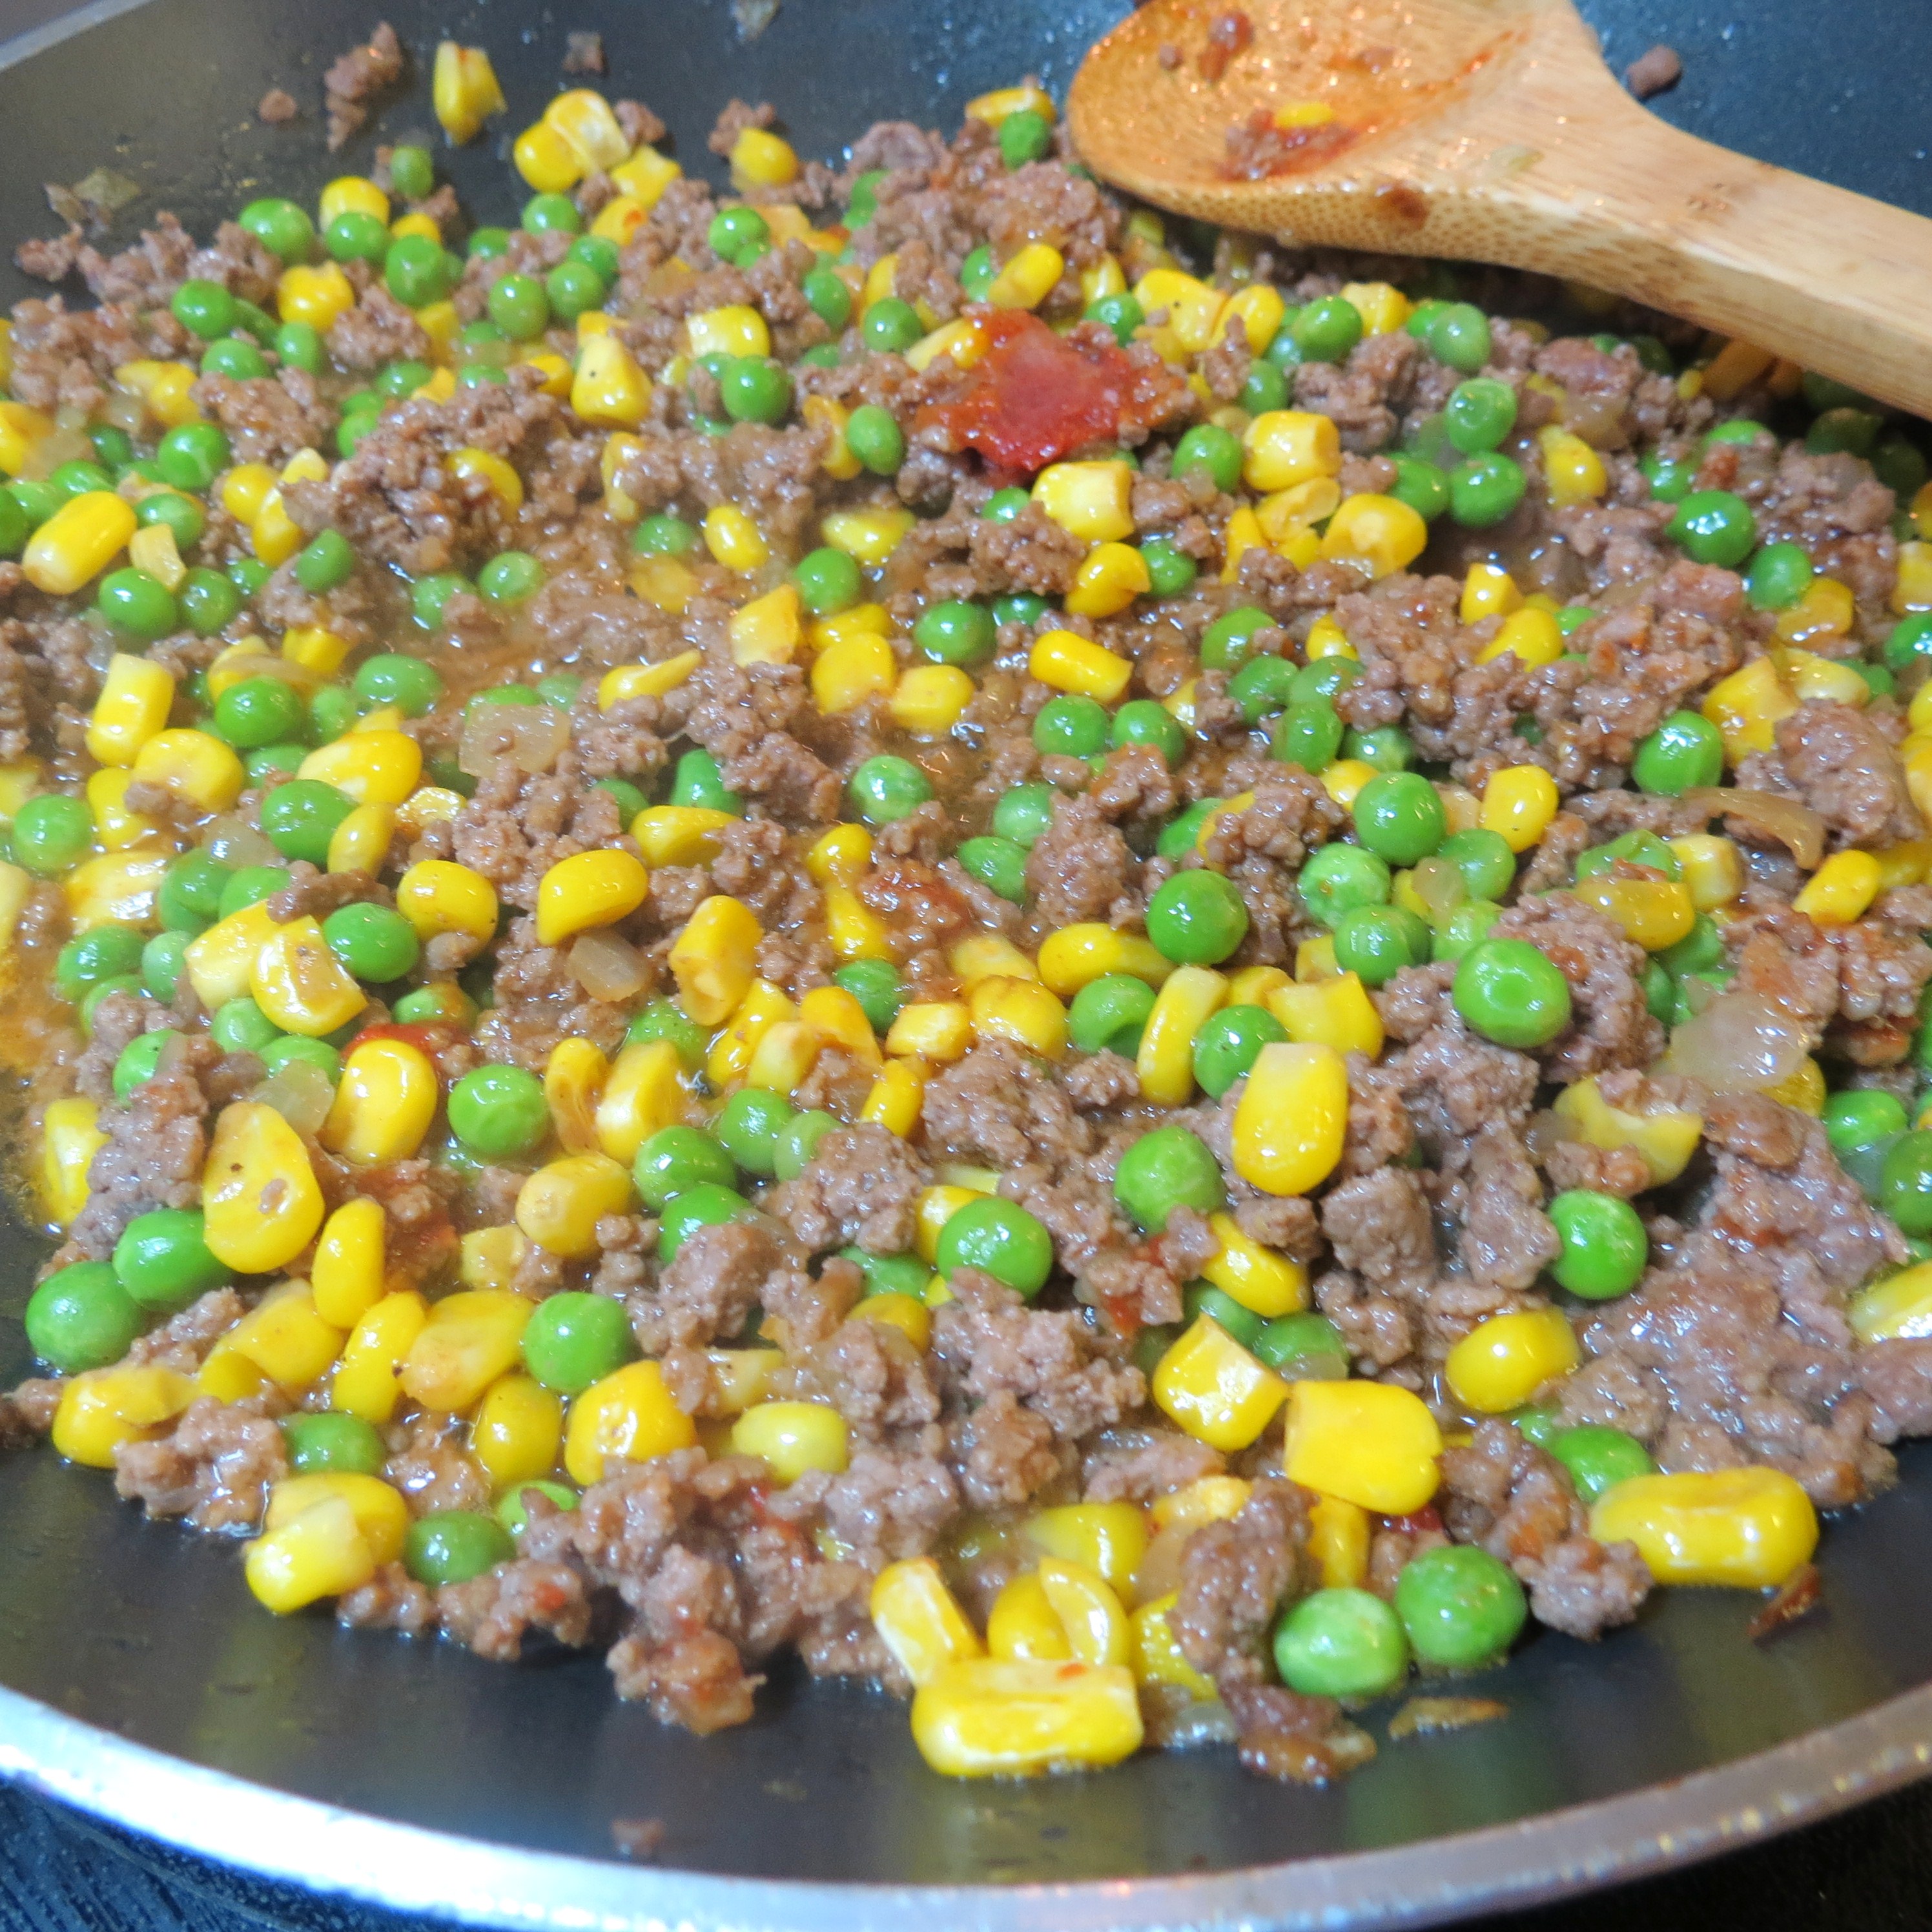
Continue cooking, stirring often, for an additional 4 to 5 minutes… until most of the liquid has been absorbed.  Set aside.

Now it’s time for the mini-pie crusts.  This is fun!  ++  Remove the pie crusts from the refrigerator about 15 minutes before so the crusts will be soft enough to work with.

Unroll pie crusts. Roll each crust into a 12″ circle, which only takes a second ’cause the crusts are almost that big already.  Using a 4″ circle (I used the 4″ top of a plastic food container – or you could use a piece of cardboard) cut out 12 circles.

Mini Shepherds Pies - My Yellow Farmhouse.comMini Shepherds Pies - My Yellow Farmhouse.com (2)

+

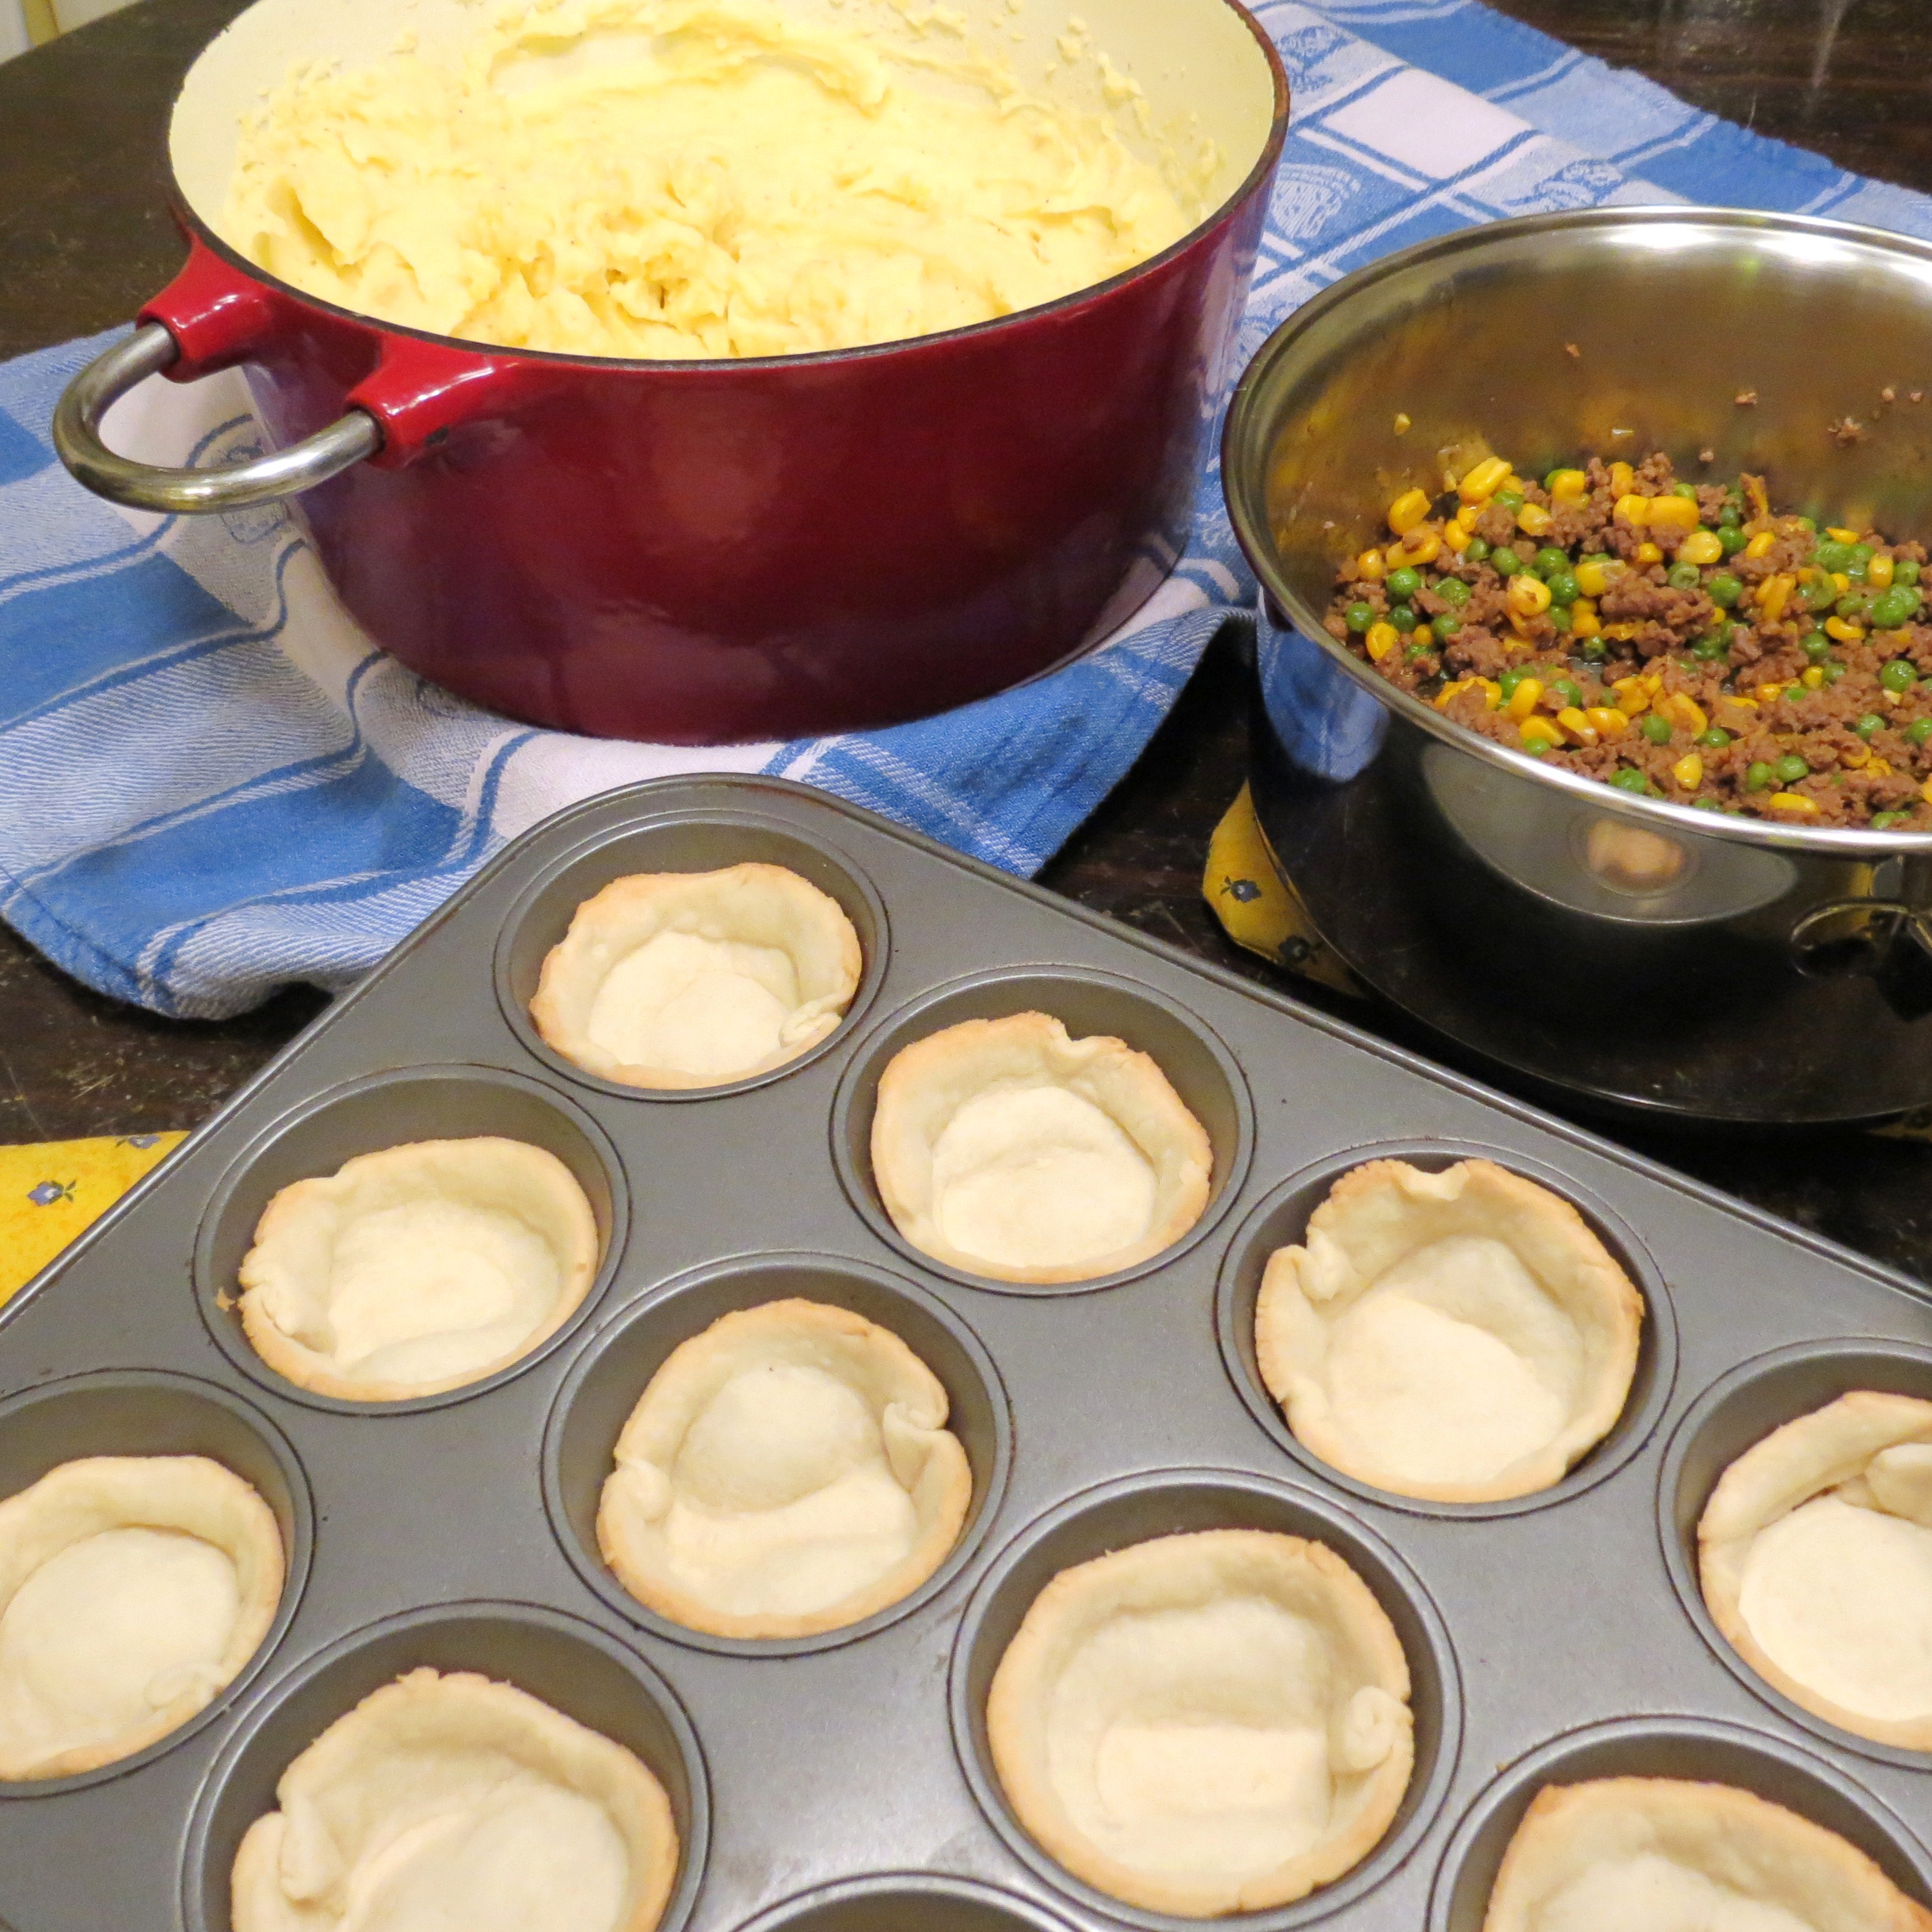
Place one pie crust circle in each of the sections of a 12-cup muffin tin.  Gently press pie crust to fit.

Bake at 400F for 8 minutes.  ++ Lower oven temperature to 350F once you’ve removed muffin tin with bottom crusts from oven.

Finishing the mashed potatoes

Mini Shepherds  Pies - - and I do mean 'pies'!

Drain cooked potatoes. Mash down with a potato masher.  Add 2 – 3 Tbs. butter, 3/4 tsp. salt, 1/4 tsp. pepper and approximately 1/3 cup milk – or ‘Half ‘n Half‘ – or Single Cream – and beat with a mixer until the potatoes are creamy but still stiff enough to hold their shape on top of the beef filling.

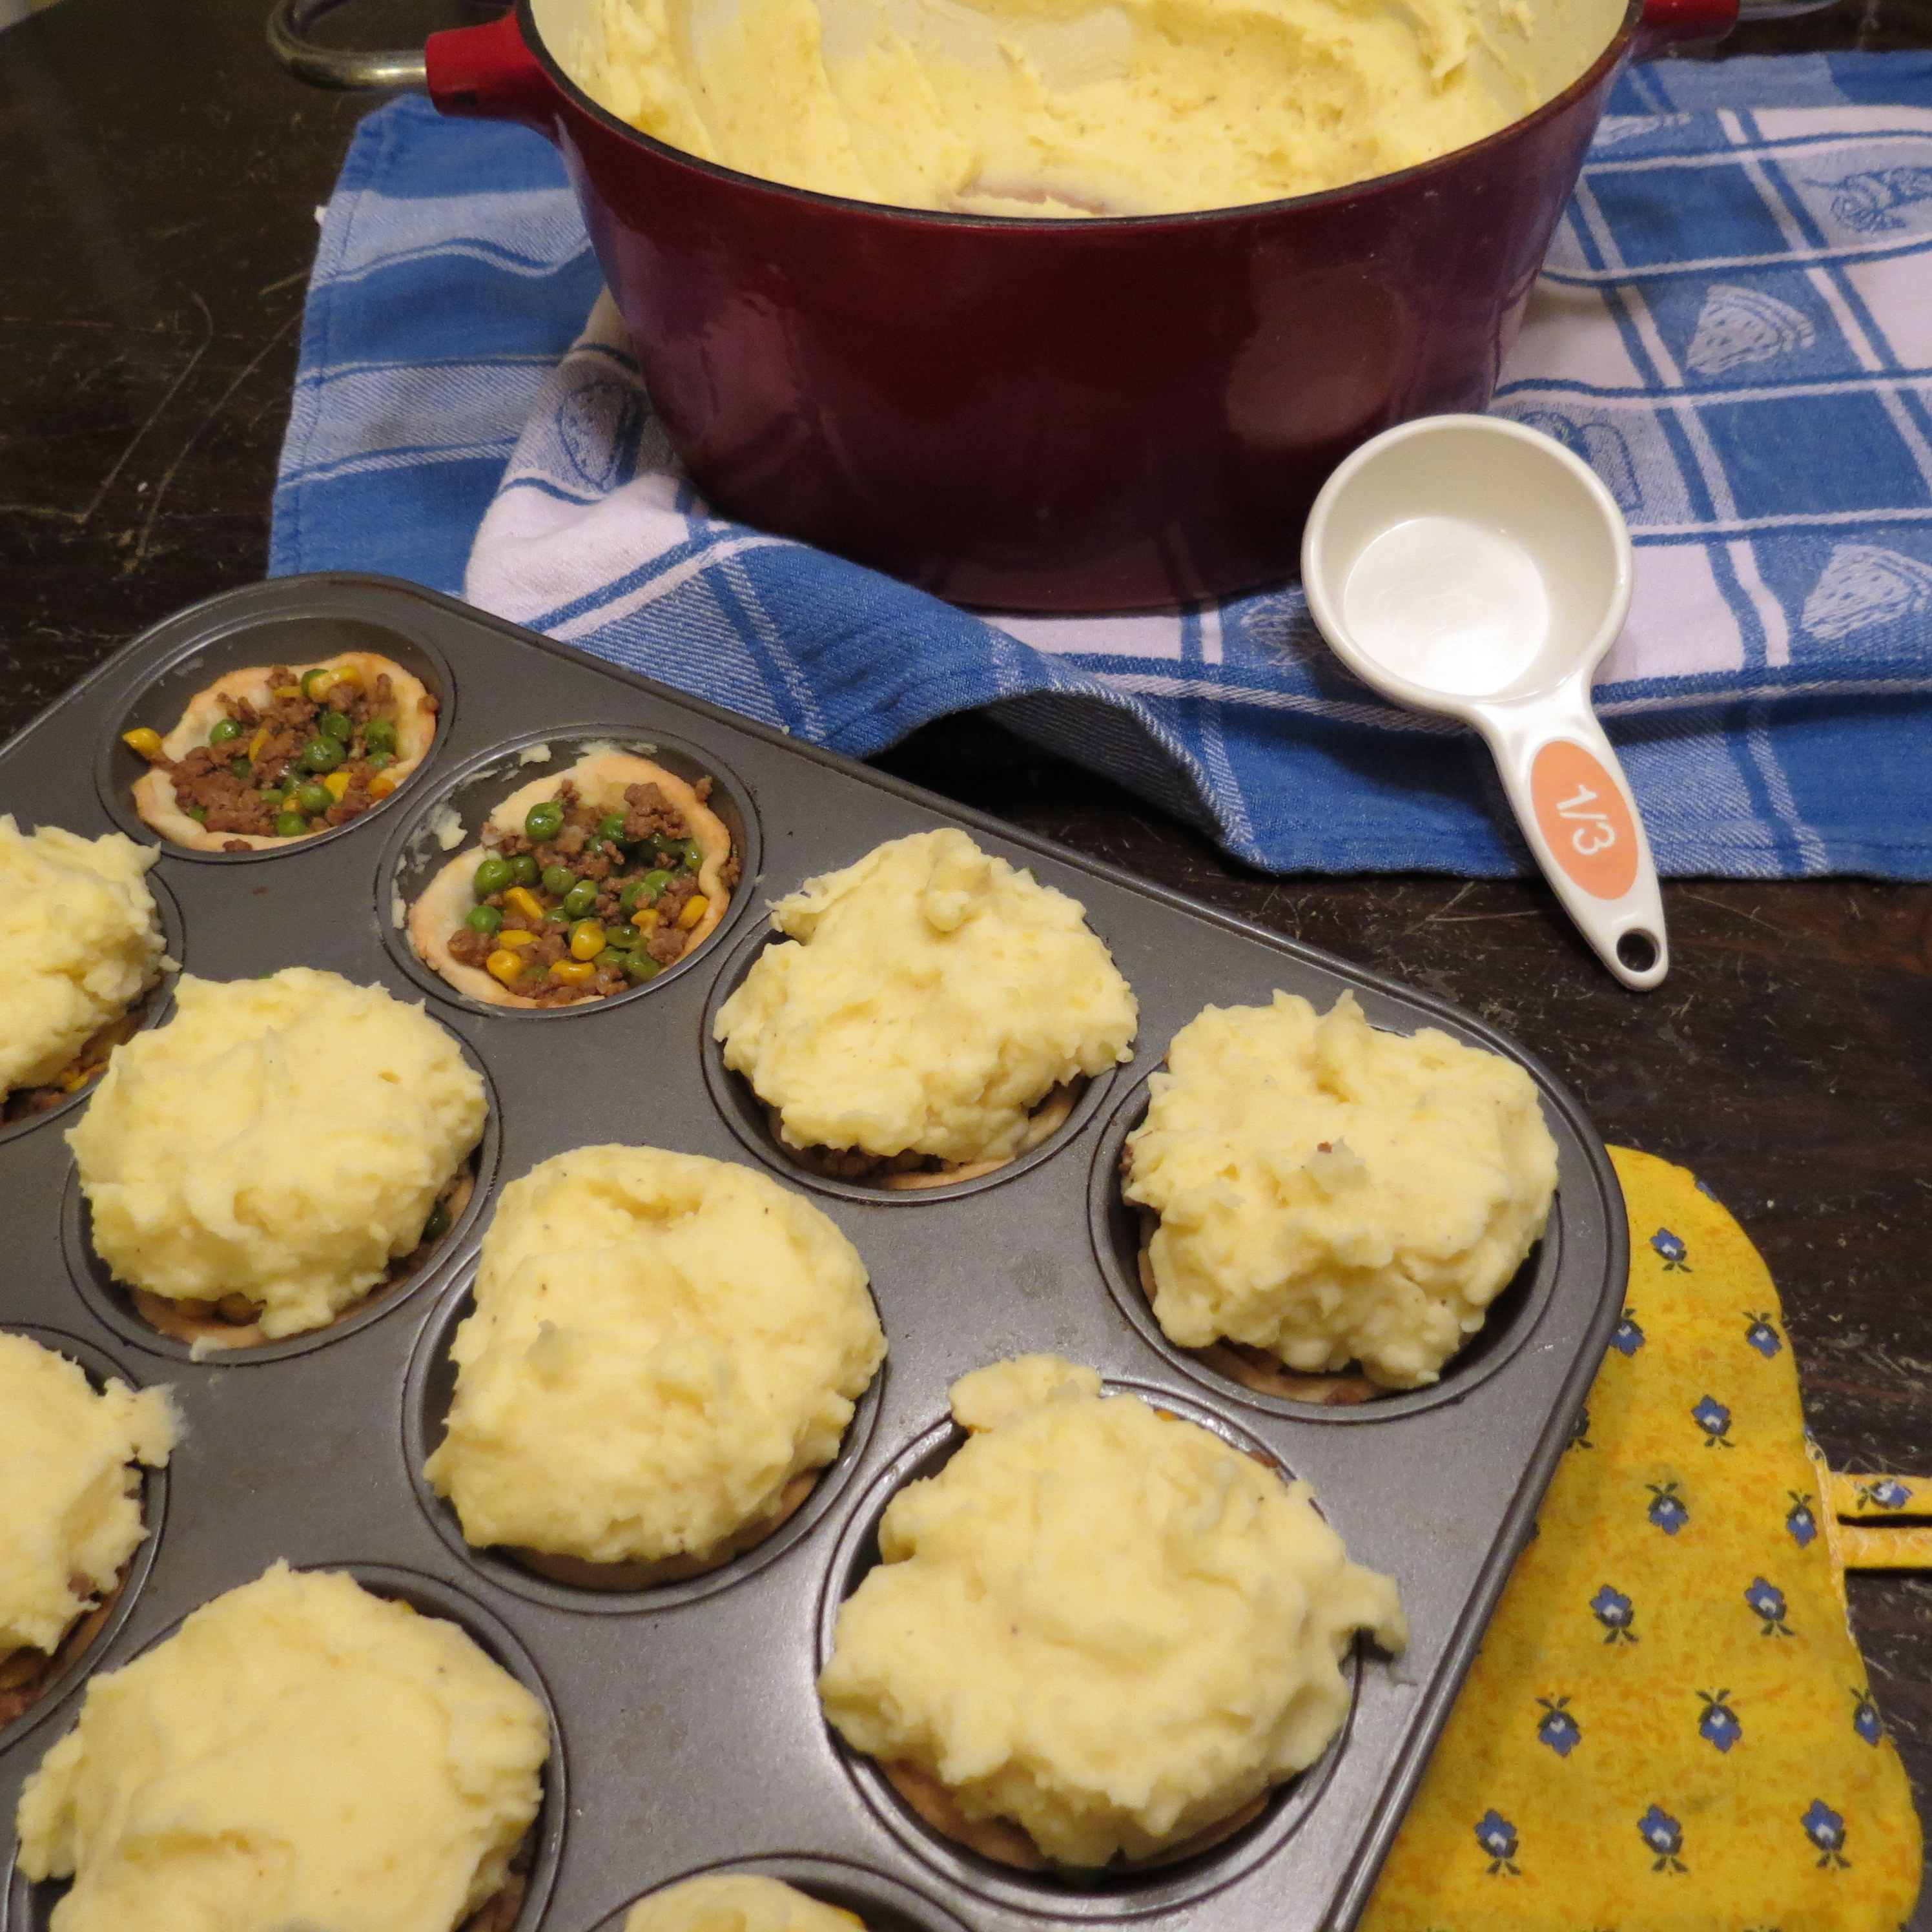
Putting it all together

Mini Shepherds Pies - My Yellow Farmhouse.com (3)

Using a 1/4 cup measuring cup, put a portion of the meat/vegetable filling in each section.  Top with 1/4 cup mashed potatoes.  ++ If you have extra mashed potatoes, add a bit more to each mini-pie.

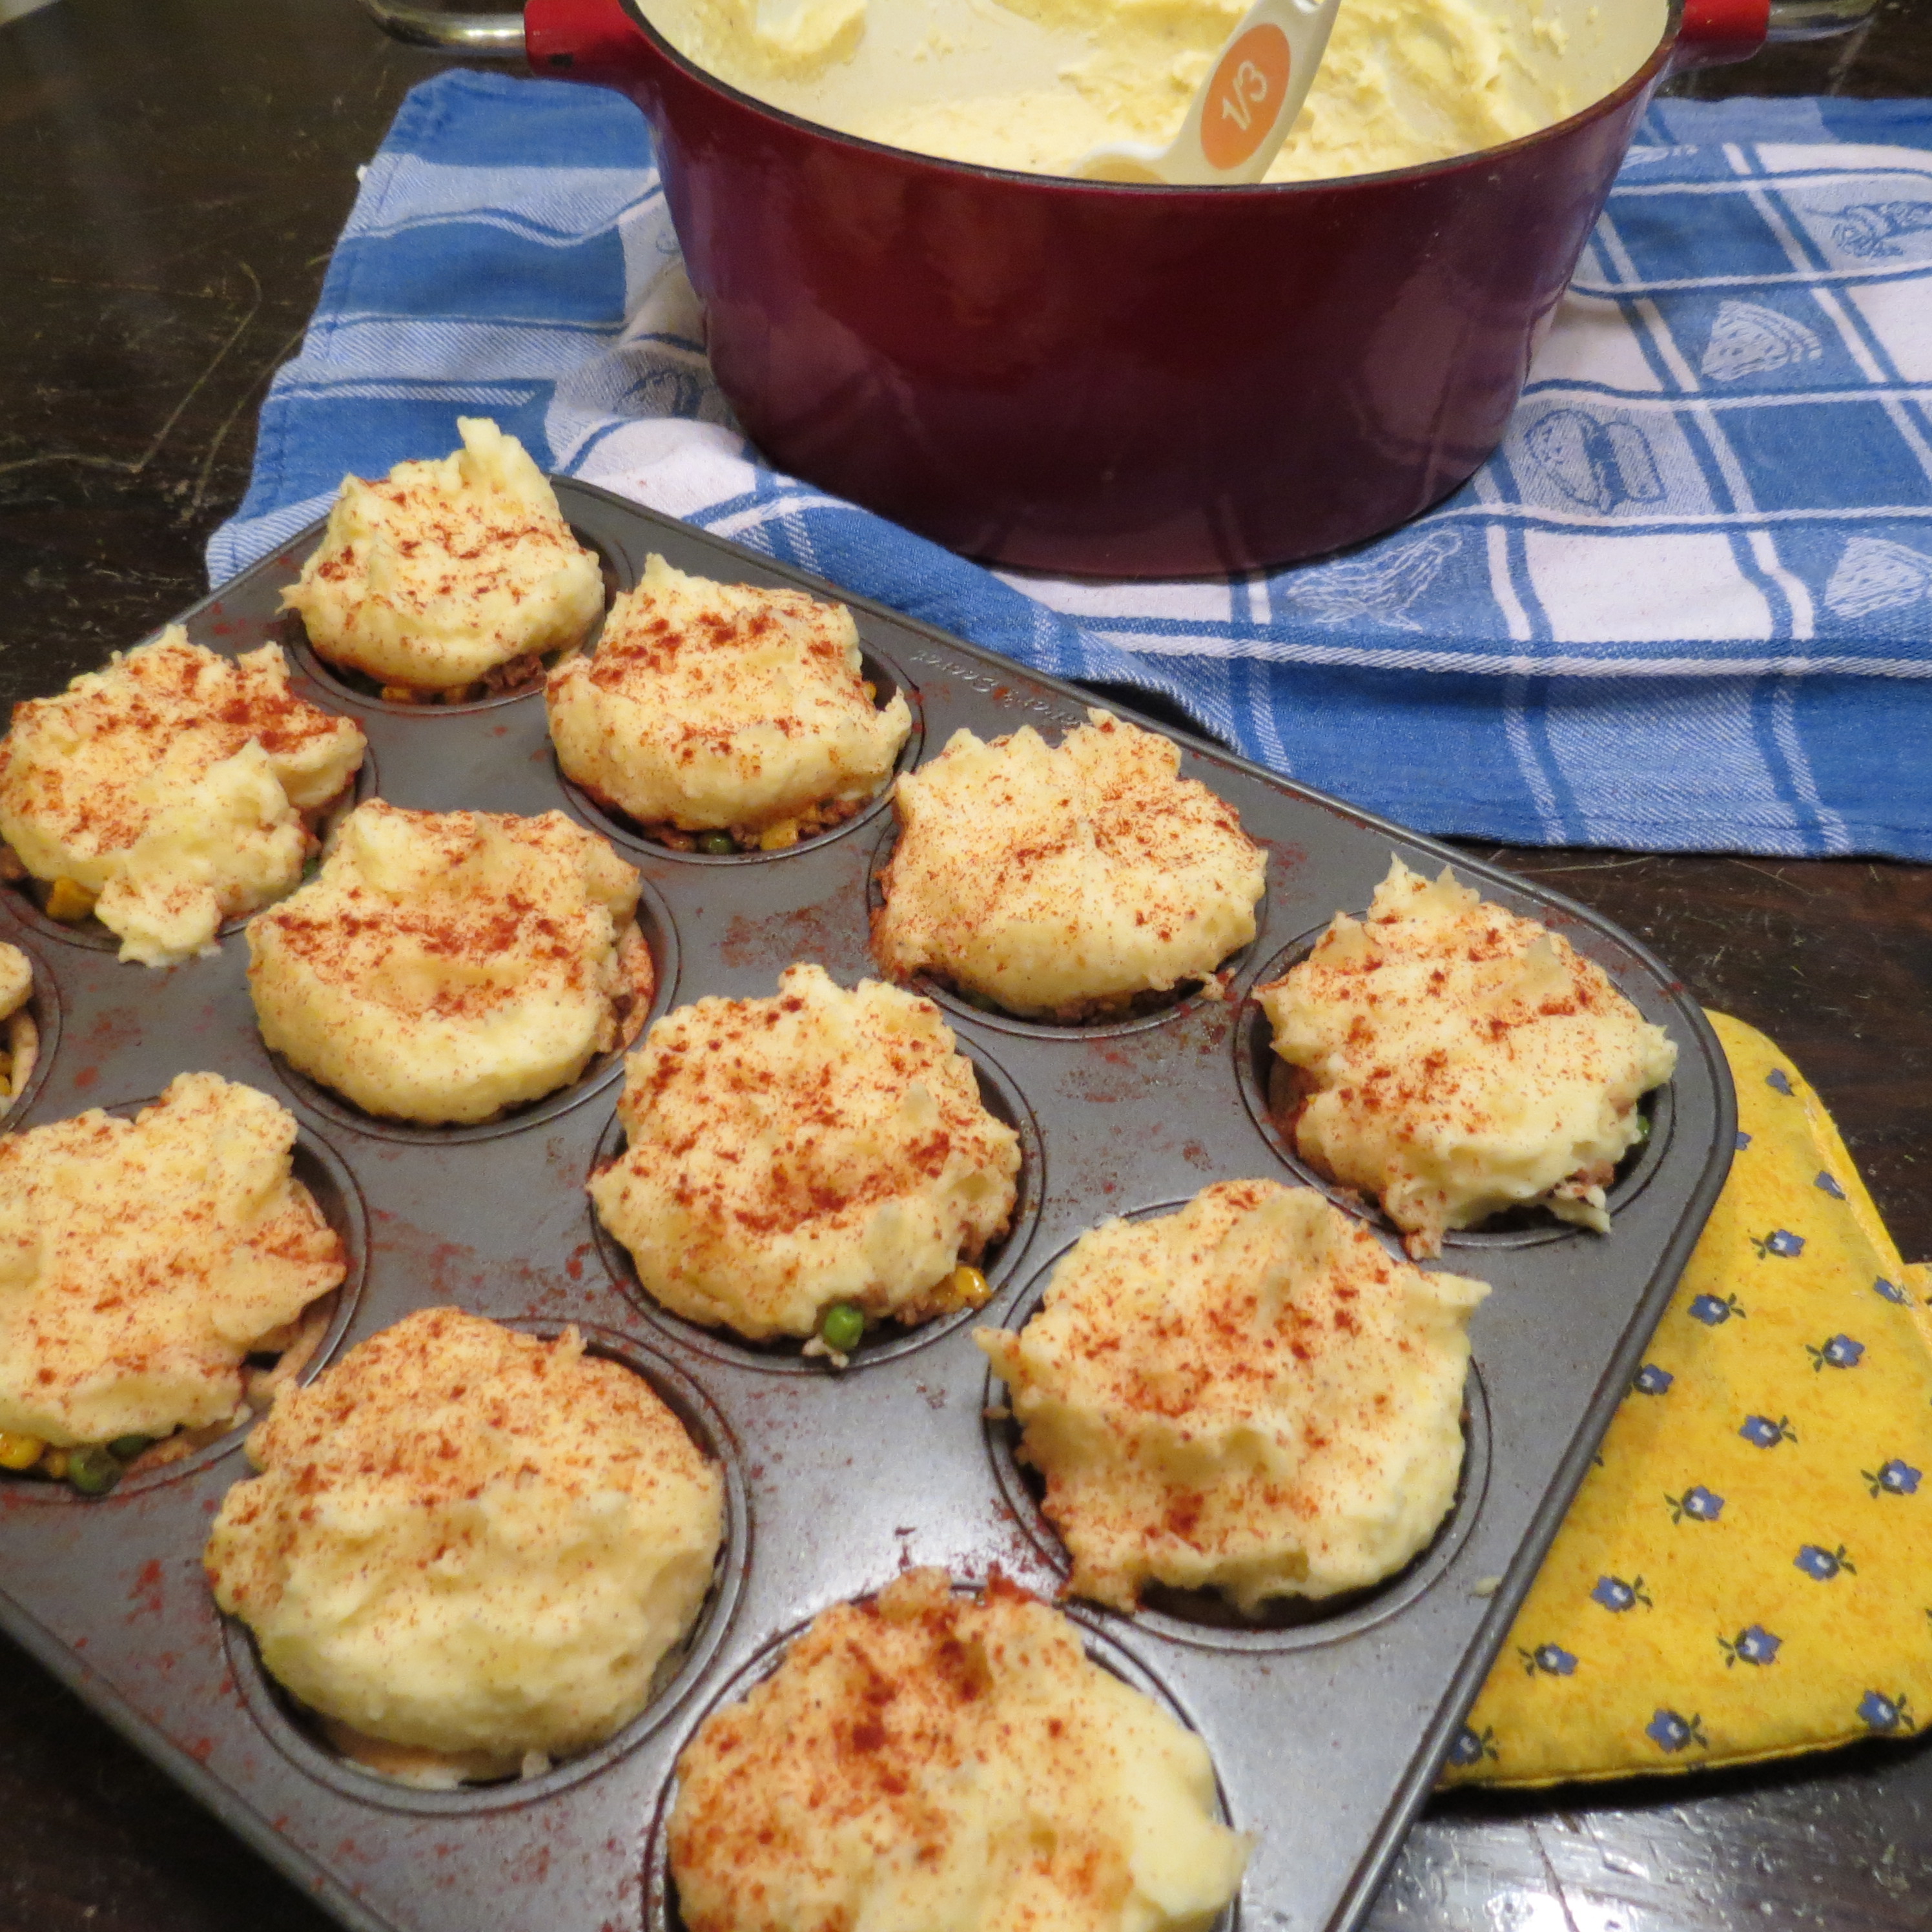
Sprinkle with a bit of paprika to give the Mini Shepherds Pies a bit of color.  You know, part of finding a particular food delicious is often due to it’s color, so adding a bit of paprika not only makes things taste better but also gives them better eye-appeal.  You can also sprinkle on a bit of cheese!

Mini Shepherds Pies - - and I do mean 'pies'!  myyellowfarmhouse.comMini Shepherds Pies - - and I do mean 'pies'!  myyellowfarmhouse.com

+

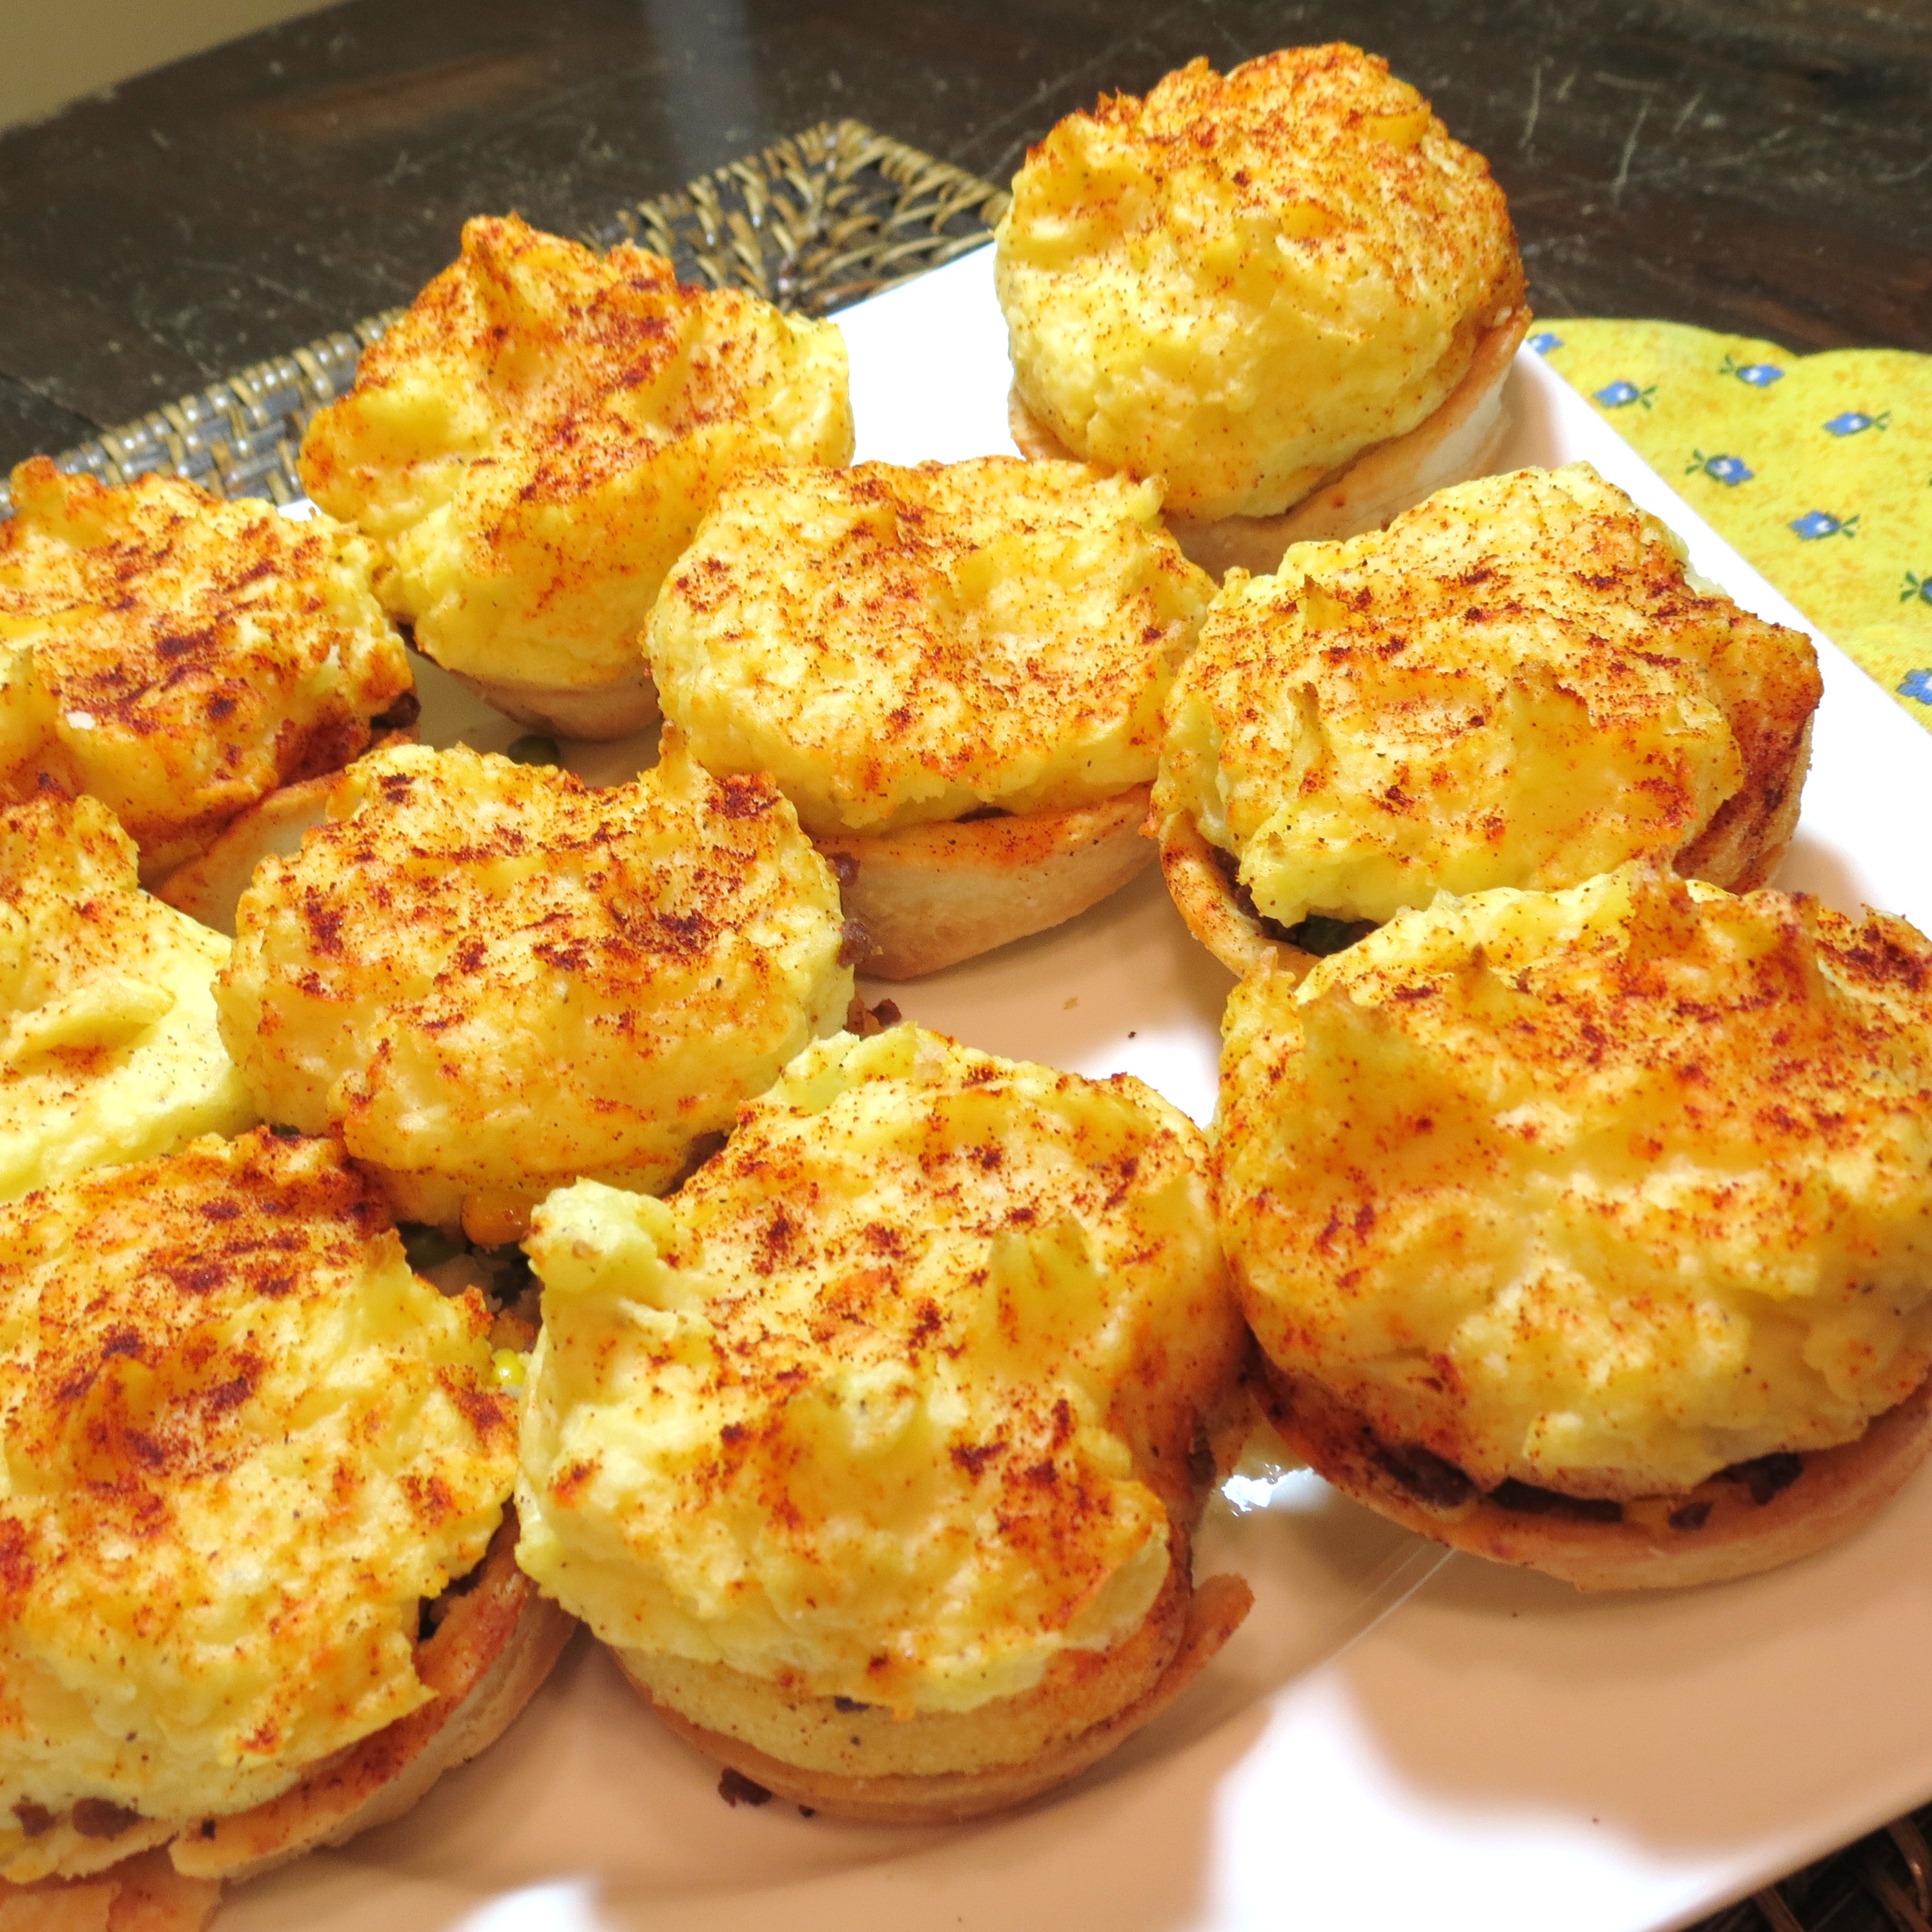
Bake the Mini-Shepherds Pies at  350F  for 25 – 30 minutes.  Potatoes and crust will be slightly browned.     

++ Let stand 10 minutes before serving, which helps the pie crust to not fall apart when you remove the mini-pies.  Enjoy !!

Mini Shepherds Pies - and I do mean 'pies'!  www.myyellowfarmhouse.com

++  Recipe adapted from myfridgefood.com/recipes/entree-beef/mini-meat-pies

Savory Cajun Pork Chops

 Because these pork chops are cooked quickly, they’re tender and juicy – not to mention flavorful !!

I just love Louisiana. I love New Orleans, I love the bayous, I love the cities and the small towns, I love the people, I love the music, I love the atmosphere & I love the food. I’ve visited there three times and I can’t wait to go back again!!

During our 2nd visit to Louisiana we visited Bayou Teche. As per usual, I had a great conversation with a woman behind the counter of a small store. She told me how to make Alligator Sauce Piquant – for which we Northerners can substitute chicken. (I actually made it (with chicken) when we lived in Malta for Mardi Gras – and it came out pretty darn good, if I say so myself !)  I’ll post that recipe another time ! Today – it’s Savory Cajun Pork Chops!

       Photo taken on my third to Louisiana – I’m addicted to everything Cajun!

Trip to Louisiana - 2012

Many Cajun/Creole dishes start with the Holy Trinity, which is bell peppers, onions and celery. Also many Cajun/Creole dishes ask you to make a roux, which is simply oil (or butter) and flour which you cook, stirring, until the mixture resembles the color of peanut butter – or darker.

The woman in the store along Bayou Teche advised me to make roux with butter. She said, “It’s always better with butter” – and she knew what she was talking about ’cause this time I used butter, butter and only butter – and I never had my roux come out even close to how it came out this time!

+++ This recipe for Savory Cajun Pork Chops serves 4 – 6, depending upon the size of the chops – and your appetite.

+++ I only add 1/4 tsp. of cayenne pepper because not everyone likes their food spicy. But be sure to add more if you want that real Cajun Kick !

+++ Just as a suggestion – I served the Savory Cajun Pork Chops on a bed of Chicken Flavored Rice-a-Roni. You’ll probably want to make two boxes for 4 – 6 people.

Ingredients

  • 6 bone-in pork chops – about 4 lbs.  (Of course, you can use boneless pork but the flavor of pork or beef is often better when the meat is ‘bone-in”.)
  • Montreal Steak Seasoning – adds flavor and some “heat”
  • 2 – 3 Tbs. olive or vegetable oil
  • 1 large green bell pepper, cut into thin strips
  • 1 large onion, sliced
  • 2 stalks celery, roughly chopped – leaves and bottom part cut off
  • 3 – 4 cloves of garlic, minced
  • 4 Tbs. butter
  • 5 Tbs. flour
  • 1 (28 oz) can stewed tomatoes with basil & oregano
  • 1 tsp. Worcestershire sauce
  • 1/4 tsp. cayenne pepper – or “to taste”
  • 1/4 tsp. pepper
  • 1 tsp. salt
  • ++ IF YOU USE BONE-IN PORK CHOPS !  Unless you have a very large skillet, you might need a Dutch oven or a stock pot (extra large saucepan) to complete the recipe.

Cooked Pork Chops - USE FOR BLOGSprinkle both sides of the six pork chops with some Montreal Steak Seasoning. Over medium-high heat, fry chops in a few tablespoons of olive or vegetable oil until browned on one side. Turn over and brown on the other side. Remove chops to plate/platter and keep warm if possible.

Holy Trinity - Crisp Tender

Add a bit more oil to the skillet, then add your Holy Trinity veggies & the minced garlic. Cook only until Crisp Tender – you don’t want mushy veggies. Once veggies are crisp tender, remove from skillet and set aside.

Making the RouxMAKING THE ROUX

Don’t be upset if the roux doesn’t get as brown as shown. This is the first time my roux came out “like it’s supposed to” and my Cajun food always tasted great. (Probably not by a true Cajun standards… but pretty delicious anyway!)

++ Tip   Have both the 5 Tbs. of flour and the 28 ounce can of stewed tomatoes opened ready to go.

Lower the heat a bit. In the same skillet, melt 4 Tb. butter and allow to brown a teeny, tiny bit. Add 5 Tbs. flour.  Cook, stirring, until the mixture becomes a lovely shade of brown. ++  This might take a few minutes, but, all of a sudden – it starts to turn brown!

Once your roux is browned and beautiful – add 28 oz. can of stewed tomatoes, 1 tsp. Worcestershire sauce, 1/4+ cayenne pepper, 1/2 tsp. pepper and 1 tsp. salt.

Holy Trinity & TomatoesReintroduce the veggies. Mix everything together and allow to simmer, stirring occasionally, until bubbly and slightly thickened.

If you don’t have a really large skillet, at this point you may have to pour out your veggies/tomato/spices mixture into a large stockpot or Dutch oven because you’re going to now add the six cooked pork chops. Continue to simmer 1 – 2 minutes until everything is heated through.  ++ Don’t overcook the pork chops, because it can make them tough.  Enjoy !!

Savory Cajun Pork

Thai-Inspired Chicken and Noodles

It’s always hard for me to wait until I’ve finished photographing a new recipe before I can enjoy it eating it – I just want to “dive in”.  And that’s what I’m doing right now – happily eating some of my Thai-Inspired Chicken and Noodles. I’m also watching Haunted Collector, so between that and eating so late, I should be having some pretty strange dreams tonight!

I had planned to make Chicken-Ham Roll-Ups today but, instead, posted about our beautiful farm in Quebec. Then, I happened to come across a recipe I had created quite a while ago for Peanut Sesame Noodles, so I decided I’d make it and post the recipe. I’ve added some chicken to the recipe, so now it makes a complete meal. I must say, I’m pretty happy with the results!

Don’t be put off by the addition of peanut butter. Many countries cook with peanuts/peanut butter, so give this recipe I try. I think you’ll like it !!

I call this recipe “Thai-Inspired” because it’s not an authentic Thai recipe. For one thing, a true “Thai” recipe would probably not include this much peanut butter, so feel free to put in less.  This dish is neither overly spicy or hot, so adjust the Cayenne pepper to your taste if you prefer heat. (You could add some red pepper flakes.) That’s the beauty of cooking – you can make this as spicy or peanut-y as you wish!

I highly recommend using Gravy Master because it gives this dish a boost of both flavor and color. (Flavour & colour for my international friends.)  Actually, much of the enjoyment in eating comes down to how food looks, as well as how it tastes, so a bit of extra color can make a difference in a recipe.   Enjoy!!

Ingredients

  • 8 oz (1/2 package) linguine or angel hair pasta – any kind of long pasta or noodles, cooked according to directions and drained.
  • 1 large onion, cut lengthwise into slices
  • 1 Tbs. butter
  • 2 pieces chicken breast, cut into 1″ chunks
  • 1 tsp. Gravy Master – “Seasoning and Browning Sauce”
  • 1/4 tsp. ginger  (I used ground ginger but you could use fresh.)
  • 1 Tbs. butter
  • 1/2 cup water
  • 1/3 cup chunky peanut butter – (Feel free to use less – I just happen to like LOTS!!)
  • 2 chicken bouillon cubes
  • 2 – 3 pinches Cayenne pepper – (Add some red pepper flakes if you like.)
  • 1 1/2 tsp. Teriyaki sauce (I like Kikkoman’s)
  • 1 1/2 tsp. dark sesame oil
  • 3/4 cup “half ‘n half” (cream)
  • salt & pepper to taste
  • 2 tsp. chopped fresh parsley, plus some for garnish

Melt 1 Tbs. butter in a large skillet over medium heat. Add sliced onion and cook, stirring occasionally, for 5 minutes. Remove cooked onions to a bowl and set aside.

Melt another 1 Tbs. butter, and add chicken chunks which have been mixed with 1 tsp. Gravy Master and 1/4 tsp. ginger. Cook, stirring, over medium-high heat for 4 minutes. LOWER HEAT TO MEDIUM.

Add 1/2 cup water, 1/3 cup chunky peanut butter (Again – feel free to use less peanut butter), 2 chicken bouillon cubes, 2 – 3 pinches Cayenne pepper, 1 1/2 tsps. Teriyaki sauce, 1 1/2 tsps. dark sesame oil, 3/4 cup “half ‘n half”, 2 tsps. chopped fresh parsley and salt and pepper to taste.

Add cooked onion slices to skillet, and continue cooking and stirring just until everything is heated through. Adjust seasonings and serve.   Enjoy!!USE AS 2N PHOTO - Thai-Inspired

Tex-Mex Casserole with Crescent Roll Crust

Although I intended to post a recipe for soup, I changed my mind once I began searching through my refrigerator. As I “dug around”, I found ground beef, crescent rolls, a left-over green pepper, half an onion, some button mushrooms, a half a bag of shredded cheese and some sour cream. My mind started “percolating” even more as I rummaged through my cupboards and found a can of tomato paste, a can of diced tomatoes and a can of cannellini beans. Bingo – with a little imagination and a dash of spices, this could turn into something deliciously Tex-Mex!! (I also had a small can of black olives, which I forgot to put in. Maybe they weren’t meant to be part of the recipe!!)

I think you’re gonna like this Tex-Mex Casserole with Crescent Roll Crust – it’s hearty, spicy and filling.   And – you might already have most of the ingredients. Enjoy!

++ UPDATE  A ‘Reddit” reader from Texas commented that, in Texas, they use Pinto beans or even black beans & they don’t use mushrooms. I appreciate their input… I’ll just consider this my version of “Tex-Mex”.   Hey – I like mushrooms !!  ; o )

Oven at 350F        Large Casserole       Cook for 25 – 35 minutes

Ingredients

  • 3/4 cup chopped green pepper
  • 3/4 cup chopped onion
  • 1 Tbs. olive oil
  • 1 1/2 cups sliced button mushrooms
  • 1 lb. ground beef
  • 1 can (19 oz.) cannellini or kidney beans – DRAINED and RINSED
  • 1 can (8 oz.) tomato sauce with basil, garlic & oregano
  • 2 Tbs. tomato paste
  • 1 can (14.5 oz.) diced tomatoes with basil, garlic & oregano – DRAINED
  • 1/3 cup sour cream
  • 2 tsp. cumin
  • 1/4 tsp. ground red pepper (cayenne pepper)
  • 1/2 tsp. salt
  • 1/4 tsp. pepper
  • 2 cups shredded cheese – any type will do – I had Four Cheese Pizza Style
  • 1 package Pillsbury Crescent Rolls
  • paprika – for color, if desired

Place 1 Tbs. olive oil In a large skillet and, over medium heat, cook pepper and onion until softened – about 8 minutes. Add sliced mushrooms and cook for another few minutes, then add 1 lb. ground beef. Continue cooking and stirring until ground beef is totally cooked. Add the next nine ingredients – rinsed, drained cannellini (or kidney) beans through to 1/4 tsp. pepper.

Pour approximately HALF of the mixture into a large casserole – or 10″ x 13″ pan. Sprinkle two cups shredded cheese over the meat mixture, and then spread on the rest of the meat mixture.

Unroll the crescent rolls and place them on top of the meat in a single layer. Sprinkle crescent rolls with a bit of paprika, for color, if desired. 

Cook in a 350F oven for between 25 – 35 minutes. Beef mixture will be bubbly and the crescent rolls will be a deeper brown and less fluffy than usual.   To be sure the crescent rolls are fully cooked, use a fork and lift up a section in the middle. If the crescent rolls aren’t fully cooked, just continue to cook a few minutes more until they are.   Enjoy !! 

Tex-Mex Casserole - My Yellow Farmhouse.com

‘Chinese’ Meatballs – A Great Make-Ahead Appetizer!

For the last several years I’ve hosted a “Women Only Pre-Holiday Madness Party”, usually on the first Saturday of December. We always have tons of fun!  Everyone brings whatever they want to drink – and an appetizer to share, so there’s lots of “nibbling” going on all night. And, of course, the beverages are flowing!  I invented these Chinese (or Sweet and Sour Meatballs) for one of those parties and they were a BIG hit.  Take my word for it – these are delicious!

++  Makes 25 – 1 1/2″ appetizer-size meatballs

Ingredients 

  • 1/2 cup dry purchased bread crumbs (“Italian” is fine.)
  • 1/4 cup milk
  • 1 1/4 lbs. (90 % lean) ground beef
  • 1 egg
  • 1/2 tsp. Worcestershire sauce
  • 1/2 tsp. teriyaki sauce
  • 2 (8 oz.) cans crushed pineapple – divided
  • 2 Tbs. minced onion
  • 1 tsp. maraschino cherry juice
  • 3/4 tsp. salt
  • 1/8 tsp. pepper
  • 3/4 cup packed brown sugar
  •  2 Tbs.  cornstarch
  • 1 Tbs. soy sauce
  • 1/4 cup teriyaki sauce
  • rest of juice & pineapple from 1st can  &  all of 2nd can
  • 2 Tbs. maraschino cherry juice
  • 10 or so maraschino cherries

FOR MEATBALLS – In a medium bowl, mix bread crumbs and milk, then add ground beef, egg, 1/2 tsp. Worcestershire sauce, 1/2 tsp. Teriyaki sauce, 1/4 cup DRAINED crushed pineapple – (reserve rest of pineapple and juice), 2 Tbs. minced onion, 2 tsp. maraschino cherry juice, 3/4 tsp. salt and 1/4 tsp. pepper.

Form into meatballs 1 1/2 ” across. Place each meatball about 1 1/2″ apart on a baking sheet, and bake in a 375 F oven for 20 minutes.

FOR SAUCE – In a large frying pan, place the rest of the ingredients – beginning with the cup of packed brown sugar down to the 10 maraschino cherries. On medium-high heat, bring sauce to a boil, while stirring.

Once sauce boils, immediately lower heat. Add cooked meatballs and continue cooking – at a simmer – until sauce is slightly thickened and coats meatballs.

++ These can be made ahead and served the next day.  I reheat them gently in an electric frying pan and serve them right from the pan so they remain warm.  Of course, they can also be warmed up & served from your slow-cooker.  Enjoy!!

'Chinese' a.k.a. 'Sweet and Sour Meatballs' - from 'My Yellow Farmhouse.com'

Three-Cheese Mac and Cheese with Shrimp

Always loved Mac ‘n Cheese… always have… always will. I’m really happy with how this Three-Cheese Mac ‘n Cheese with Shrimp turned out!!! It’s super creamy, and has the added treat of lightly marinated shrimp.

This recipe came about because of two experiences; one yucky, and one delicious. First, the yucky experience. Not long ago, I ordered Shrimp, Macaroni ‘n Cheese at a local chain restaurant. I usually enjoy their food but not this time. The Shrimp, Macaroni ‘n Cheese was so nasty that I couldn’t even eat it. It was a gooey mess that tasted like it’d been made with wallpaper paste. (The waitress saw my still-full plate and didn’t charge me for the meal. Of course, I still had my “bar bill” !)

Now, on to the “yummy” experience. This past October some good friends invited me over for drinks and a fire. Although I hadn’t expected a meal, my friend Sue cooked up a bunch of great dishes – my absolute favorite was her Three-Cheese Mac ‘n Cheese. When I asked her how she made it, she dug into her trash and pulled out the recipe, posted on our local supermarket’s (Big Y) bag of Mac & Cheese Blend. So, that’s the recipe I used as the basis for my Three-Cheese Mac ‘n Cheese with Shrimp. I love the addition of the marinated shrimp ’cause I’m a great believer that even a good thing can always be made better.

When you see the ingredients, you’re gonna think, “Heart Attack on a Plate”! Don’t let the ingredients scare you – it’s super rich, so you don’t need to eat a lot. And it’s great for guests – I know ’cause I’ve served it to guests and they loved it – and that was before I got the idea of adding the marinated shrimp.  Enjoy!!

Possible - auto adjusted

I feel I should warn you…. this makes A LOT … and it’s so rich that a bit goes a long way. This recipe is great for a family – or a crowd, so if you don’t need a HUGE amount, then divide the recipe in half !!

Oven at 350 F          Use at 10″ x 13″ casserole        Cook for about 25 minutes

    Ingredients

  • 16 oz. bag of medium-to-large PRECOOKED shrimp (I buy frozen.)
  • 2 tsp. Italian Dressing
  • 1 tsp. Worcestershire sauce
  • 16 oz. box of elbow macaroni – MINUS ONE CUP OF UNCOOKED MACARONI !!!
  • 6 Tbs. butter (3/4’s of a stick of butter)
  • 4 Tbs  flour
  • 1 1/2 cups whole milk
  • 3/4 cup light cream
  • 1 cup sour cream
  • 1 1/2 cups shredded Sharp Cheddar Cheese (Purchase an 8 oz bag)
  • 1/4 cups shredded Swiss Cheese
  • 1 1/4 cups cut-up American Cheese (I don’t think they sell it shredded. Just ask the deli for about 1/2 pound, and then cut it up to equal 1 1/4 cups.)
  • 1/2 tsp. garlic salt with parsley
  • 3/4 tsp. salt
  • 1 cup shredded Sharp Cheddar Cheese (The rest of the 8 oz. bag.)
  • 1 cup “smashed up” butter crackers…. such as Ritz

If, like me, you buy frozen precooked shrimp, make sure you allow the shrimp to drain in a colander for a while to remove any excess liquid. If the shrimp have tails, cut them off, then cut the shrimp into 2’s or 3’s, depending upon the size of the shrimp.(Shrimps for my European friends!) Place the shrimp in a medium-sized bowl, and mix in 2 tsp. Italian Dressing and 1 tsp. Worcestershire sauce – set shrimp aside.

Cook the elbow macaroni (minus the 1 cup) according to the package directions. While macaroni is cooking, start making the sauce. In a medium-sized pan, over medium heat, melt 6 Tbs. butter. Once butter is melted, add 4 Tbs. flour, and stir with a whisk (or spoon) until well-blended. (Mixture will be frothy.) Continue to cook, stirring, for another minute. Slowly add 1 1/2 cups whole milk and 3/4 cup light cream. Continue cooking and stirring for about three minutes – mixture will be slightly thickened.

Add 1 cup sour cream and mix until thoroughly blended, then add the Cheddar, Swiss and American cheeses. Remove from the heat. The sauce and cheese mixture is probably gonna look pretty thick and globby at this point – but that’s what you want. Add 1/2 tsp. garlic salt with parsley and 3/4 tsp. salt. If your pan is large enough, stir in the shrimp, but you’re gonna need a large bowl in order to mix the sauce & shrimp mixture with the macaroni.

Pour cheese sauce/shrimp/macaroni mixture into a large casserole. Sprinkle on 1 cup of shredded sharp cheddar cheese – which should finish the 8 oz. bag. Sprinkle 1 cup “smashed up” butter crackers over the cheese. (An easy way to break up the crackers is to put a bit more than half-a-sleeve into a gallon storage bag, then “smash” the crackers with your hand, a can or the side of a hammer.)

Cook in a 350 F oven for about 25 minutes – or until the edges of the casserole are slightly bubbly……… I think a nice baby spinach salad with sliced apples, walnuts, thinly sliced Bermuda onion and mushrooms would be great with this.   Enjoy!

Oven “Barbecued” Chicken

Barbequed Chicken - FIXED - MARCH 2013 - USE FOR BLOG

Plump chicken breasts and legs are marinated before being broiled, then baked in the oven, resulting in chicken that’s moist, tender and flavorful. You know, recently I’ve been thinking how my mom used to broil chicken – and how delicious it was. And I’ve also been thinking how no one seems to use their broiler for cooking anymore….  So, drag out that broiler pan and cook yourself up some of this oven-barbecued chicken. It’s yummy!

You’ll need a broiler pan, sprayed with non-stick spray (or spread on some vegetable oil).  (This will keep help keep the chicken skin from sticking.)   

++  Don’t have a broiler pan – use a large baking pan and put a cooling rack in it. 

++  Don’t have either a broiler pan or a roasting pan – that’s OK.  Use a 13″ x 9″ pan. The Oven-Barbecued Chicken will be delicious which ever type pan you use.

Ingredients

  • 6 pieces of chicken – breasts or thighs – or a combination of both. (Not boneless.)
  • 1/2 cup chopped onions
  • 1 cup Italian salad dressing – (I like Wish Bone Robusto Italian)
  • 1 cup barbecue sauce – (I like Sweet Baby Ray’s Hickory and Brown Sugar)

FIRST STEP – –  Marinate Chicken

In a small frying pan, cook 1/2 cup chopped onions for a few minutes. (They don’t need to be fully cooked.)  In a bowl large enough to fit six pieces of chicken, put the cooked onions, Italian salad dressing and barbecue sauce – mix everything together. Add the six pieces of chicken and turn to coat.

Cover the bowl and refrigerate for several hours – or overnight – turning the chicken at least once.

About an hour before you plan to eat, remove chicken from the barbecue sauce mixture. DON’T THROW OUT THE SAUCE!!

 SECOND STEP  – – Broiler on LOW       Pan placed on highest rack in oven.

Place the chicken, skin side down, on greased broiler pan. Baste chicken with some of the barbecue sauce mixture. Place broiling pan 5 – 6 inches below the broiling element and broil for 10 – 15 minutes. (If chicken starts to burn, broil for only 10  minutes or so.)

Turn chicken over and baste with more barbecue sauce. Broil that side for 10 – 15 minutes. (Again, if skin starts to burn, broil for only 10 minutes or so.)

THIRD STEP – –  Oven at 350 F

Turn off broiler.  Remove chicken and broiler pan from oven.  Place oven rack in the center of the oven and set temperature at 350 F.

++ Place broiler pan – with the broiled chicken – in the oven.  Bake chicken for about 25 minutes – or (using a meat thermometer) cook until chicken reaches an internal temperature of 170 F.

++  If you happen to have a broiler pan, I recommend using it ’cause the chicken will be less crowded and will cook faster.  Enjoy!!

Oven 'Barbecued' Chicken - myyellowfarmhouse.com
Oven ‘Barbecued’ Chicken

Turkey Strata (Casserole) – Uses Left-Over Turkey and Stuffing

This is so delicious – and so easy  !!  (My photos do NOT do it justice.)

While working on this post, I’m enjoying a good-sized portion of this delicious Turkey Strata! I gotta say – it’s yummy!! Since the Turkey Strata can already be in the oven when your guests arrive, you’ll have time to clean up your kitchen and meet them with a smile and a glass of wine! The “clean kitchen” part would be exceptional for me… my kitchen is usually a disaster when my company arrives. But they’re used to it… and the meal is always good !

Oven at 350 F      Bake for 30 minutes      Serves 4 – 5 people     

Ingredients & Method

  • 1 Tbs. olive oil
  • 3/4 cups sliced onions
  • 3 – 4 heaping cups baby spinach leaves  (Feel free to add more spinach !)
  • 1/2 can mushroom soup
  • 1 packet turkey gravy – (I like McCormick)
  • 1/2 cup milk
  • 3/4 cup water
  • 2 tsp. chopped fresh parsley
  • 1/2 tsp. salt
  • 1/4 tsp. pepper
  • 1/2 tsp. poultry seasoning – (I like Bell’s)
  • 3 cups left-over stuffing – or prepare a packaged stuffing – (I like Stovetop Turkey)
  • 3 cups cooked chicken/turkey, cut into bite-sized pieces
  • 1/8 cup Italian-flavored breadcrumbs
  • 2 Tbs. grated Parmesan cheese
  • paprika

In a medium-sized skillet over medium heat, cook the sliced onions in the olive oil for 2 minutes. Add baby spinach and cook for another minute. Remove from heat and set aside. In a medium-sized saucepan, over medium-high heat, mix the 1/2 can of mushroom soup, the packet of turkey gravy, milk, water, parsley, poultry seasoning, salt & pepper. Whisk – or stir – until mixture comes to a boil. Lower heat and, still whisking, cook for a minute. Add the bite-sized chicken/turkey to the sauce mixture.

To assemble the Turkey Strata, use a 9′ x 9″ pan or a medium-sized casserole and begin by making a layer of HALF of the stuffing. Spoon HALF the turkey/sauce mixture on top of the stuffing. Now, make a layer of the onion/spinach mixture. (There is only one layer of the onion/spinach mixture.)

turkey-strata-casserole-fixed-3

Make your final layer of stuffing, and spoon the second – and final layer – of the sauce/turkey mixture on top of the stuffing.

Sprinkle with 1/8 cup bread crumbs and 2 Tbs. grated Parmesan. For color, sprinkle on some paprika. Bake at 350F for 30 minutes. The crumb topping should be slightly browned around the edges and the filling should be bubbling!       Enjoy !!

Turkey Strata (Casserole) - Uses Leftover Turkey and Stuffing! - My Yellow Farmhouse.com

Penne Mozzarella Bake

Hi There – well, here’s another recipe from the woman who’s in the running for The World’s Worst Procrastinator! I’ve recently been thinking, “Maybe I’ll put these recipes out there – and no one’s gonna ever see them”. Then, I noticed that almost 100 people have “checked out” my little recipe blog so far….even though I have, at this point, so few recipes. If that’s not a motivating factor, then I don’t know what is!!  I’m sending out a great, big THANKS to my first 100 visitors! And I promise, there’ll be lots and lots of delicious recipes “comin’ at ya” from My Yellow Farmhouse!

I made up this recipe recently – and – I gotta say – it’s damn good!! Perhaps it’s the additional depth of flavor due to adding some red wine, and simmering everything together for a bit before assembling and baking this Penne Mozzarella Bake.

Oven at 350 F     Serves 6

  • smaller-sized Penne (macaroni) – measure 3 cups, then cook  “al dente”
  • 1 lb. ground beef – 80% lean
  • 1/4 cup chopped onion
  • 1/4 cup chopped green pepper – or mixture of red & green
  • 1/2 tsp. dried basil
  • 1/2 tsp. garlic salt with parsley
  • black pepper to taste – about 1/4 tsp.
  • 1 tsp. salt
  • 4 cups prepared spaghetti sauce
  • 1/4 cup red wine
  • 1/2 cup grated Parmesan – divided in two1/4 cup portions
  • 7 oz. container of sliced fresh mozzarella, drained

In a large skillet, over medium heat, cook ground beef until no longer pink. Remove beef from skillet, taking out most of the fat, but not all. Add the chopped onion and pepper to the skillet; cook, stirring, for about 4 minutes. Return beef to skillet. Simmer with the chopped onions and peppers for about 2 minutes, stirring occasionally. Now add spaghetti sauce, spices and red wine.  Lower heat, cover skillet, and simmer 15 minutes, stirring occasionally. (If you don’t have a big lid, cover with foil.)

Add the cooked Penne to the simmered spaghetti sauce mixture. (If there’s not enough room in the skillet, mix Penne and sauce mixture in a large bowl.)

Place half the Penne/sauce mixture in a 2-quart casserole. Then, in a single layer, place the drained mozzarella slices. Sprinkle with the 1/4 cup grated Parmesan cheese.

Cover this layer with the rest of the Penne/sauce mixture. Sprinkle with 1/4 cup Parmesan cheese.  Bake at 350 F – uncovered – for 30 minutes. Pour yourself a nice glass of the red wine left-over from making the sauce – and ENJOY!!

Beef ‘n Mushroom Pie

Recently I prepared Beef ‘n Mushroom Pie a day ahead and brought it to my aunt’s home, where it was quickly & easily reheated.  I served it with ready-made sweet potatoes – sooo good !!   I love this pie – it’s like a “meat & potato meal” in a pie.
It’s already been a year since I began my blog – and Beef ‘n Mushroom Pie was the first recipe  posted!

+++++++++++++

Well, after promising many of you for almost a year that I’d “get moving” and begin posting recipes –  I’m FINALLY posting my first one. (I can’t guarantee how well this first blog is gonna come out because I can’t be bothered reading lots of instructions!!) I’ve got zillions of recipes I want to share, and I know many of you have complained that you’re tired of always cooking the same things. So, consider me here to shake up your culinary life!! I made this Beef ‘n Mushroom Pie recently when some friends invited me over for an evening of “pizza and a bonfire”. (And, of course, some “beverages”!) The pie was a big hit!! (It’s a Pillsbury Bake Off winner from about 20 years ago.) I changed the recipe slightly, such as using four cups of potatoes instead of two. With the extra potatoes, you’ll get at least six good-sized yummy portions!!  The recipe calls for a pound of left-over roast beef, but, since people don’t prepare roast beef as much as they used 20 years ago, I just buy a one pound “hunk” at the deli counter of my local grocery store. Oh…if you’re wondering how the party went… well, we were in the hot tub at 1:30 a.m.!!! —-  Believe me – this pie has so much flavor, with so little effort!

 Ingredients
  • 1 lb. cubed COOKED roast beef, about 3 cups   ++ Buy a 1 pound “hunk” at the deli counter.
  • 1/4 cup chopped red pepper
  • 1/4 cup chopped green pepper
  • 1/4 cup chopped onion
  • 1 can UNDILUTED mushroom soup
  • 1 (6.5 oz.) can sliced mushrooms, DRAINED
  • 1/4 tsp. salt-free seasoning – such as Mrs. Dash (I like Garlic & Herb)
  • 1/4 tsp. garlic salt with parsley
  • a few dashes of pepper
  • 2 – 4 cups sliced potatoes, cooked      ++  I used 4 cups
  • 1 pkg. refrigerated pie crust (containing 2 crusts)
  •  1 egg, beaten
Method

Oven at 375 F   Bake pie for 45 minutes

In a large skillet, cook cubed beef, chopped peppers & onion in a few tablespoons of olive oil over medium heat for about 3 to 5 minutes.

Add the mushroom soup, mushrooms and spices. Mix well. COVER and simmer for 10 minutes.

Line a deep pie plate with a crust. (It’s a good idea to take the crust out of the refrigerator about 15 minutes before you want to use it!)

Pour in the hot filling. Now it’s time to add the potatoes, which have been cooked and drained. Just layer them on top of the hot mixture.

OK – you’re almost done!! Place the top crust on top of the potatoes. Fold the top crust over the bottom crust and “crimp” the edges of the crust. You can do this with a fork (don’t press too hard or you make the edges to thin) or with you can crimp it with your fingers.

Now for the “beauty part” – the part that makes everyone go “Wow, how’d you get your pie to look like that?” Beat an egg in a small glass or bowl, then, using your fingers as a paint brush (use a pastry brush if you want, but you’ll only have to wash it after!), spread SOME of the beaten egg (you won’t need it all) all over the top crust.

++If you end up with “puddles” of egg wash in some of the grooves, just dab it out with a bit of paper towel.

Bake at 375 F – in the center of the oven – for 45 minutes. Enjoy !!

++ If baking the pie ahead of time, allow the cooked Beef ‘n Mushroom Pie to cool for about 25 minutes, then cover with foil & store in refrigerator.  ++  To reheat pre-baked pie, remove foil & bake in a 350 F oven for about a half hour.

++ When reheating, if you’re not sure the pie’s fully heated – here’s what I do… I stick a CLEAN finger in the center. If it’s hot – it’s ready!   (Yeah,  that’s a bit unorthodox but hey, it works.)  

Beef n Mushroom Pie - My Yellow Farmhouse.jpg