A New Spin on an Old Favorite – Mushroom Ravioli Lasagna with a Light Basil & Bell Pepper Tomato Sauce

Mushroom Ravioli Lasagna  - My Yellow Farmhouse

My son Dan recently dropped by and I told him I’d made a new dish called Mushroom Ravioli Lasagna.  He wanted to try it for himself… and the first words out of his mouth were, “Why did you make so much”?  Hey, I prefer to make A LOT.  It’s just as easy to make a lot as it is too make a little.  And everyone loves leftovers, especially if you have children who seem to eat 18 hours a day.  I guess I’m still thinking like the woman who used to feed twin sons…. plus all their friends.  And now I just feed the neighbors!   ; 0 )

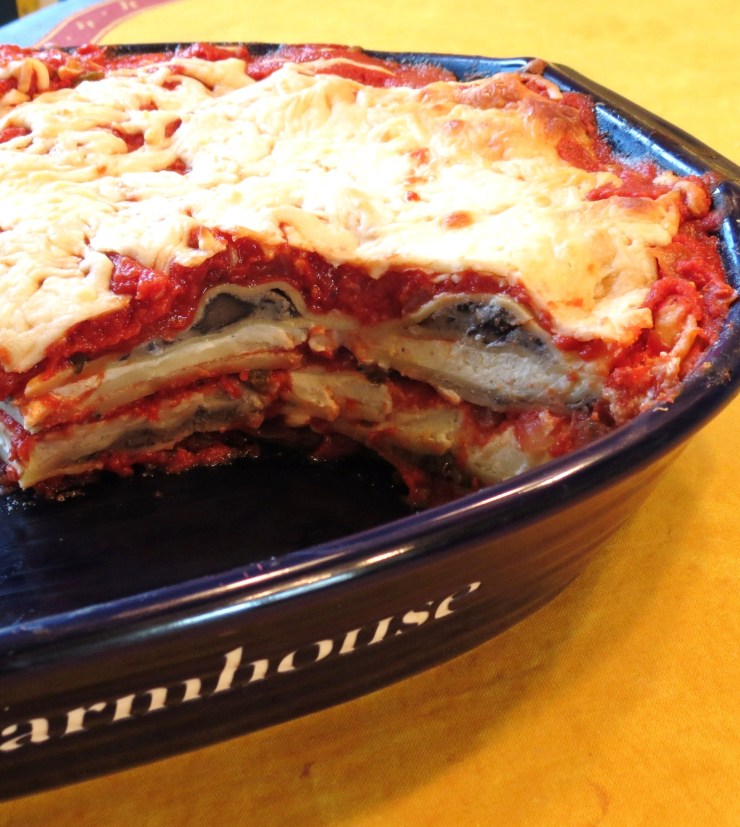
Mushroom Ravioli Lasagna with a Light Basil & Bell Pepper Tomato Sauce is easier, at least to me, than preparing a regular lasagna with lasagna noodles.  And the mushroom ravioli gives this Italian staple a whole new spin.  The tomato sauce has a fresh, light taste and is a cinch to prepare. I used several types of bell pepper, a bit of red onion, two cans of VERY good quality crushed tomatoes, one can of tomato sauce, some roughly chopped basil – plus salt and pepper.  Then I let the sauce simmer for about an hour, which thickened it up perfectly and allowed the flavors to meld.

While the sauce was simmering I mixed the ricotta, parmesan, eggs and fresh Italian parsley, and cooked the mushroom ravioli al dente.  All that was left to do was make the layers, which I thought was a lot of fun.  (Maybe I need to get out more, huh?)


A few of my sister-in-laws (I have six) visited Saturday night, when I prepared this lasagna. The wine was flowing and we had a lot of fun.  Due to my broken ankle, one of them had to drain the ravioli and place the lasagna in the oven… And take it out, of course.

I hope you like this Mushroom Ravioli Lasagna with a Light Basil & Bell Pepper Tomato Sauce as much as we did.  Enjoy!

Follow this link to -‘Not Your Grandmother’s’ Turkey (or Chicken) Tetrazzini – Prepared with Tortellini Instead of Spaghetti !

larger-photo-chicken-tetrazzini-with-a-twist-tortellini-instead-of-spaghetti

small red heart

Oven at 425 degrees F  for 45 minutes           13″ x 10″ deep casserole dish

Do NOT Cover Lasagna with Foil !    

Allow lasagna to stand for 10 minutes after removing it from the oven.

     INGREDIENTS

Sauce

  • 1 Tbs. olive oil
  • ½ cup each; chopped red pepper, chopped green pepper, chopped orange pepper ++ Or any combination – to equal  1 1/2 cups.
  • ¾ cup chopped red onion
  • 2 cans (28 oz.) crushed tomatoes ++  I used Sclafani brand for the first time & was very impressed with the quality.
  • 1 (8 oz.) can tomato sauce  ++  I used Hunts – Basil, Garlic & Oregano
  • 2 Tbs. roughly chopped fresh basil
  • 1 tsp. salt
  • ground fresh pepper – to taste

Filling

  • 4 cups (32 ounces) ricotta cheese
  • 1 (16 oz.) package shredded Mozzarella  ++ DIVIDED  Mix 2 1/2 cups into the ricotta mixture – the rest will be sprinkled top. 
  • 1/2 cup grated Parmesan (or Romano) cheese
  • 2 eggs
  • 1 Tbs. chopped fresh flat leaf parsley (a.k.a. Italian parsley)
  • 1 tsp. salt
  • 1/2 – 3/4 tsp. black pepper

Ravioli

  • 3 packages (9 0z.) fresh mushroom-stuffed ravioli, cooked according to package directions    ++ I used Buitoni Riserva Pasta Agnolotti Wild Mushroom, located in the refrigerator aisle of your grocery store.
  • 1 tsp. salt and 1 Tbs. olive oil in water
  • 2 Tbs. olive oil… to mix with cooked ravioli.  Helps it not to stick. (I forgot to do this…)

     METHOD

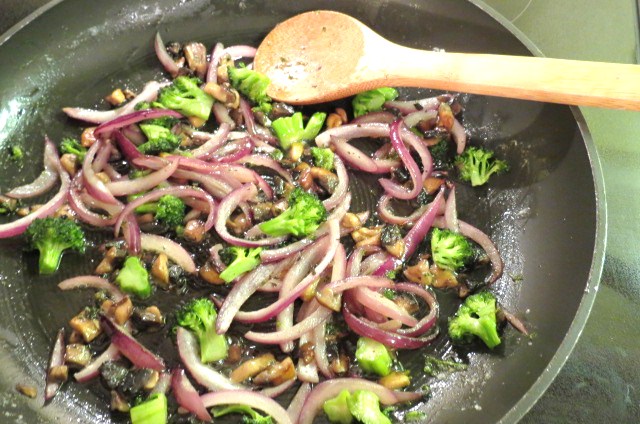
Add 1 Tbs. olive oil to a large stock pot or Dutch Oven.  Add ½ cup each; chopped red pepper, chopped green pepper, chopped orange pepper ++ Any combination – to equal  11/2 cups and ¾ cup chopped red onion.  Cook, stirring occasionally, over medium heat until peppers and onion begin to soften. (They’ll cook more in the oven.)

Add 2 cans (28 oz.) crushed tomatoes, 1 (8 oz.) can tomato sauce, 2 Tbs. roughly chopped fresh basil, 1 tsp tsp. salt and ground fresh pepper, to taste.  Simmer sauce, stirring occasionally, for one hour. Do NOT cover pan.  Sauce will reduce by about 1/3.

I highly  recommend using a splatter guard!

splatter guard

While sauce is simmering, prepare ricotta/mozzarella mixture.  In a medium bowl mix 4 cups (32 ounces) ricotta cheese, 2 1/2 cups shredded Mozzarella, 1/2 cup grated Parmesan cheese, 2 eggs, 1 Tbs. chopped fresh flat leaf parsley (a.k.a. Italian parsley), 1 tsp. salt and 1/2 – 3/4 tsp. black pepper.  Set aside.

Ravioli

Cook al dente, according to package directions.  Drain well and mix with 2 Tbs. olive oil so the ravioli won’t stick together.  Set aside.

Putting It All Together    ++  See photos below !

In a large casserole – or 13″ x 10″ pan – spread about 1  cups tomato sauce.  Layer about 14 mushroom ravioli on top, depending upon the size of the ravioli.  Spread HALF the ricotta/mozzarella mixture on top of ravioli.  Cover with more tomato sauce. Add your second layer of ravioli, other half of ricotta/mozzarella mixture and your final layer of ravioli.  Spread remaining tomato sauce on top.

At this time you can sprinkle on the remaining shredded mozzarella BUT I suggest you wait until the lasagna has been cooking for about 25 minutes, then sprinkle on the shredded mozzarella because this helps the mozzarella to not overcook and turn brown.  Enjoy!

Mushroom Ravioli Lasagna - My Yellow Farmhouse

Slightly-Spicy Three Bean, Tomato and Kale Soup

This soup has the richness of a minestrone and the benefit of being Good forYou!
For some extra ‘zing’ – right before serving – sprinkle soup with a bit of Italian Three-Cheese Blend  (Parmesan, Asiago & Romano).

Every time I develop a new recipe, I’m always hoping the end result equals the flavors I’d envisioned.  And I must say I’m very pleased with this Slightly-Spicy Three Bean, Tomato and Kale Soup.  It’s super easy to prepare and makes quite a bit, which is always a plus. Simmering this soup for an hour allows the peppery flavor of the kale to stand out, and the broth becomes slightly creamy due to starches in the kidney, black and garbanzo beans. ++  I decided not to add any meat to this soup, but, of course, you could add some chopped chicken or beef if you choose.  But this soup is so hearty, I think you really won’t miss the meat at all !

INGREDIENTS
  • 3/4 cup roughly chopped red pepper
  • 3/4 cup roughly chopped red onion
  • 2 Tbs. olive oil
  • 2 large cloves garlic, minced
  • 3 cups kale, roughly chopped      ++ Cut out the thick stems running down the center of the leaf.
  • 1 can (15.5 oz.) kidney beans – drained and rinsed
  • 1 can (15.5 oz) black beans – drained and rinsed
  • 1 can (15.5. oz.) garbanzo beans – drained and rinsed
  • 1 (48 oz.) container chicken broth – PLUS – another 2 cups   ++ The extra 2 cups can be replaced by 2 cups water and 2 bouillon cubes. ++  If using ‘Knorr’ chicken bouillon cubes, you’ll only need 1.
  • 1 can (28 oz.) crushed tomatoes with Italian herbs   ++  I like ‘Contadina’
  • 3/4 tsp. salt – or to taste
  • 1/8 tsp. black pepper
  • 1/4 tsp. chili powder
  • 1/4 tsp. cayenne pepper
  • 1/2 tsp. Italian seasonings  ++ Or a mixture of oregano, basil, thyme, sage & rosemary
  • ++  Italian Three-Cheese Blend – OR – any type of Italian grated cheese to sprinkle on top
METHOD

In a large Dutch Oven (or large cooking pot such as you would use to boil pasta) cook 3/4 cup roughly chopped red pepper and 3/4 cup roughly chopped red onion in 2 Tbs. olive oil over medium heat for 3 – 4 minutes… or until veggies begin to look translucent.  ++ There’s no need to worry about under-cooking or over-cooking the red pepper or onion, they’ll finish cooking in the broth. Add 2 large cloves garlic, minced – continue cooking for about another minute.

Slightly-Spicy Three Bean and Kale Soup  - myyellowfarmhouse.com

Add 1 can (15.5 oz.) kidney beans – drained and rinsed, 1 can (15.5 oz) black beans – drained and rinsed and 1 can (15.5. oz.) garbanzo beans – drained and rinsed

Slightly-Spicy Three Bean, Tomato and Kale Soup - myyellowfarmhouse.com Removing ribs from kale - photo courtesy food52.com

Now add 3 cups roughly chopped kale, stems removed. Pour in one container (48 oz.) of purchased chicken broth plus 2 cups.  ++ As mentioned above, the extra 2 cups can be 2 cups of water and a chicken bouillon cube.  (Or, if you have it, 8 cups homemade chicken broth).  

Add the contents of 1 can (28 oz.) crushed tomatoes with Italian herbs – and you’re almost there!!

Add spices;  3/4 tsp. salt (or to taste), 1/8 tsp. black pepper, 1/4 tsp. chili powder, 1/4 tsp. cayenne pepper and 1/2 tsp. Italian seasonings. Bring soup to a boil, lower heat and simmer for about an hour, stirring occasionally.    ++ No need to cover pot.

Slightyly Spicy Three Bean, Tomato and Kale Soup - myyellowfarmhouse.com

Waiting for soup to come to a simmer….

After about an hour…. that is, if you’ve been able to wait for the full hour ….. you’ll have a big pot of yummy soup to share with your neighbors.  Which is what I love to do.    PS  I also shared some of my Honey Walnut Bread, which I just L.O.V.E.  – recipe for that coming soon.   ENJOY !!

1 - Slightly-Spicey Three Bean, Tomato and Kale Soup - myyellowfarmhouse.com

++ Photo credit for ‘prepping kale’ goes to http://food52.com/blog/8211-how-to-prep-kale. I highly recommend food52.com – it’s full of terrific ideas and advice !!

‘Grab ‘n Go’ Crustless Quiche Squares

Above Photo  Shows Yield from Second (Smaller) Version of Recipe

Grab 'n Go' Crustless Quiche Squares - My Yellow Farmhouse.com

UPDATE – – Cathy from Australia told me she prepared Crustless Quiche Squares BUT she substituted cooked bacon for the broccoli. I love that idea!  Cathy calls them Bacon and Egg Squares and said they were a big hit with her four daughters!   'Grab 'n Go' Quiche Squares - with Bacon instead of Broccoli

When my twin sons were teenagers I had a repertoire (of sorts) featuring things they could ‘Grab ‘n Eat’  –  and by ‘they’ I mean my sons and their multitudinous friends … all of whom seemed to have bottomless stomachs.

Crustless Quiche Squares are a bit more ‘solid’ than most quiches due to the addition of a bit of flour, which is why they’re so easy to ‘grab and eat’ either for breakfast (as I did today), for a packed lunch or to serve as appetizers.  And they’re equally delicious eaten right from the fridge or at room temperature.

++  Today I made a smaller version of the original recipe, which works well for someone like me who doesn’t need to feed lots of teenagers!  That recipe follows the larger yield recipe below.

       THIS VERSION  MAKES A LOT   ……   USE A GREASED 13″ X 9″ PAN   

  (++ See below for recipe which makes fewer squares ++)     

Ingredients        

++ Oven temperature changes  – –    Bake at 400F for 15 minutes, …  then lower to 350F for 30 – 35 minutes.    

  • 10 eggs
  • 1/3 cup butter
  • 2 medium Bermuda onions, sliced
  • 1 1/2 cups chopped mushrooms
  • 1 1/2 cups chopped broccoli
  • 1/2 cup flour
  • 1 tsp. baking POWDER
  • 1/3 tsp. salt
  • 1 lb. (16 oz.)  small-curd cottage cheese
  • 1 lb. (16 oz.)  Monterey Jack Cheese – grated

In a large bowl, beat 10 eggs with an electric mixer for about a minute.  Set aside.

In a large skillet, over medium heat, melt 1/3 cup butter.  Add 2 medium Bermuda onions, sliced; 1 1/2 cups chopped mushrooms and 1 1/2 cups chopped broccoli. Cook, stirring occasionally, for 15 minutes.  Set aside.

'Grab 'n Go' Crustless Quiche Squares - My Yellow Farmhouse.com

Add 1/2 cup flour, 1 tsp. baking POWDER and 1/3 tsp. salt to the previously beaten eggs until combined.

Add 1 lb. small-curd cottage cheese and 1 lb. grated Monterey Jack Cheese and beat until combined.

Add sauteed onions, mushrooms and broccoli. Again, beat until combined.

'Grab 'n Go' Crustless Quiche Squares - My Yellow Farmhouse.com

Pour into greased 13′ x 9′ pan.    ++ Bake at 400F for 15 minutes………then REDUCE HEAT to 350F for 30 – 35 minutes.

Crustless Quiche Squares should be light brown when fully cooked, and a knife stuck in the middle shouldn’t stick.  Enjoy!

                                                                         + + + +

++ Directions for Making a SMALLER Batch of  ‘Grab ‘n Go’ Crustless Quiche Squares ++

++  Use a greased 9′ x 9′ pan

++ Oven temperature changes  – –    Bake at 400F for 15 minutes, …  then lower to 350F for 23 – 25 minutes.   
   

Ingredients

  • 5 eggs
  • 1/4 cup butter
  • 1 medium Bermuda onions, sliced
  • 3/4 cup chopped mushrooms
  • 3/4 cup chopped broccoli
  • 1/4 cup flour
  • 1/2 tsp. baking POWDER
  • 1/4 tsp. salt
  • 1/2 lb. (8 oz.) small-curd cottage cheese
  • 1/2 lb. (8 oz.) Monterey Jack Cheese – grated

In a large bowl, beat 5 eggs with an electric mixer for about 30 – 40 seconds.  Set aside.

In a large skillet, over medium heat, melt 1/4 cup butter.  Add 1 medium Bermuda onions, sliced; 1/2 cup chopped mushrooms and 1/2 cup chopped broccoli. Cook, stirring occasionally, for 15 minutes.  Set aside. 'Grab 'n Go' Crustless Quiche Squares - My Yellow Farmhouse.com

Add 1/4 cup flour, 1/2 tsp. baking POWDER and 1/4 tsp. salt to the previously beaten eggs until combined.

Add 8 oz. (1/2 lb.) small-curd cottage cheese and 8 oz. (1/2 lb.) grated Monterey Jack Cheese and beat until combined.

Add sauteed onions, mushrooms and broccoli. Again, beat until combined.

'Grab 'n Go' Crustless Quiche Squares - My Yellow Farmhouse.com

Pour into greased 9” x 9′ pan.    ++ Bake at 400F for 15 minutes………then LOWER HEAT to 350F for 22 to 23 minutes.

Crustless Quiche Squares should be light brown when fully cooked, and a knife stuck in the middle shouldn’t stick.  Enjoy!

++ Recipe adapted from ‘The Frugal Gourmet’

Grab 'n Go - Crustless Quiche Squares - My Yellow Farmhouse.com


Roasted Butternut Squash Soup

Recipe adapted from People magazine – December 2013

I absolutely adore butternut squash, in any incarnation. The flavor of this butternut squash soup is enhanced by roasting the squash in the oven, then adding honey and a bit of nutmeg to the finished soup. A good thing about this soup – you don’t have to peel the squash, which I hate …

   Ingredients

  • 2 – 3 pounds of butternut squash  (You want to end up with 5 – 6 cups of mashed squash.)
  • 1 Tbs. olive oil
  • 3 cups chicken or vegetable broth 
  • 2 Tbs. honey – or ‘to taste’
  • 1 cup half & half
  • 1/8 tsp. nutmeg – or ‘to taste’
  • 1 tsp. salt – or ‘to taste’

Preheat oven to 350.

Cut butternut squash in half. Remove the seeds and fibers and discard.

As you can see, I used 1 1/2 very large squashes and I ended up with quite a bit left over, which was absolutely fine with me.  (You want enough squash to end up with 5 – 6 cups of mashed squash.)

Roaster Butternut Squash Soup - My Yellow Farmhouse.jpg Lightly oil a cookie sheet with olive oil. Be sure to use a sided cookie sheet.  I used one without sides and had to clean the oven after…..  Place squash, cut side down, on the cookie sheet.  Bake for 30 – 40 minutes or until squash is very tender when pierced with a sharp knife.

Scrape squash pulp into a blender.  (I didn’t have a blender when I made the soup at our Pocono house, so I pureed the squash in batches using my small Nutri Bullet. Hence, the photo of the pureed squash not in a blender, but in a bowl.)

Puree squash with about 1 1/2 cups of chicken stock and honey until smooth.

Pineapple Upside-Down Cake, Butternut Squash Soup and Truffles 058Place pureed squash in a large saucepan. Add 1/2 cup half & half, remaining broth and 1 tsp salt – or ‘to taste’. Cook, stirring, occasionally, until heated through.  Do no boil !!

If you like a thinner soup, add more chicken broth. If you like a thicker soup, add more pureed squash.  Serve sprinkled with a bit of nutmeg.  Enjoy!

Roasted Butternut Squash Soup - My Yellow Farmhouse.jpg

‘Easy-Creamy’ Asparagus Soup

++  This soup can be made using JUST the snapped off ends of asparagus – OR – using the entire stalk of asparagus. (I just got a kick out of making a great tasting soup with asparagus ends, which are usually thrown away!)

On New Year’s Day I enjoyed a meal (more like a ‘feast’) at my sister-in-law’s home. I brought the asparagus, and, as I was breaking off the ends (which is actually rather fun to do) I began to think, “I bet I could do something with these little babies”. So I took them home and made an easy but delicious soup which I called ‘Free Asparagus Soup!”

Asparagus is good for you for several reasons, one being that asparagus contains Saponins. Saponins have anti-inflammatory and anti-cancer properties and their intake has been associated with improved blood pressure, improved blood sugar regulation and better control of blood fat levels.

+ Tip   Asparagus should be eaten within 48 hours of purchase.

+ Tip   Once you bring asparagus home, wrap the ends in a damp paper or cloth towel and place in the vegetable bin of your refrigerator.

Ingredients & Method        Recipe makes 4 cups of soup but is easily doubled or tripled

++ If you have any questions about this soup, feel free to use the ‘comment’ section below

  • 5 cups water
  • 2 1/2 cups roughly chopped asparagus ends left after cooking asparagus spears – OR –  whole (unsnapped) asparagus spears  
  • 1/4 cup chopped onion
  • 1 Knorr chicken bouillon cube – – or 2 regular cubes
  • salt – to taste   (I didn’t use any…)
  • 1/2 cup heavy or whipping cream
  • croutons – for garnish

Place 5 cups water,  2 1/2 cups roughly chopped asparagus, 1/4 cup chopped onion, bouillon cube(s) & salt in a medium saucepan. Simmer for about 40 minutes.

Allow to soup to cool a bit so you can blend it in batches. (Last year I purchased a Magic Bullet, so I used that.) 

Return the blended soup to the saucepan. Add cream. Simmer soup for a bit until rewarmed. Serve sprinkled with croutons and, perhaps, a stick-to-the-ribs grilled cheese sandwich. Enjoy!!

Grilled Cheese - Photo Courtesy of Bouchon Bakery and Serious Eats.comPhoto courtesy of Bouchon Bakery & Serious Eats.com.

Mushroom Soup – Made Entirely in Your Microwave !

++ UPDATE — I changed the amount of butter back to the original 1/4 cup (from 2 Tbs.) because I realized 1/4 cup of butter is necessary to make a roux so the soup thickens properly.)

Mushroom Soup - Made Entirely in Your Microwave - My Yellow Farmhouse.comI love this mushroom soup – it’s easy to make and delicious!   I brought some of this soup to a friend’s home recently and a very, very fussy man really, really liked it!    ‘Nough said – here’s the recipe!

Ingredients & Method         

Makes 7 cups  –  enough for 4 people

  • 12 ounces fresh mushrooms – sliced thin (about 4 – 4 1/2 cups)
  • 1/2 cup chopped onion
  • 1/4 cup butter
  • 1/2 cup flour
  • 4 cups water  (Or chicken broth… if using chicken broth you don’t need bouillon cubes.)
  • 2 chicken bouillon cubes  – I like Knorr – they’re bigger and pack more flavor
  • 1/2 tsp. salt   –  or to taste
  • 1/4 tsp. pepper  –  or to taste
  • 1 cup Half & Half   
  • 2 tsp. fresh parsley, chopped

Place sliced mushrooms, 1/2 cup chopped onion and 1/4 cup butter in a 3 quart microwavable bowl.

Mushroom Soup - Made Entirely in Your Microwave

Cover with a microwavable lid – or waxed paper. Microwave on high for 4 minutes – STIRRING ONCE – just until mushrooms release their liquid.

Stir in 1/2 cup flour to make a smooth past.

USE - Mushroom Soup - Made Entirely in Your Microwave 015

Gradually stir in 4 cups water (or chicken broth…. no bullion cubes needed). Continue to stir until well-blended and no lumps remain.

Add 1 cup Half & Half, 2 chicken bouillon cubes, 1/2 tsp. salt & 1/4 tsp. pepper. (Remember – no bouillon cubes needed if you’re using broth.)

Microwave – UNCOVERED – on high for 9 – 10 minutes – until soup is bubbling and slightly thickened. Stir several times – especially during the last few minutes !

Remove bowl with pot holders ’cause it’ll be HOT !!  Sprinkle on 2 tsp. fresh parsley. Enjoy!

Mushroom Soup - Made Entirely in Your Microwave - My Yellow Farmhouse.com

Zucchini Appetizers

I started making these “Zucchini Appetizers” about 25 years ago when we lived outside Philadelphia, Pennsylvania in a lovely town called Villanova. These are delicious – and do they ever disappear fast! They’re also great to have in the fridge for those times when you just want to grab something quickly.

I always had things like this in the fridge for my twin sons and their friends to “nosh” on. Although, occasionally, I’d spy one of their friends walking by with The Very Last Piece of Something I’d had my heart set on. ( And I’m speaking of you, “Joe F” !! )

As some of you know, I’ve been a bit “under the weather” off and on now for several months but recently I’d been feeling much better. Then, two weeks ago, I fell and messed up the ligament connecting my left collarbone to the shoulder. My shoulder had begun healing, when, two days ago, I fell five minutes after arriving at a friend’s cabin while bringing a bag into the house. Of course, I crashed on the same shoulder….!! But –  have I let having one arm in a sling change my plans for a large party this coming Saturday – heck no !!

I prepared these “Zucchini Appetizers” recently while at our home in the Pocono Mountains. I did pretty well chopping etc. using “mostly” one hand…. and taking the photos was NOT easy….  Right now I’m typing with two hands ’cause I’m sick of typing with only one …. although I think I’ll pay for doing this tomorrow..    Enjoy !     PS – I heard from my son’s wife that he was pretty happy I left him a good portion of these “Zucchini Appetizers”!

Oven at 350 F         grease a 9″ x 13″ pan        Bake for 25 – 30 minutes, until golden brown

Ingredients

  • 3 cups thinly sliced zucchini – about 4 small – OR  – 2 medium 
  • 1/2 cup finely chopped onion
  • 1 clove garlic, minced
  • 2 Tbs. chopped fresh parsley –  (I didn’t have garlic or parsley, so I used 1/2 tsp. garlic salt with parsley.)
  • 1 cup Original Bisquick (UPDATE – my friend made these using low-fat Bisquick!!)
  • 1/2 cup freshly grated Parmesan cheese  (The flavor is so much better with fresh Parmesan!!)
  • 1/2 tsp. seasoned salt (I prefer Mrs. Dash – Garlic & Herb)
  • 1/2 tsp. dried oregano or Italian Seasonings
  • 1/2 tsp. salt
  • 1/8 tsp. pepper
  • 1/3 cup vegetable oil  (Original recipe calls for 1/2 cup…)
  • 3 large eggs, slightly beaten  (Since many of us now buy LARGE eggs, I found that 4 large eggs were too many. If you buy MEDIUM eggs, then use 4.)

cut zuchinni

Prepare 3 cups thinly sliced zucchini, 1/2 cup finely chopped onion, 1 clove minced garlic and 2 Tbs. chopped fresh parsley. (If you don’t have fresh garlic or fresh parsley, use 1/2 tsp. garlic salt with parsley.)

Add veggies to a medium bowl. Add 1 cup Original Bisquick and 1/2 cup freshly grated Parmesan cheese.

Now add 1/2 tsp. seasoned salt, 1/2 tsp. dried oregano or Italian Seasonings, 1/2 tsp. salt, 1/8 tsp. pepper, 1/3 cup vegetable oil, 3 large eggs, slightly beaten. (If using medium eggs, use 4 eggs!)  Mix everything together. You may have some tiny lumps, don’t worry about that!

Pour everything into a greased casserole or 9″ x 13″ pan. (My casserole was a bit smaller than a 9″ x 13″, so I just baked it for 5 minutes longer!!)  

poured in pan

Bake for 25 to 30 minutes – or until its golden brown – in an oven set at 350 F.

Here’s what it’ll look like when you take it out of the oven – yum !!

possible - cookedAllow to cool a while, then cut into squares or triangles. For appetizers, cut into 3′ x 3″ squares. For “noshing” – cut as big as you like.  These “Zucchini Appetizers” are great eaten warm but they can also be served at room temperature, which is how I serve them at parties.   Another great thing about these is they can be made the day before!!  Enjoy!!

Use for last photo

Stuffed Shells Florentine – Cook in Oven – OR – Outside on Your Grill !

++ These Stuffed Shells Florentine can be cooked outside on a covered grill set at “low” so your kitchen remains nice and cool !!t

The term Florentine, or à la Florentine, refers to any dish which is prepared in the style of the fabulous city of Florence, which resides in the Tuscan region of Italy. Florentine recipes often feature meat, poultry or fish served over a bed of spinach. In this recipe the spinach is, in fact, mixed with ricotta, mozzarella and Parmesan cheeses – plus eggs, fresh parsley and some spices. All this deliciousness becomes the filling for the stuffed shells, over which a quick and easy marina sauce is poured, followed by a grating of either Parmesan or Romano cheese. I’ve been making this recipe for years and it’s always been a family favorite, however I decided to change both the filling and the sauce – and I have to say I’m very happy with the results!

I was recently invited to spend a weekend with friends in the beautiful town of Wells, Maine. I had decided Stuffed Shells Florentine would be great to bring because everyone likes them – and this recipe makes a lot! Several of us planned to head north in just one car, so, in order to save space, I prepared the filling and the sauce – and cooked the shells –  in advance and then assembled the final dish the following night.

And, get this, my friend decided she’d cook the stuffed shells on the grill so we wouldn’t heat up her kitchen. I never would’ve thought of that . . .  We took the containers of sauce, the filling and the precooked shells outside and assembled everything on the picnic table. Since there were three of us stuffing the shells, it only took a few minutes.

We sealed the pan with a sheet of aluminum foil, and placed it in the grill – which was set to LOW.  Then we enjoyed a drink and just let the Stuffed Shells Florentine simmer away. We were very pleasantly surprised when we checked after a half hour to see the sauce bubbling away, signaling that the shells were thoroughly heated through.

So, now you have two choices –  heat these in either your oven or your  grill.  Enjoy!

++ Cook stuffed shells in the oven at 350 for about 40 minutes.

++ Cook stuffed shells in covered grill set on LOW for about 30 minutes.

Ingredients

  • 1 full box of jumbo pasta shells – cooked according to package directions and drained  (We had about five shells for which we didn’t have filling, but they were the ones which had fallen apart, so that worked out well !)
  • 2 jars (24 oz.) prepared tomato sauce  (I like Bertolli – Tomato & Basil)
  • 1/4 to 1/2 cup red wine
  • 1 Tbs. chopped fresh basil
  • 4 cups ricotta cheese (32 ounces)
  • 2 cups shredded mozzarella cheese  – plus extra to sprinkle on top !
  • 1/2 cup grated Parmesan cheese  –  plus extra to sprinkle on top !
  • 1 (10 oz) package frozen (DEFROSTED AND DRAINED!!) spinach (I actually squeeze the defrosted spinach to get out all the excess water.)
  • 2 eggs
  • 1 Tbs. chopped fresh flat leaf parsley (a.k.a. Italian parsley)
  • 1 tsp. salt – (or to taste)
  • 1/2 tsp. black pepper

– – – – –  “A Little Help from My Friends” Marinara Sauce  – – – – –

Place two jars (24 oz.) of marinara sauce into a large saucepan – add 1/4 to 1/2 cup red wine and 1 Tbs. chopped fresh basil. Simmer, uncovered, over medium to medium-low heat while you cook the pasta shells and prepare the stuffing.

+ +  I had planned to prepare a meat sauce featured on the blog “From the Bartolini Kitchens”.  I had even purchased the ingredients but ended up “doctoring” a purchased sauce when I realized I was running out of time. (And I was actually very satisfied with the results of my “doctoring”.)  But, if you’d like to make this dish with a traditional Italian meat sauce, take a minute to head over to John’s blog!

http://fromthebartolinikitchens.com/2013/01/16/basic-meat-sauce-sugo-di-carne/

John's Basic Meat Sauce Recipe

– – – – –  To Prepare the Filling  – – – – –

Stuffed Shells - cheese and spinach 1

In a medium bowl, mix 4 cups ricotta cheese, 2 cups shredded mozzarella, 1/2 cup Parmesan (or Romano) cheese , the defrosted and DRAINED spinach, 2 eggs, 1 Tbs.chopped flat leaf parsley, 1 tsp. salt and 1/2 tsp. black pepper.

– – – – –  Putting It All Together  – – – – –

Pour about two cups of sauce in the bottom of a 10 x 13 pan – or a large disposable aluminum pan. With a large spoon, spread the sauce out a bit so most of the bottom is covered with sauce – you don’t have to be fussy about it ….

Fill each shell with a heaping soup spoonful of the cheese/spinach mixture.  Pour the remaining sauce over the shells.

Sprinkle some shredded Mozzarella and grated Parmesan. (We ended up using some grated Monterey Jack in place of the grated Parmesan, which added a nice little “kick” of flavor!)

Ready for the Oven or Grill !!  (Cover with aluminum foil.)

Stuffed Shells - uncooked

Cover with aluminum foil. If using oven, set temperature to 350 and cook until heated through – about 35 – 40 minutes.  If using you grill, set dial to LOW and cook until heated through – about 30 minutes. (I put a – freshly washed – finger in the middle to check for doneness. It’s a bit unorthodox – but it works!)

Once the stuffed shells are heated through,  remove the aluminum foil and let the shells sit about five minutes. Of course, if you just can’t wait, then you can skip the “let it sit” part.  Enjoy!

Stuffed Shells Floretine - myellowfarmhouse.com

Jalapeno Corn Chowder

Jalapeno Corn Chowder - USE FOR BLOG 2

I adapted this from a “soup” recipe, but to me, perhaps because I’m a New Englander, this is a “chowder”. Or, as my Bostonian mother would’ve said, “It’s a CHOW-DA”. Here’s some information regarding “chowder” from Wikipedia –  “The phonetic variant, chowda, found in New England, is believed to have originated in Newfoundland (Canada) in the days when Breton fisherman would throw portions of the day’s catch into a large pot, along with other available foods.  Fish chowder, corn chowder, and clam chowder continue to enjoy popularity in New England and Atlantic Canada.”

So, whether you call this recipe a soup or a chowder, it’s thick, rich and delicious. And, as an added bonus, it’s quick and easy to make. Enjoy!

Ingredients

  • 1 Tbs. olive oil
  • 2 tsp. chopped fresh garlic
  • 2 cups frozen hash brown potatoes with onion & peppers (Also called Potatoes O’Brien)
  • 3 cups milk
  • 1 can (15 oz) creamed corn
  • 1 can Green Giant “Mexicorn” – – or 2 cups whole kernel corn
  • 1/2 tsp. salt
  • 1 tsp. cumin
  • 8 oz. Jalapeno Jack Cheese, cut into slices (I used Great Midwest.)

Add 1 Tbs. olive oil to a medium saucepan and cook 2 tsp. chopped fresh garlic and 2 cups hash browns for 8 – 10 minutes, stirring often.

Add 3 cups milk, 1 can creamed corn and 1 can “Mexicorn” (or 2 cups whole kernel corn), 1/2 tsp. salt and 1 tsp. cumin. Mix everything together and bring chowder to a simmer. Reduce the heat to low and cook for 10 minutes, stirring often.

Remove saucepan from heat !! Add 8 oz Jalapeno Jack Cheese slices. Stir until cheese is melted and incorporated into the chowder. Ladle it out – and enjoy!!

1st one fixed