‘Recipe Roundup No. 2’ ….. Super Bowl Snack Ideas

I follow lots of terrific food blogs and recently I decided to ‘share the wealth’ by posting a weekly Recipe Roundup.  Each Roundup features four delicious recipes from four different bloggers. 

When I first began my little food blog the main idea was to share recipes, which we all love to do.  (I’m sure many of you have a file of recipes either copied from friends, ripped out of magazines or found online.)  What I hadn’t expected was the joy I would find in making lots of new friends! 

This week features recipes from Foodie Crush, My Favourite Pastime,  Damn Delicious  &  Chef Mimi.    Enjoy!

small red heart 

Heidi, of Foodie Crush, blogs from Salt Lake City and calls herself a ‘recipe maker, picture taker, lover of food bloggers and their recipes and photos. 

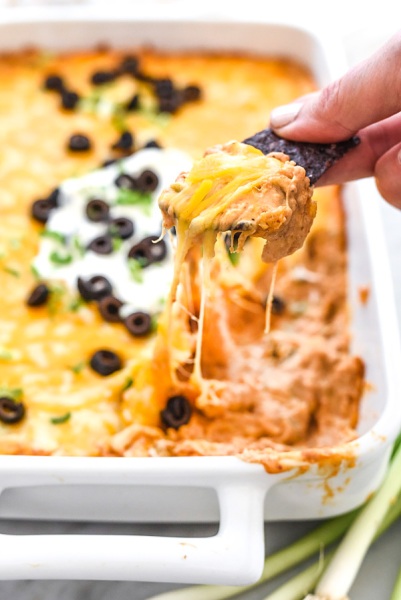
Follow this link for Heidi’s recipe for Cheesy Texas Trash Dip

Cheesy-Texas-Trash-Dip-foodiecrush.com.jpg
Cheesy Texas Crab Dip


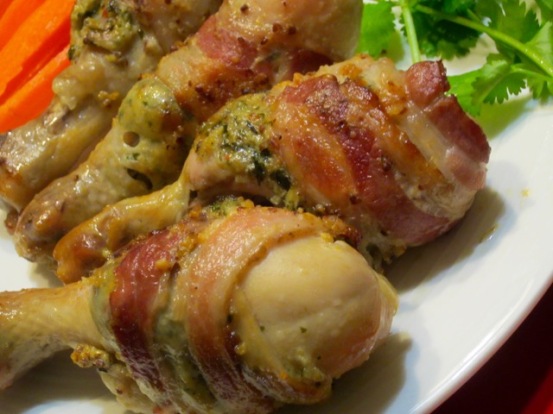
Liz hails from Canada, hence the name of her blog is My Favourite Pastime – with that added ‘u’ we Americans no longer use for some reason.  Liz is a prolific baker but she shares great recipes of all kinds.

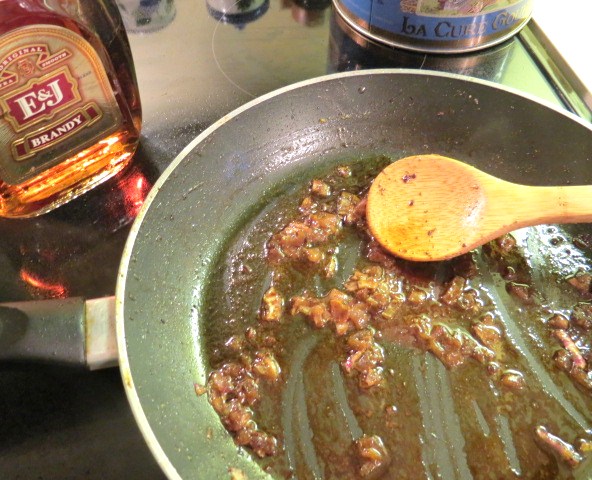
Follow this link to Liz’s recipe for Chicken Legs with Bacon & Ricotta Stuffing

chicken-with-bacon-and-ricotta-stuffing-myfavouritepastime-com_4648.jpg
Chicken with Bacon and Ricotta Stuffing


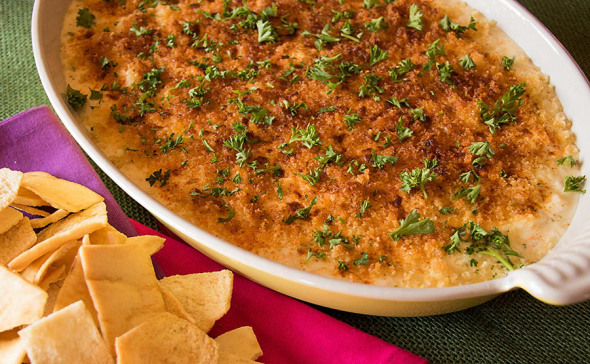
Mimi, whose wonderful blog is called Chef Mimi, has been involved in many aspects of ‘the food world’ including  being a personal chef, a caterer, a food columnist and a cooking school teacher etc.  etc.

Follow this link to Mimi’s recipe for crab dip.

Crab Dip - Chef Mimi.com.jpg
Crab Dip


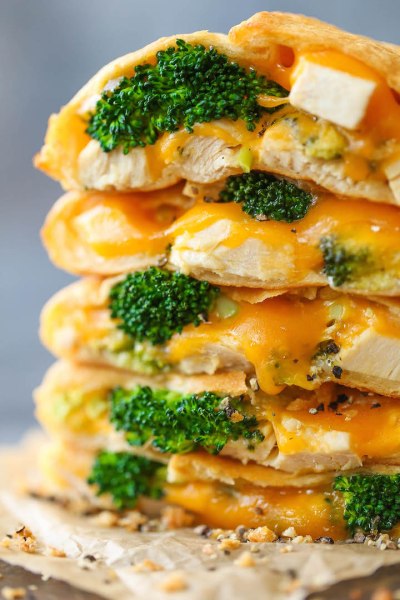
Chungah, of Damn Delicious, resides in California with her Corgi named Butters. Chungah like to say she cooks in a closet-sized kitchen.  Closet-sized or not, she does a great job.

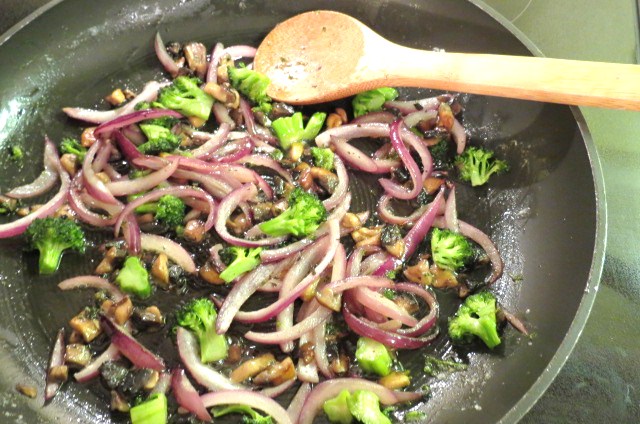
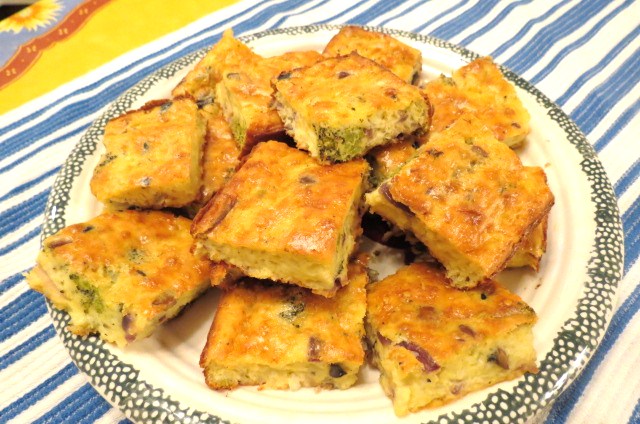
Follow this link to Chungah’s Cheesy Chicken and Broccoli Pockets

Cheesy-Chicken-and-Broccoli-Pockets - courtesy of Damn Delicious.jpg
Cheesy Chicken and Broccoli Pockets

See you at the next Roundup, partner!


copy-recipe-roundup

Celebrating Christmas after December 25th & a Recipe for ‘Ham and Cheddar Balls with Honey Mustard Dipping Sauce’

Tonight is New Year’s Eve but my extended family and I celebrated Christmas yesterday – and a merry time it was!

snowmen-at-twilight-myyellowfarmhouse-com
Snowmen at Twilight – My Yellow Farmhouse

Christmas Traditions – making buttery sugar cookies with new & old cookies cutters.  (The angel and poinsettia cookie cutters were my mother’s.)  

Christmas, even though celebrated after December 25th, still felt like Christmas to me and my extended family two days ago. There were happy, excited children, brightly wrapped presents, rum-spiked eggnog and lots of food and Christmas cookies – plus love, laughter and Bing Crosby singing Christmas Carols.    ; o )

I kept the menu for our ‘Christmas Meal’ simple and did much of the cooking the day before.  I baked three French Canadian Meat Pies, ‘spiral cut’and roasted the ham and prepared Make-Ahead Loaded Mashed Potatoes. I served only one vegetable – Wilted Spinach with Olive Oil and Pine Nuts, which takes only minutes to prepare.

To nosh on while we opened presents I made a platter featuring good old deviled eggs, various types of olives, and sliced tomatoes & fresh mozzarella drizzled with balsamic vinegar. I also served a few old favorites like one we like to call Vito’s Dip, and Ham and Cheddar Balls with Honey Mustard Dipping Sauce.  (I think my twin brother ate half the Ham and Cheddar Cheese Balls because he loves them and I hadn’t make them in years.)

Below my directions for making Ham and Cheddar Balls you’ll find links to Grammy Brouillette’s French Canadian Meat Pies, Make Ahead Loaded Mashed Potatoes and a link to Fabulous Foods.com‘s directions for how to cut and bake a spiral ham.

small red heart

Ham and Cheddar Balls with Honey Mustard Dipping Sauce


Oven at 350F          Bake for 20 minutes

INGREDIENTS

  • 3 cups biscuit mix – such as Bisquick   ++  If Bisquick isn’t available, check online for directions to make your own.  It’s easy!
  • 1 1/2 cups diced ham
  • 4 cups shredded Cheddar cheese (16 oz.)
  • 1/2 grated Parmesan cheese
  • 1 Tbs. chopped fresh parsley
  • 1 tsp. brown mustard    ++  I use GREY POUPON’S ‘Country Mustard’
  • 2/3 cup milk

Honey Mustard Dipping Sauce

  • 3/4 cup mayonnaise
  • 3 Tbs. brown mustard
  • 1 – 2 Tbs. honey

METHOD

Lightly grease a cookie sheet ..  OR  ..  line cookie sheet with parchment paper.

In a large bowl, using a large serving spoon, mix all ingredients until well blended.

Form dough into 1″ balls. Place balls 2″ apart on cookie sheet.

Bake for 20 minutes.  Balls will be lightly browned

While balls are baking, prepare sauce.  In a small serving bowl mix 3/4 cup mayonnaise, 3 Tbs. brown mustard and 1 2 Tbs. honey until blended.

++  ‘Ham and Cheese Balls may be baked the day before, placed in a big ziplock bag, refrigerated and reheated on a cookie sheet for a 6 – 7 minutes at 350F.

Recipe adapted from Bisquick brand’s Holiday Ham Balls.

Directions for preparing Grammy Brouillette’s French Canadian Meat Pies

Recipe for ‘Make Ahead Loaded Mashed Potatoes’

slow-cooker-loaded-mashed-potatoes-myyellowfarmhouse-com

Fabulous Foods tells you everything you need to know to spiral and cook a ham.  My ham sure didn’t look quite as ‘pretty’ as this one, but it was delicious!

http://www.fabulousfoods.com/articles/957827/how-to-spiral-carve-ham

spiral-cut-ham-courtesy-of-farmpac
Photo courtesy of FARMPAC.

christmas-2016-myyellowfarmhouse-com

Pâté Prepared with Shallots and Brandy

I think pâté is one of those things people absolutely love – or they take one look and refuse to try it. Don’t be one of those people – you’ll be cheating yourself out of something truly delicious!!  (I loved this pâté so much I ate the whole bowl in two days!!)

Here is how pâté is described by Wikipedia – ” Pâté is a mixture of cooked ground meat and fat minced into a spreadable paste. Common additions include vegetables, herbs, spices, and either wine or brandy (often Cognac or Armagnac). Pâté can be served either hot or cold, but it is considered to develop its fullest flavor after a few days of chilling.”

I used butter and a good amount of brandy, plus shallots and thyme, in this recipe. And don’t let the fact the recipe includes chicken livers throw you off !  This pâté is quick to prepare and you’re going to feel so proud when you tell your guests you made it yourself.

Pâté is actually better when made the day before – and – you can serve pâté either at room temperature or cold, which makes it perfect for entertaining.  If you’re hosting several people, consider purchasing some good quality cheeses, grapes and apples to go along with the pâté. Add crunchy crackers or rusks and – voila – you have a very impressive platter to serve before dinner!

Ingredients and Method

  •  2 Tbs. butter    ++ You’ll need 3 1/2 Tbs. butter total
  • 1/2 lb. (8 oz) chicken livers
  • 1 small shallot, chopped
  • 1/4 tsp. ground thyme
  • 3 Tbs. brandy
  • 1/2 cup heavy (or whipping) cream
  • 3/4 tsp. salt
  • 14 tsp. pepper
  • 1 1/2 Tbs. butter
  • 1/2 tsp. chopped fresh parsley  ++ I like to buy fresh parsley, chop it up, put it into a baggie and then place it in the freezer. That way I always have it on hand!

METHOD

Melt 2 Tbs. butter in a medium skillet over medium heat. Add the chicken livers.

Pate Made with Shallots and Brandy - My Yellow Farmhouse

Cook for 2 to 3 minutes until lightly browned but still slightly pink inside.

Pate Made with Shallots and Brandy - My Yellow Farmhouse

Transfer to a blender (or food processor) and reserve the skillet.

Lower the heat a bit. Add the chopped shallot, cooking until shallot is softened.

Sprinkle on 1/4 tsp. ground thyme and stir to combine.

Pate Made with Shallots and Brandy - My Yellow Farmhouse

Remove skillet from heat. Carefully add 3 Tbs. brandy.  Return skillet to heat and cook, stirring, until brandy is almost evaporated. (After this photo was taken, I continued to cook the brandy/ shallot mixture for about 30 more seconds.)

Pate Made with Shallots and Brandy - My Yellow Farmhouse

Add brandy/shallot mixture, 1/2 cup heavy cream, 3/4 tsp. salt and 1/4 tsp. pepper to blender.  Blend until super smooth.  (The original directions call for pressing the pate through a sieve at this point, which I did, but, if the pate is blended well enough, this step is NOT necessary.) Pour pâté into a small serving dish.

Place 1 1/2 Tbs. butter in a small microwavable bowl (cover the bowl). Warm just until butter is melted. Mix in 1/2 tsp. chopped fresh parsley. Pour melted butter over the pâté in bowl. (If you like, sprinkle a bit more parsley on top.)

Congratulations. You’ve just made a pâté that’ll ‘knock their socks off’.  Refrigerate until set, 1 – 2 hours. (That is… if you can wait that long.)   Enjoy !!

Pate Made with Shallots and Brandy - My Yellow Farmhouse

++ Original recipe courtesy of REALSIMPLE magazine – October 2014

‘Grab ‘n Go’ Crustless Quiche Squares

Above Photo  Shows Yield from Second (Smaller) Version of Recipe

Grab 'n Go' Crustless Quiche Squares - My Yellow Farmhouse.com

UPDATE – – Cathy from Australia told me she prepared Crustless Quiche Squares BUT she substituted cooked bacon for the broccoli. I love that idea!  Cathy calls them Bacon and Egg Squares and said they were a big hit with her four daughters!   'Grab 'n Go' Quiche Squares - with Bacon instead of Broccoli

When my twin sons were teenagers I had a repertoire (of sorts) featuring things they could ‘Grab ‘n Eat’  –  and by ‘they’ I mean my sons and their multitudinous friends … all of whom seemed to have bottomless stomachs.

Crustless Quiche Squares are a bit more ‘solid’ than most quiches due to the addition of a bit of flour, which is why they’re so easy to ‘grab and eat’ either for breakfast (as I did today), for a packed lunch or to serve as appetizers.  And they’re equally delicious eaten right from the fridge or at room temperature.

++  Today I made a smaller version of the original recipe, which works well for someone like me who doesn’t need to feed lots of teenagers!  That recipe follows the larger yield recipe below.

       THIS VERSION  MAKES A LOT   ……   USE A GREASED 13″ X 9″ PAN   

  (++ See below for recipe which makes fewer squares ++)     

Ingredients        

++ Oven temperature changes  – –    Bake at 400F for 15 minutes, …  then lower to 350F for 30 – 35 minutes.    

  • 10 eggs
  • 1/3 cup butter
  • 2 medium Bermuda onions, sliced
  • 1 1/2 cups chopped mushrooms
  • 1 1/2 cups chopped broccoli
  • 1/2 cup flour
  • 1 tsp. baking POWDER
  • 1/3 tsp. salt
  • 1 lb. (16 oz.)  small-curd cottage cheese
  • 1 lb. (16 oz.)  Monterey Jack Cheese – grated

In a large bowl, beat 10 eggs with an electric mixer for about a minute.  Set aside.

In a large skillet, over medium heat, melt 1/3 cup butter.  Add 2 medium Bermuda onions, sliced; 1 1/2 cups chopped mushrooms and 1 1/2 cups chopped broccoli. Cook, stirring occasionally, for 15 minutes.  Set aside.

'Grab 'n Go' Crustless Quiche Squares - My Yellow Farmhouse.com

Add 1/2 cup flour, 1 tsp. baking POWDER and 1/3 tsp. salt to the previously beaten eggs until combined.

Add 1 lb. small-curd cottage cheese and 1 lb. grated Monterey Jack Cheese and beat until combined.

Add sauteed onions, mushrooms and broccoli. Again, beat until combined.

'Grab 'n Go' Crustless Quiche Squares - My Yellow Farmhouse.com

Pour into greased 13′ x 9′ pan.    ++ Bake at 400F for 15 minutes………then REDUCE HEAT to 350F for 30 – 35 minutes.

Crustless Quiche Squares should be light brown when fully cooked, and a knife stuck in the middle shouldn’t stick.  Enjoy!

                                                                         + + + +

++ Directions for Making a SMALLER Batch of  ‘Grab ‘n Go’ Crustless Quiche Squares ++

++  Use a greased 9′ x 9′ pan

++ Oven temperature changes  – –    Bake at 400F for 15 minutes, …  then lower to 350F for 23 – 25 minutes.   
   

Ingredients

  • 5 eggs
  • 1/4 cup butter
  • 1 medium Bermuda onions, sliced
  • 3/4 cup chopped mushrooms
  • 3/4 cup chopped broccoli
  • 1/4 cup flour
  • 1/2 tsp. baking POWDER
  • 1/4 tsp. salt
  • 1/2 lb. (8 oz.) small-curd cottage cheese
  • 1/2 lb. (8 oz.) Monterey Jack Cheese – grated

In a large bowl, beat 5 eggs with an electric mixer for about 30 – 40 seconds.  Set aside.

In a large skillet, over medium heat, melt 1/4 cup butter.  Add 1 medium Bermuda onions, sliced; 1/2 cup chopped mushrooms and 1/2 cup chopped broccoli. Cook, stirring occasionally, for 15 minutes.  Set aside. 'Grab 'n Go' Crustless Quiche Squares - My Yellow Farmhouse.com

Add 1/4 cup flour, 1/2 tsp. baking POWDER and 1/4 tsp. salt to the previously beaten eggs until combined.

Add 8 oz. (1/2 lb.) small-curd cottage cheese and 8 oz. (1/2 lb.) grated Monterey Jack Cheese and beat until combined.

Add sauteed onions, mushrooms and broccoli. Again, beat until combined.

'Grab 'n Go' Crustless Quiche Squares - My Yellow Farmhouse.com

Pour into greased 9” x 9′ pan.    ++ Bake at 400F for 15 minutes………then LOWER HEAT to 350F for 22 to 23 minutes.

Crustless Quiche Squares should be light brown when fully cooked, and a knife stuck in the middle shouldn’t stick.  Enjoy!

++ Recipe adapted from ‘The Frugal Gourmet’

Grab 'n Go - Crustless Quiche Squares - My Yellow Farmhouse.com


“A Little Help from My Friends” Warm & Spicy Dip for Tortilla Chips

I always try to have the fixins for this warm & spicy Mexican-inspired dip in case people drop by. Talk about easy!  All you have to do is open two jars, pour the contents into a medium bowl, add a few spices, mix it all together – then warm it in the microwave until bubbly.

++  As with any recipe of this type, feel free to add more of the spices depending upon your personal preference.  A friend of mine threw this together for me recently a few minutes before a party.  She didn’t bother to measure the ingredients and it was delicious!

Ingredients  

  • One (15.5 oz) jar chunky salsa (I like “medium” heat…)    ++ For a thicker dip, add 1/2 jar of chunky salsa instead of the whole jar.  Actually, that’s what I’ve been doing lately!
  • One (15.5 oz) jar salsa con queso (Again, I like “medium” heat)
  • 1/2 tsp. cumin
  • + new addition +    1/4 tsp. dried cilantro  (I use McCormick’s)
  • 1/4 tsp. Mrs. Dash Southwest Chipotle
  • ++ If you don’t have any Mrs. Dash Southwest Chipotle, add a bit of cayenne pepper.)
  • ++ To ‘Kick This up a Notch” – – fry up about 1/4 cup chopped onion in butter and add !!
  • a bag of tortilla chips

I don’t know of many things that are this easy to make, yet taste so good.    Enjoy !

Warm and Spicy Dip for Tortilla Chips - My Yellow Farmhouse.com

“Barbecued” Cocktail Franks

Some of my neighbors invited to me their house today – Easter Sunday. I planned on bringing an appetizer containing seafood salad… but… last night when I arrived at the supermarket to purchase “said seafood salad”, the store pretty-much closed as I drove into the parking lot. (See, I’m not kidding when I tell you what a procrastinator I am.)

So, this morning, I was forced to go to Plan B. (Procrastinators always have a Plan B.) In my fridge I had a small package of Hillshire Farms Lit’l Wieners – so I decided to make some kind of “barbequed” cocktail franks. I was very pleased with the final product. And I think you will be too!

These “Barbequed” Cocktail Franks are really easy and quick to make. Besides the cocktail franks, all you’ll need is some barbeque sauce, a bit on onion and a bit of brown sugar – oh – and some water. It doesn’t get much easier than that!   Enjoy!

Ingredients

  • 1 (14 oz.) package cocktail-size franks – DRAINED (I used Hillshire Farms Lit’l  Wieners)
  • olive or vegetable oil
  • 2 Tbs. finely chopped onion
  • 6 Tbs. barbeque sauce (I like Sweet Baby Ray’s)
  • 6 Tbs. water
  • 1 Tbs. packed brown sugar

Place some olive oil – or vegetable oil – in a large skillet. Add DRAINED franks and 2 Tbs. finely chopped onion. Cook on medium heat, stirring occasionally, for 5 to 6 minutes – until the onion is softened and the franks are browned a bit.

Lower the heat. Add 6 Tbs. barbeque sauce, 6 Tbs. water and 1 Tbs. packed brown sugar. Cook, stirring, until sauce is thickened a bit and coats the cocktail franks – and you’re done. How about that for easy!  Pour the cocktail franks and sauce into a serving dish – put out some toothpicks and napkins – and enjoy!!!

Barbequed Cocktail Franks

‘Chinese’ Meatballs – A Great Make-Ahead Appetizer!

For the last several years I’ve hosted a “Women Only Pre-Holiday Madness Party”, usually on the first Saturday of December. We always have tons of fun!  Everyone brings whatever they want to drink – and an appetizer to share, so there’s lots of “nibbling” going on all night. And, of course, the beverages are flowing!  I invented these Chinese (or Sweet and Sour Meatballs) for one of those parties and they were a BIG hit.  Take my word for it – these are delicious!

++  Makes 25 – 1 1/2″ appetizer-size meatballs

Ingredients 

  • 1/2 cup dry purchased bread crumbs (“Italian” is fine.)
  • 1/4 cup milk
  • 1 1/4 lbs. (90 % lean) ground beef
  • 1 egg
  • 1/2 tsp. Worcestershire sauce
  • 1/2 tsp. teriyaki sauce
  • 2 (8 oz.) cans crushed pineapple – divided
  • 2 Tbs. minced onion
  • 1 tsp. maraschino cherry juice
  • 3/4 tsp. salt
  • 1/8 tsp. pepper
  • 3/4 cup packed brown sugar
  •  2 Tbs.  cornstarch
  • 1 Tbs. soy sauce
  • 1/4 cup teriyaki sauce
  • rest of juice & pineapple from 1st can  &  all of 2nd can
  • 2 Tbs. maraschino cherry juice
  • 10 or so maraschino cherries

FOR MEATBALLS – In a medium bowl, mix bread crumbs and milk, then add ground beef, egg, 1/2 tsp. Worcestershire sauce, 1/2 tsp. Teriyaki sauce, 1/4 cup DRAINED crushed pineapple – (reserve rest of pineapple and juice), 2 Tbs. minced onion, 2 tsp. maraschino cherry juice, 3/4 tsp. salt and 1/4 tsp. pepper.

Form into meatballs 1 1/2 ” across. Place each meatball about 1 1/2″ apart on a baking sheet, and bake in a 375 F oven for 20 minutes.

FOR SAUCE – In a large frying pan, place the rest of the ingredients – beginning with the cup of packed brown sugar down to the 10 maraschino cherries. On medium-high heat, bring sauce to a boil, while stirring.

Once sauce boils, immediately lower heat. Add cooked meatballs and continue cooking – at a simmer – until sauce is slightly thickened and coats meatballs.

++ These can be made ahead and served the next day.  I reheat them gently in an electric frying pan and serve them right from the pan so they remain warm.  Of course, they can also be warmed up & served from your slow-cooker.  Enjoy!!

'Chinese' a.k.a. 'Sweet and Sour Meatballs' - from 'My Yellow Farmhouse.com'