Thick ‘n Creamy Charred Red Bell Pepper and Potato Chowder

red pepper - courtesy of Re Della Produce

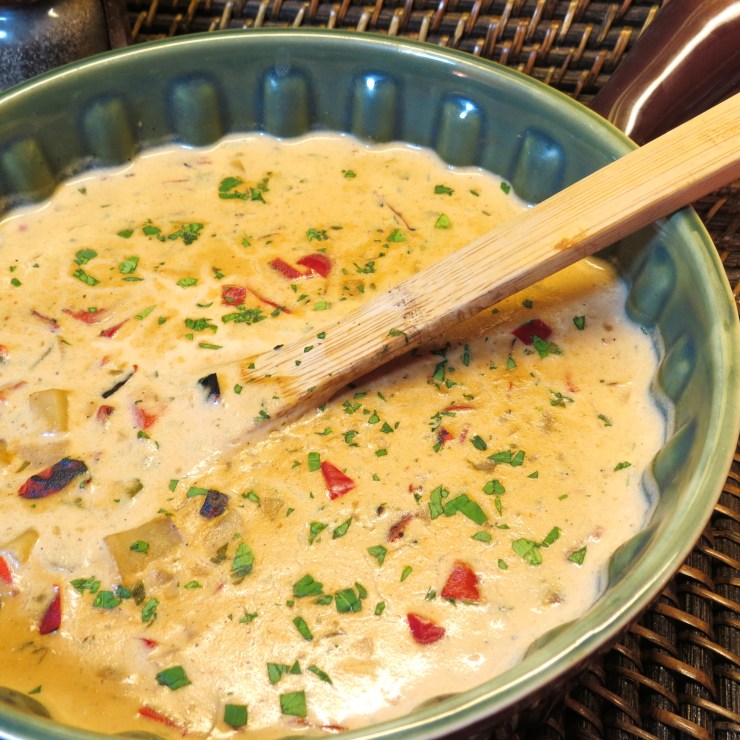
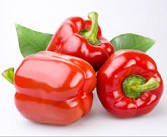
The mellow flavor of charred (blackened) red bell peppers adds a big flavor boost to this chowder. Don’t worry – charring the red bell peppers isn’t a lengthy process, as it can sometimes be. The chopped peppers are charred right in the pan, then chopped onions and potatoes are added, along with chicken broth, fresh parsley and a good amount ‘half and half’ cream….  plus a dash of cayenne pepper.  Add some crusty bread – and you’ll have dinner on the table in about 45 minutes!

I made a few changes from the original recipe simply because I’m from the part of the States we call New England.  Massachusetts to be exact, where a chowder (chow-da) should be thick and creamy, full of chunks of potatoes, onions and, quite often, clams. So I substituted ‘half and half’ cream for the milk AND there is no ‘mashing down’ of the potatoes, onions and red bell peppers as suggested in the original.     ; o )

++  Whole milk, 2% milk or 1% can be used instead of the ‘half and half’

++  “Half and half” is a mixture of half heavy cream and milk commonly found in the States.  In Canada, half-and-half is 10% cream.

   INGREDIENTS

  • non-stick cooking spray
  • 3 cups roughly chopped red bell peppers     ++ approx. 2 large 
  • 2 cups roughly chopped yellow onion       ++ approx. 1  1/2 large 
  • 2 cups peeled russet potatoes, chopped into 1/2′ cubes     ++ approx. 1 russet potato
  • 2 cups chicken broth   ++ vegetable broth can be substituted
  • 2 cups ‘half and half’ OR milk    ++  If using milk, you may want to use more cornstarch to thicken the chowder.  
  • 1 Tbs. chopped fresh parsley  –  ++ plus some to sprinkle on top of chowder
  • 1/8 – 1/4 tsp. cayenne pepper
  • 1/2 to 3/4 tsp. salt
  • 1/4 tsp. pepper
  • 1 Tbs. cornstarch

  METHOD                   ‘Dutch Oven’ – – A large heavy cooking pot with a lid.

Dutch Oven - Walmart

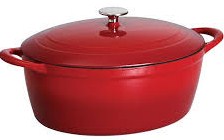
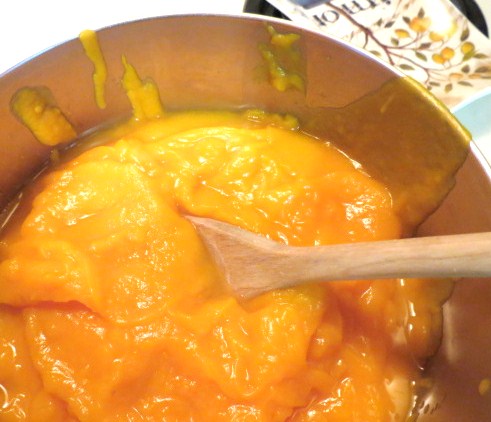
Spray bottom of a 4-quart Dutch Oven with non-stick cooking spray – heat over medium-high heat for a few minutes.  Add 3 cups roughly chopped red bell peppers. Cook, UNCOVERED, 12 – 15 minutes until peppers are charred, stirring occasionally.

Lower heat a bit.  Add 2 cups roughly chopped yellow onion.  Cook, stirring occasionally, for 5 to 6 minutes, until onion becomes translucent.  Add 2 cups peeled russet potatoes, chopped into 1/2′ cubes, and 2 cups chicken broth.  ++ Vegetable broth may be substituted.  

Bring to a boil – reduce heat.  Simmer, COVERED, 12 minutes – or until potatoes are tender.

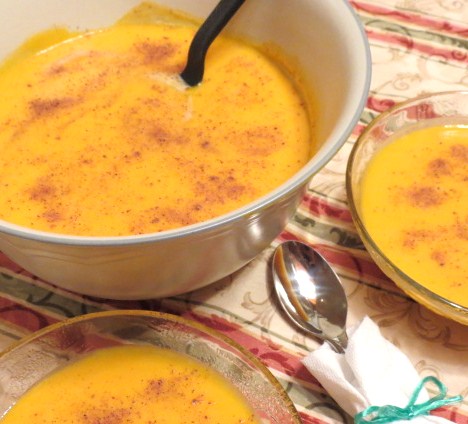
Add 2 cups ‘half and half’ (or milk), 1 Tbs. chopped fresh parsley, 1/8 – 1/4 tsp. cayenne pepper, 1/2 – 3/4 tsp. salt and 1/4 tsp. pepper.  Simmer, UNCOVERED, until chowder is heated through, stirring occasionally.

Place 3/4 cup of the chowder liquid in a mug and mix in 1 Tb. cornstarch.  Slowly add to chowder, stirring slowly until chowder thickens. ++ If using milk, you may want to use more than 1 Tbs. cornstarch.

Serve with some chopped fresh parsley sprinkled on top of chowder.  (Thick ‘n Creamy Charred Red Bell Pepper and Potato Chowder is even better when eaten the next day.)  Enjoy!

Follow this link for recipe – ‘No Name Bread’ – A Hearty, Moist Loaf, Perfect with Stew, Chili and Chowder

'No Name Bread' - myyellowfarmhouse.com

Creamy Charred Red Bell Pepper and Potato Chowder - myyellowfarmhouse.com

Creamy Charred Red Bell Pepper and Potato Chowder - myyellowfarmhouse.com

—-

Creamy Charred Red Bell Pepper and Potato Chowder - myyellowfarmhouse.com

Creamy Charred Red Bell Pepper and Potato Chowder - myyellowfarmhouse.com

—-

Creamy Charred Red Bell Pepper and Potato Chowder - myyellowfarmhouse.com

 ++ Recipe adapted from Better Homes and Gardens (Sept. 2105).

Roasted Butternut Squash Soup

Recipe adapted from People magazine – December 2013

I absolutely adore butternut squash, in any incarnation. The flavor of this butternut squash soup is enhanced by roasting the squash in the oven, then adding honey and a bit of nutmeg to the finished soup. A good thing about this soup – you don’t have to peel the squash, which I hate …

   Ingredients

  • 2 – 3 pounds of butternut squash  (You want to end up with 5 – 6 cups of mashed squash.)
  • 1 Tbs. olive oil
  • 3 cups chicken or vegetable broth 
  • 2 Tbs. honey – or ‘to taste’
  • 1 cup half & half
  • 1/8 tsp. nutmeg – or ‘to taste’
  • 1 tsp. salt – or ‘to taste’

Preheat oven to 350.

Cut butternut squash in half. Remove the seeds and fibers and discard.

As you can see, I used 1 1/2 very large squashes and I ended up with quite a bit left over, which was absolutely fine with me.  (You want enough squash to end up with 5 – 6 cups of mashed squash.)

Roaster Butternut Squash Soup - My Yellow Farmhouse.jpg Lightly oil a cookie sheet with olive oil. Be sure to use a sided cookie sheet.  I used one without sides and had to clean the oven after…..  Place squash, cut side down, on the cookie sheet.  Bake for 30 – 40 minutes or until squash is very tender when pierced with a sharp knife.

Scrape squash pulp into a blender.  (I didn’t have a blender when I made the soup at our Pocono house, so I pureed the squash in batches using my small Nutri Bullet. Hence, the photo of the pureed squash not in a blender, but in a bowl.)

Puree squash with about 1 1/2 cups of chicken stock and honey until smooth.

Pineapple Upside-Down Cake, Butternut Squash Soup and Truffles 058Place pureed squash in a large saucepan. Add 1/2 cup half & half, remaining broth and 1 tsp salt – or ‘to taste’. Cook, stirring, occasionally, until heated through.  Do no boil !!

If you like a thinner soup, add more chicken broth. If you like a thicker soup, add more pureed squash.  Serve sprinkled with a bit of nutmeg.  Enjoy!

Roasted Butternut Squash Soup - My Yellow Farmhouse.jpg

Zucchini Appetizers

I started making these “Zucchini Appetizers” about 25 years ago when we lived outside Philadelphia, Pennsylvania in a lovely town called Villanova. These are delicious – and do they ever disappear fast! They’re also great to have in the fridge for those times when you just want to grab something quickly.

I always had things like this in the fridge for my twin sons and their friends to “nosh” on. Although, occasionally, I’d spy one of their friends walking by with The Very Last Piece of Something I’d had my heart set on. ( And I’m speaking of you, “Joe F” !! )

As some of you know, I’ve been a bit “under the weather” off and on now for several months but recently I’d been feeling much better. Then, two weeks ago, I fell and messed up the ligament connecting my left collarbone to the shoulder. My shoulder had begun healing, when, two days ago, I fell five minutes after arriving at a friend’s cabin while bringing a bag into the house. Of course, I crashed on the same shoulder….!! But –  have I let having one arm in a sling change my plans for a large party this coming Saturday – heck no !!

I prepared these “Zucchini Appetizers” recently while at our home in the Pocono Mountains. I did pretty well chopping etc. using “mostly” one hand…. and taking the photos was NOT easy….  Right now I’m typing with two hands ’cause I’m sick of typing with only one …. although I think I’ll pay for doing this tomorrow..    Enjoy !     PS – I heard from my son’s wife that he was pretty happy I left him a good portion of these “Zucchini Appetizers”!

Oven at 350 F         grease a 9″ x 13″ pan        Bake for 25 – 30 minutes, until golden brown

Ingredients

  • 3 cups thinly sliced zucchini – about 4 small – OR  – 2 medium 
  • 1/2 cup finely chopped onion
  • 1 clove garlic, minced
  • 2 Tbs. chopped fresh parsley –  (I didn’t have garlic or parsley, so I used 1/2 tsp. garlic salt with parsley.)
  • 1 cup Original Bisquick (UPDATE – my friend made these using low-fat Bisquick!!)
  • 1/2 cup freshly grated Parmesan cheese  (The flavor is so much better with fresh Parmesan!!)
  • 1/2 tsp. seasoned salt (I prefer Mrs. Dash – Garlic & Herb)
  • 1/2 tsp. dried oregano or Italian Seasonings
  • 1/2 tsp. salt
  • 1/8 tsp. pepper
  • 1/3 cup vegetable oil  (Original recipe calls for 1/2 cup…)
  • 3 large eggs, slightly beaten  (Since many of us now buy LARGE eggs, I found that 4 large eggs were too many. If you buy MEDIUM eggs, then use 4.)

cut zuchinni

Prepare 3 cups thinly sliced zucchini, 1/2 cup finely chopped onion, 1 clove minced garlic and 2 Tbs. chopped fresh parsley. (If you don’t have fresh garlic or fresh parsley, use 1/2 tsp. garlic salt with parsley.)

Add veggies to a medium bowl. Add 1 cup Original Bisquick and 1/2 cup freshly grated Parmesan cheese.

Now add 1/2 tsp. seasoned salt, 1/2 tsp. dried oregano or Italian Seasonings, 1/2 tsp. salt, 1/8 tsp. pepper, 1/3 cup vegetable oil, 3 large eggs, slightly beaten. (If using medium eggs, use 4 eggs!)  Mix everything together. You may have some tiny lumps, don’t worry about that!

Pour everything into a greased casserole or 9″ x 13″ pan. (My casserole was a bit smaller than a 9″ x 13″, so I just baked it for 5 minutes longer!!)  

poured in pan

Bake for 25 to 30 minutes – or until its golden brown – in an oven set at 350 F.

Here’s what it’ll look like when you take it out of the oven – yum !!

possible - cookedAllow to cool a while, then cut into squares or triangles. For appetizers, cut into 3′ x 3″ squares. For “noshing” – cut as big as you like.  These “Zucchini Appetizers” are great eaten warm but they can also be served at room temperature, which is how I serve them at parties.   Another great thing about these is they can be made the day before!!  Enjoy!!

Use for last photo

Stuffed Shells Florentine – Cook in Oven – OR – Outside on Your Grill !

++ These Stuffed Shells Florentine can be cooked outside on a covered grill set at “low” so your kitchen remains nice and cool !!t

The term Florentine, or à la Florentine, refers to any dish which is prepared in the style of the fabulous city of Florence, which resides in the Tuscan region of Italy. Florentine recipes often feature meat, poultry or fish served over a bed of spinach. In this recipe the spinach is, in fact, mixed with ricotta, mozzarella and Parmesan cheeses – plus eggs, fresh parsley and some spices. All this deliciousness becomes the filling for the stuffed shells, over which a quick and easy marina sauce is poured, followed by a grating of either Parmesan or Romano cheese. I’ve been making this recipe for years and it’s always been a family favorite, however I decided to change both the filling and the sauce – and I have to say I’m very happy with the results!

I was recently invited to spend a weekend with friends in the beautiful town of Wells, Maine. I had decided Stuffed Shells Florentine would be great to bring because everyone likes them – and this recipe makes a lot! Several of us planned to head north in just one car, so, in order to save space, I prepared the filling and the sauce – and cooked the shells –  in advance and then assembled the final dish the following night.

And, get this, my friend decided she’d cook the stuffed shells on the grill so we wouldn’t heat up her kitchen. I never would’ve thought of that . . .  We took the containers of sauce, the filling and the precooked shells outside and assembled everything on the picnic table. Since there were three of us stuffing the shells, it only took a few minutes.

We sealed the pan with a sheet of aluminum foil, and placed it in the grill – which was set to LOW.  Then we enjoyed a drink and just let the Stuffed Shells Florentine simmer away. We were very pleasantly surprised when we checked after a half hour to see the sauce bubbling away, signaling that the shells were thoroughly heated through.

So, now you have two choices –  heat these in either your oven or your  grill.  Enjoy!

++ Cook stuffed shells in the oven at 350 for about 40 minutes.

++ Cook stuffed shells in covered grill set on LOW for about 30 minutes.

Ingredients

  • 1 full box of jumbo pasta shells – cooked according to package directions and drained  (We had about five shells for which we didn’t have filling, but they were the ones which had fallen apart, so that worked out well !)
  • 2 jars (24 oz.) prepared tomato sauce  (I like Bertolli – Tomato & Basil)
  • 1/4 to 1/2 cup red wine
  • 1 Tbs. chopped fresh basil
  • 4 cups ricotta cheese (32 ounces)
  • 2 cups shredded mozzarella cheese  – plus extra to sprinkle on top !
  • 1/2 cup grated Parmesan cheese  –  plus extra to sprinkle on top !
  • 1 (10 oz) package frozen (DEFROSTED AND DRAINED!!) spinach (I actually squeeze the defrosted spinach to get out all the excess water.)
  • 2 eggs
  • 1 Tbs. chopped fresh flat leaf parsley (a.k.a. Italian parsley)
  • 1 tsp. salt – (or to taste)
  • 1/2 tsp. black pepper

– – – – –  “A Little Help from My Friends” Marinara Sauce  – – – – –

Place two jars (24 oz.) of marinara sauce into a large saucepan – add 1/4 to 1/2 cup red wine and 1 Tbs. chopped fresh basil. Simmer, uncovered, over medium to medium-low heat while you cook the pasta shells and prepare the stuffing.

+ +  I had planned to prepare a meat sauce featured on the blog “From the Bartolini Kitchens”.  I had even purchased the ingredients but ended up “doctoring” a purchased sauce when I realized I was running out of time. (And I was actually very satisfied with the results of my “doctoring”.)  But, if you’d like to make this dish with a traditional Italian meat sauce, take a minute to head over to John’s blog!

http://fromthebartolinikitchens.com/2013/01/16/basic-meat-sauce-sugo-di-carne/

John's Basic Meat Sauce Recipe

– – – – –  To Prepare the Filling  – – – – –

Stuffed Shells - cheese and spinach 1

In a medium bowl, mix 4 cups ricotta cheese, 2 cups shredded mozzarella, 1/2 cup Parmesan (or Romano) cheese , the defrosted and DRAINED spinach, 2 eggs, 1 Tbs.chopped flat leaf parsley, 1 tsp. salt and 1/2 tsp. black pepper.

– – – – –  Putting It All Together  – – – – –

Pour about two cups of sauce in the bottom of a 10 x 13 pan – or a large disposable aluminum pan. With a large spoon, spread the sauce out a bit so most of the bottom is covered with sauce – you don’t have to be fussy about it ….

Fill each shell with a heaping soup spoonful of the cheese/spinach mixture.  Pour the remaining sauce over the shells.

Sprinkle some shredded Mozzarella and grated Parmesan. (We ended up using some grated Monterey Jack in place of the grated Parmesan, which added a nice little “kick” of flavor!)

Ready for the Oven or Grill !!  (Cover with aluminum foil.)

Stuffed Shells - uncooked

Cover with aluminum foil. If using oven, set temperature to 350 and cook until heated through – about 35 – 40 minutes.  If using you grill, set dial to LOW and cook until heated through – about 30 minutes. (I put a – freshly washed – finger in the middle to check for doneness. It’s a bit unorthodox – but it works!)

Once the stuffed shells are heated through,  remove the aluminum foil and let the shells sit about five minutes. Of course, if you just can’t wait, then you can skip the “let it sit” part.  Enjoy!

Stuffed Shells Floretine - myellowfarmhouse.com