Moroccan Chicken Tagine with Sweet Potatoes (Does NOT have to be cooked in a tagine!)

Moroccan Chicken and Rice Pilaf - - myyellowfarmhouse.com

Moroccan Chicken and Sweet Potatoes -- myyellowfarmhouse.com

Today it snowed almost all day long, so it was a perfect day to prepare a dish which simmers away in the oven, filling your kitchen with the scent of cardamom, cinnamon, turmeric and ginger!

I’m not proud to say I actually received my beautiful tagine as a gift LAST Christmas.  (I’ve told you I’m a procrastinator..)  There’s no excuse for waiting so long to ‘try it out’. It’s not as if I don’t see the tangine every day, sitting and waiting patiently on the lower shelf of the buffet in my kitchen…

tangine - kitchen buffet - myyellowfarmhouse.com

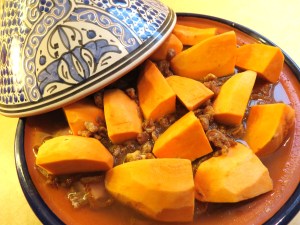
Moroccan Chicken Tagine can be be cooked several different ways; 1. In a tangine – cooked in the oven.  2.  In a tangine, cooked on very low heat on top of the stove.  3.  In a covered casserole – cooked in the oven.  4.  In a large saucepan or Dutch Oven – either in the oven (if pan has heatproof handles) or on top of the stove.

Whichever way you chose to cook Moroccan Chicken Tagine, you’re in for a treat.  And, except for frying up the onions and garlic in a skillet, you have a one pot meal with no mess in the kitchen. If you’re lucky enough to have a tagine, you can proudly present your Moroccan meal served right from your tagine.                

++  Tagines, according to my research, range in size from 8″ to 16″.  Actually, mine is only 7″ across at the base but it’s deep, so I was able to able to put in 8 boneless & skinless chicken thighs, plus 2 large cut-up sweet potatoes.

++ Be sure to learn how to use your tagine if you’ve never cooked with one before!  (The terracotta ones need special care.)   ++ Here’s a link to a great website which we could call “All You Ever Wanted to Know About Tangines” !  http://moroccanfood.about.com/od/moroccanfood101/f/How-to-Use-Tagine.htm

Love Moroccan? Here’s another recipe – plus Couscous with Raisins and Sliced Almonds

Moroccan Chicken and Couscous - My Yellow Farmhouse.com

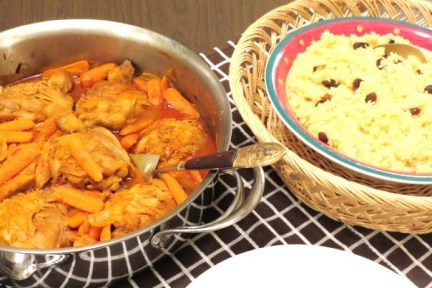
‘Never Fail’ Armenian Rice Pilaf

Moroccan Chicken and Rice Pilaf - - myyellowfarmhouse.com

++ Start tagine in a cold oven

++ Place oven rack at 2nd lowest level. 

INGREDIENTS       Oven at 325 (F)      Cook for 2 hours.   If cooking on top of stove in a saucepan or Dutch Oven, be sure to just ‘simmer’ the tangine.

  • 6 – 8 boneless/skinless chicken THIGHS
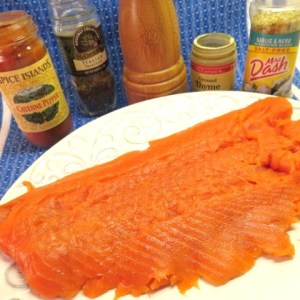
  • 2 – 3 medium sweet potatoes – peeled and cut into eighths.   ++  My tangine is small, so I only used 2 medium sweet potatoes.  They turned out soo yummy cooked this way that I plan to try to cram more in next time!! 
  •  2 Tbs. olive oil
  • 1 medium onion, sliced      ++  About 2 cups
  • 4 large cloves of garlic, minced or finely chopped   ++  Warm garlic cloves in microwave for 10 – 15 seconds, which helps remove papery covering on garlic cloves.
  • 1 tsp. ground ginger
  • 1 tsp. ground cinnamon
  • 1/2 tsp. ground turmeric
  • 1 tsp. ground coriander      ++  I used 1 tsp. minced fresh cilantro, which are the leaves of the same plant.  In fact, coriander comes from the seeds.
  • 1/4 to 1/2 tsp. chili powder
  • 1/4 tsp. cardamom
  • 1 tsp. salt
  • 1/4 tsp. freshly ground pepper
  • 1/4 cup chopped dates    (You can purchase chopped dates – BIG time saver!)
  • 1 cup HOT chicken broth    ++  Can also use 1 CUP HOT water and one bouillon cube.

METHOD

Arrange boneless/skinless chicken thighs in one layer on bottom of tagine.   ++  I folded the loose bits under, which looks a bit nicer and helps the chicken cook evenly.

Moroccan Chicken Tagine - www.myyellowfarmhouse.com

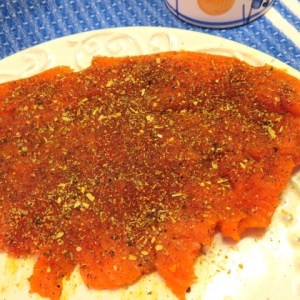
Put the following spices in a small dish or glass and set aside; 1/2 tsp. ground ginger, 1 tsp. ground cinnamon, 1/2 ground turmeric, 1 tsp. ground coriander (or 1 tsp. minced fresh cilantro), 1/4 to 1/2 tsp. chili powder, 1/4 tsp. cardamom, 1 tsp. salt and 1/4 tsp. freshly ground pepper.

Pour 2 Tbs. olive oil into a large skillet.  Add sliced onions and cook over medium heat until onions begin to brown a bit – between 5 to 6 minutes.

Add minced garlic.  Cook two to three minutes more, stirring occasionally.

Add the spices you’d set aside.  Stir to combine with the onions and garlic.  Cook one more minute, stirring.

Spread contents of skillet over chicken.

Moroccan Chicken Tangine - -  myyellowfarmhouse.com

Make one layer of the peeled and cut-up sweet potatoes.  Sprinkle 1/4 chopped dates over potatoes.  Pour 1 cup HOT broth over all.

Moroccan Chicken  Tangine - -www.myyellowfarmhouse.com

Cover on tagine.  Lower oven rack to second lowest level.  Place covered tagine in COLD oven.  Set temperature to 325F.

Cook for two hours.  ++  Chicken and sweet potatoes will be cooked after 1 1/2 hours but the extra 1/2 hour of cooking time REALLY makes the chicken thighs tender.  Enjoy !!

Moroccan Chicken and Rice Pilaf 2- - myyellowfarmhouse.com

Roasted Cauliflower and Red Pepper Gratin with Toasted Pine Nuts

++ This can be prepared GLUTEN FREE  !!

++  UPDATE – – EVEN BETTER WHEN MADE A DAY AHEAD !!      I just discovered that the next day the flavor of the roasted red peppers and cheddar cheese is infused throughout and the cauliflower is lovely & creamy !!  It tastes a lot like a very special version of Mac & Cheese.

It amazes me, now that I’m actually paying attention, how many fabulous recipes can be found which are healthy AND delicious.  Not only am I losing weight in my effort to eat healthy, I also have a lot more energy.  LOOK OUT WORLD !!

If you think you don’t like cauliflower, this may be the recipe to change your mind !  This is NOT your mother’s (or grandmother’s) ‘boiled all to hell’ cauliflower.  A light cheese sauce graces the roasted cauliflower with loads of flavor and there’s a tiny bit of heat from the cayenne pepper. And, except for garlic salt with herbs, there’s no salt in this recipe.  (This was my dinner last night, that’s how much I enjoyed this dish.)

INGREDIENTS

  • 7 cups cauliflower, cut into pieces 2″       ++ Uses 1 head of cauliflower, with perhaps a bit leftover
  • 1 red pepper, cut into 1/4′ strips
  • 1 – 2 Tbs. olive oil
  • 1 Tbs. flour      ++  For ‘Gluten-Free use 1 Tbs. cornstarch
  • 1/4 tsp. garlic salt with parsley      ++  Or garlic powder
  • 1/8 tsp. cayenne pepper
  • 1/4 tsp. salt-free seasoning      ++  I like ‘Mrs. Dash – Garlic & Herb’
  • 1/8 tsp. freshly ground pepper
  • 14 – 1/3 cup pine nuts       ++  a.k.a. pinola nuts        ++  You could also use walnuts or pecans
  • 2 Tbs. butter
  • 1 1/4 cups 2% milk      ++  I used 1% & that worked fine!
  • 1 1/4 grated Cheddar cheese

SET OVEN AT 425 (F)       TOTAL COOKING TIME – 25 MINUTES    (10 MINS, THEN 15 MINS.)                                           

Mix together cauliflower pieces, red pepper strips and 1 – 2 Tbs. olive oil.

Roasted Cauliflower Gratin with Toasted Pine Nuts

Spread vegetables evenly on baking sheet with sides.  

Roasted Cauliflower Gratin with Toasted Pine Nuts

Roast veggies in a 425 (F) oven for 10 minutes.  While cauliflower is roasting, toast pine nuts and prepare cheese sauce.

                                       Roasted Cauliflower and Red Pepper – After 10 Minutes

cooked -Roasted Cauliflower Gratin with Toasted Pine Nuts

TOASTED PINE NUTS  

In a small (ungreased) frying pan over medium heat toast pine nuts, shaking pan occasionally, until nuts become lightly browned.

CHEESE SAUCE

In a small bowl mix together 1 Tbs. flour  (For ‘Gluten-Free use 1 Tbs. cornstarch), 1/4 tsp. garlic salt with parsley, 1/8 tsp. cayenne pepper, 1/4 tsp. salt-free seasoning and 1/8 tsp. freshly ground pepper

Melt butter in a medium saucepan over medium heat.  Once butter is melted, add the flour and spices.  Whisk together and cook, stirring with whisk, for about a minute. 

Slowly add 1 1/4 cup milk and continue whisking until mixture is well blended.  Continue to simmer sauce for 4 – 5 minutes if using flour, whisking occasionally.  ++  If using cornstarch, the simmering time will be less.   ++  If sauce becomes too thick when using cornstarch, add a bit more milk.

REMOVE SAUCEPAN FROM HEAT.  Add 1 1/4 cup shredded cheese and whisk until cheese sauce is smooth.  Add toasted pine nuts.

Remove baking sheet from oven after 10 minutes.  Using a spatula, gently turn the partially cooked cauliflower and red pepper strips.  Drizzle cheese sauce slowly over veggies.

Return baking sheet to oven and roast for another 15 minutes, or until tops of cauliflower are nicely browned.  Serve & Enjoy !!

Roasted Cauliflower Gratin with Toasted Pine NutsRoasted Cauliflower Gratin with Toasted Pine Nuts

Nutty Oatmeal and Wholewheat Bread

Oatmeal and Wholewheat Bread - My Yellow Farmhouse.com

For Bread Machine directions, follow this link – https://myyellowfarmhouse.com/2015/01/22/nutty-oatmeal-wholewheat-bread-bread-machine-version/

– – – –

This is the latest recipe in my Eating Healthy series.  And I’m happy to say that after only a week of ‘eating healthy’ I’m back in my jeans – and I can actually sit here and work on this post without having to unzip them.  If I’m hungry, I eat.  I just watch what I eat.  Believe me – I have a long, long way to go weight-wise.  But I’m motivated and enjoying the process.

It took me two tries to get this recipe the way I wanted it… and it was definitely worth the effort.  Nutty Oatmeal & Wholewheat Bread has a delicious, nutty taste.  And it’s good for you! There’s a cup of oatmeal and a cup of wholewheat flour, plus a cup of regular bread flour (because I don’t like heavy bread).  I added 1 tablespoon of chia seeds, which are so very good for you – or – you could add some bran in place of the chia seeds.  I  also added 1/3 cup of chopped walnuts, which, like chocolate, make everything taste better.    ++ This bread makes wonderful toast!

small red heart

INGREDIENTS                    Makes One Loaf

  • 1 cup very warm water
  • 2 1/4 tsp. active dry yeast
  • 2 Tbs. honey            ++  Or brown sugar
  • 1 1/4 tsp. salt
  • 2 Tbs. butter             ++  Or Olive oil
  • 1 cup quick-cooking oats
  • 1 cup wholewheat flour
  • 1 cup flour      ++  In the United States, bread flour is different than regular flour.  In Canada, regular flour has the same qualities as bread flour.  I use bread flour but this recipe works with either.
  • 2 pinches nutmeg
  • OPTIONAL    –    1 Tbs. Chia seeds    ++  Or wheat germ
  • OPTIONAL    –    1/3 cup chopped walnuts  ++  Walnuts will be added once dough has been kneaded a while.

METHOD

3 - Nutty Oatmeal and Wholewheat Bread - My Yellow Farmhouse.com (3)

Measure 1 cup very warm water.    ++  The water should feel warm on your wrist – not hot.  Too hot and you kill the yeast.  Too cold, and the yeast just sits there. 

Add 2 Tbs. honey and stir briefly.  Add 2 1/4 tsp. active dry yeast.  Again stir briefly.  I’ve never seen directions to ‘stir’… it’s just what I do.)

Allow water, honey and yeast to sit for 15 minutes.

++  I usually give the mixture a little stir after about 7 minutes.

++  During cold weather you may want to place the measuring cup somewhere out of drafts.  I use my microwave!

After 15 minutes the water, honey and yeast should’ve bubbled up to resemble the photo above.  ++ If it does NOT – your water may have been too cold or too hot – or – your yeast may not be good anymore.  Just dump the contents out and try it again.  DO NOT GIVE UP!  The first bread I made was heavy as a brick!!

++  The quality of yeast goes down the longer you have it.  Use ‘6 months’ as your guide for when it’s time to discard it BUT your bread won’t fail if the yeast is older.  Your bread will just not rise quite as much and will have less flavor.  (I buy small jars of yeast but the same applies to packets.)

Pour the liquid into a medium-sized bowl.  Add 1 1/4 tsp. salt, 2 Tbs. butter, 1 cup quick-cooking oats, 1 cup wholewheat flour, 1 cup flour (see note above), 1 Tbs. Chia seeds and 2 pinches nutmeg.  ++  You’ll be adding the walnuts a bit later.

Using your hands (or a large spoon if you wish) mix the ingredients until combined, which should only take about a minute.

KNEADING THE DOUGH

Place dough on lightly floured work surface.  ++  I usually use a ‘tea towel’ (a.k.a. ‘dish towel) but this dough is a bit sticky, just I just used the counter.

Knead dough about 5 minutes.  ++  To knead dough, push away from you with the palm of your hand, turn dough, fold over and repeat. If dough is too sticky, add a bit more flour.

++ Now add 1/3 chopped walnuts and knead just until walnuts are incorporated.  Form dough into a ball.

++  Here’s an excellent link to learn how to knead bread –  http://bread.wonderhowto.com/how-to/knead-bread-dough-by-hand-355638/

Dough After Kneading

6 -  Nutty Oatmeal and Wholewheat Bread - My Yellow Farmhouse.com (5)

ALLOWING THE DOUGH TO ‘RISE’    

8 - Nutty Oatmeal and Wholewheat Bread - My Yellow Farmhouse.com (7)

After dough has been kneaded, place it in a greased bowl.  Turn dough over to grease top.  Cover bowl with a dish towel or plastic wrap.  Let rise in warm place for 30 to 40 minutes, or until double in size. 

++ During cold weather, place a 10′ x 13′ pan half-full of VERY HOT water on the bottom rack. of your oven.  Place the covered bowl containing the dough on the top rack.

7 - Nutty Oatmeal and Wholewheat Bread - My Yellow Farmhouse.com

ALLOWING THE DOUGH TO RISE A 2nd TIME

Once dough has risen, you’re going to ‘punch it down’, which seems pretty counter-intuitive…but allowing the dough rise a 2nd time will make the bread much lighter.  ++  If you like dense bread – then just skip this step!

Cover bowl with dishtowel and repeat step above for rising the dough.  Again – allow to rise for 30 – 40 minutes or until double in size.

 FORMING THE DOUGH  –  This is fun and easy!!

9 - Nutty Oatmeal and Wholewheat Bread - My Yellow Farmhouse.com (8)

10 - Nutty Oatmeal and Wholewheat Bread - My Yellow Farmhouse.com (9)

Remove dough from bowl.  Place on a lightly floured surface.  Using fingers, press dough into an 8′ x 12′ rectangle.  Beginning at short end, roll up tightly.  Place in a greased (I use olive oil) 9′ x 5′ loaf pan.

Bake in a 375 (F) oven for 35 – 40 minutes.  Allow the Nutty Oatmeal and Wholewheat Bread a few minutes to cool off due to the denseness of the bread…. that is….if you can wait.  (I didn’t!)     Enjoy!

2 - Nutty Oatmeal and Wholewheat Bread - My Yellow Farmhouse

Nutty Oatmeal & Wholewheat Bread – Bread Machine Version

2 - Nutty Oatmeal and Wholewheat Bread - My Yellow Farmhouse

Follow this link for Nutty Oatmeal and Wholewheat Bread made without a bread machine –   http://myyellowfrmhouse.com/2015/01/22/nutty-oatmeal-and-wholewheat-bread/

This is the latest recipe in my Eating Healthy series.  And I’m happy to say that after only a week of ‘eating healthy’ I’m back in my jeans – and I can actually sit here and work on this post without having to unzip them.  If I’m hungry, I eat.  I just watch what I eat.  Believe me – I have a long, long way to go weight-wise.  But I’m motivated and enjoying the process.

It took me two tries to get this recipe the way I wanted it… and it was definitely worth the effort.  Nutty Oatmeal & Wholewheat Bread has a delicious, nutty taste.  And it’s good for you! There’s a cup of oatmeal and a cup of wholewheat flour, plus a cup of regular bread flour (because I don’t like heavy bread).  I added 1 tablespoon of chia seeds, which are so very good for you – or – you could add some bran in place of the chia seeds.  I  also added 1/3 cup of chopped walnuts, which, like chocolate, make everything taste better.    ++ This bread makes wonderful toast!

small red heart

INGREDIENTS        ++  According to my bread machine directions, this is the order of the ingredients as they’re put into the bread machine.  Check the directions for your bread machine, just in case they differ.

  • 1 cup warm water
  • 2 Tbs. honey            ++  Or brown sugar
  • 1 1/4 tsp. salt
  • 2 Tbs. butter             ++  Or Olive oil
  • 1 cup quick-cooking oats
  • 1 cup wholewheat flour
  • 1 cup bread flour      ++  In the United States, bread flour is different than regular flour.  In Canada, regular flour has the same qualities as bread flour.  Follow your manufacturer’s directions.
  • 1 Tbs. Chia seeds    ++  Or wheat germ
  • 2 pinches nutmeg
  • 2 1/4 tsp.active dry yeast  ++  I use Bread Machine yeast but regular yeast may be used
  • 1/3 cup chopped walnuts   ++  The walnuts should be added during your machine’s ‘add’ cycle, which is part way through the kneading process.  Your machine should give you a signal.  If not, add the walnuts after machine has had time to knead the dough for awhile.


use - Nutty Oatmeal and Wholewheat Bread - My Yellow Farmhouse.com (2)

Set bread machine on ‘grain’ cycle.   ++  Your machine’s grain cycle will allow for the bread to rise twice, which gives the bread a lighter texture.  Enjoy !!

++  This step is NOT necessary but if you want a darker, crisper crust, up-end your baked bread into a 9’x 9′ square pan.  Remove bread machine pan from bread.  Turn bread over so crust side faces up.  Place in a 400′ oven for 5 – 6 minutes. 

Oatmeal and Wholewheat Bread - My Yellow Farmhouse.com

Herbed Blackened Salmon Fillets

You know you’re in trouble when you can’t zip your jeans !!  And you know you’re in trouble when your doctor tells you that you’ve gained 13 pounds in three months !!  POSSIBLE REASONS FOR THIS WEIGHT GAIN.  1. Trip to ‘all-inclusive’ resort in Cancun in October.   2.  Holiday Eating… beginning with Thanksgiving and ending with a two-week trip to Florida during Christmas and the New Year.   3.  Copious amounts of cooking during said trip, which meant copious amounts of eating – not to mention copious amounts of white wine and just lazing around like a nice, warm happy slug in the sunshine.  Oh, I forgot to mention Margaritas in both Mexico and Florida… yes… copious amounts!

I refuse give in and buy new jeans, so I’ve decided to begin taking care of myself and eating right. My guideline for this new endeavor is the Mayo Clinic’s ‘Dash Diet Program’ which is NOT a diet.  Rather, it’s an excellent guide to eating well.  And by eating well you lose weight, have more energy and also lower your blood pressure and possibly your cholesterol.

Herbed Blackened Salmon Fillets is the first of several posts which will feature delicious, healthy recipes.  I do hope you come along on this new journey with me.  If you’re already eating healthy, you might find a few new ideas.  Or, if you’re like me and need to lose some weight to improve your life, you may discover recipes to inspire you.  ++ I’ll keep you all informed as to my ‘progress’ with the too-small jeans!

1 - Herbed Blackened Salmon - My Yellow Farmhouse.com

2 - organic salmon steak - courtesy of Graig Farm -

Salmon Fillet = uneven thickness                           Salmon Steaks = even throughout.

INGREDIENTS            ++ Enough salmon for 2 servings

  • 1 lb. salmon fillet   OR   1 lb. salmon steak
  •           Blackening Seasoning
  • 1/4  to  1/8 tsp. cayenne pepper
  • 1/4 tsp. freshly ground pepper
  • 3/4 tsp. paprika
  • 1/2 tsp. Mrs. Dash ‘Garlic & Herbs’    ++  Contains no salt !
  • 1/2  tsp. Italian Seasoning

3 - Blackened Salmon - My Yellow Farmhouse.com

METHOD

Rinse salmon and pat dry with paper towels.  Place salmon on a plate.  In a small bowl, mix blackening seasoning  ingredients .

++ For salmon fillet with skin on one side, rub blackening seasoning on the flesh side of the fillet only.   (You won’t need all the seasoning.)       ++ Allow fish to rest for 10 minutes.

++  For skinless salmon fillet  OR  salmon steak, rub 1/2 the blackening seasoning on one side of fish.  Repeat on other side.                      ++ Allow fish to rest for 10 minutes.

Drizzle about 2 Tbs. olive oil in large, heavy skillet. Heat skillet over medium-high heat.  (Skillet is hot enough when a bit of water, sprinkled onto heated skillet, ‘dances’.)

Lower heat to medium.

4 - possible - Salmon (2)

++  For Salmon Fillet

  • Place salmon fillet, skin side down, in center of heated skillet.
  • Cook for about 3 minutes, depending upon thickness of fillet.   ++ Cooked skin should peel right off !!
  • Flip fish and continue cooking for another  3 minutes or so.

++  Cooking time will depend upon the thickness of the fillet.  My fillet was rather thin, so I cooked it for 3 minutes on the first side and only 2 minutes on the second side.

++ Cooked salmon will be lighter in color and should look opaque.  Use your best judgement.  It’s actually better to undercook fish slightly than to overcook it.

++  For Salmon Steak

  • Place salmon steak in center of heated skillet.
  • Due to the thicker nature of salmon steaks, they take just a bit longer to cook.
  • Turn the fish when the bottom half looks opaque.
  • Continue cooking another 5 – 8 minutes.

++  Cooking time will depend upon the thickness of the salmon steak.

++  Cooked salmon will be lighter in color and should look opaque.  Use your best judgement.  It’s actually better to undercook fish slightly than to overcook it !

Herbed Blackened Salmon - My Yellow Farmhouse.com.

Recipe adapted from ‘The DASH Diet for Beginners’.

Photo of organic salmon steak courtesy of ‘Graig Farm’.