Savory Cheese and Scallion Scones

My recipe for Maple Pecan Scones was one of several featured on the blog Fig Jam & Lime Cordial’s International Scone Week 2013, which made me happy as a little kid eating an ice cream cone!! Fig Jam and Lime Cordial is written by Celia, who happens to be from Australia. Drop by her blog because it’s jam-packed with excellent recipes!

Click here to see all the wonderful scone recipes from ‘International Scone Week 2013’.

For International Scone Week 2014 I’m submitting this recipe for Savory Cheese and Scallion Scones. (Savoury – for the rest of English speaking world.) I believe you’re going to like these scones!

Oven at 375F     Bake for 20 – 23 minutes

  • 2 cups all-purpose flour
  • 1/2 tsp. salt
  • 1 Tbs. baking powder   (Yes – a tablespoon!)
  • 6 Tbs. cold butter, cut into small pieces
  • 1 cup grated sharp cheddar cheese
  • 1/3 cup chopped scallions a.k.a. green onions   (Use both white and green parts.)
  • 2 large eggs
  • 1/3 cup milk
  • 1 tsp. Dijon mustard (You can add up to 1 Tbs. if you like.)
  • several shakes of hot sauce

Savory Cheese and Scallion Scones - My Yellow Farmhouse.com

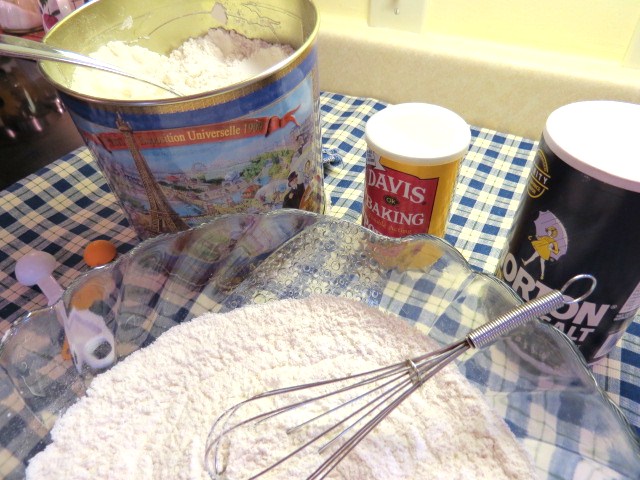
In a medium-sized bowl mix 2 cups flour, 1/2 tsp. salt and 1 Tbs. baking powder.  Work in the cut-up 6 Tbs. of butter with your fingers until there’s an evenly crumbly mixture and you don’t see any pieces of butter.

Savory Cheese and Scallion Scones - My Yellow Farmhouse.com (3)

Add 1 cup grated cheese and 1/3 cup chopped scallions.

Savory Cheese and Scallion Scones - My Yellow Farmhouse.com (4)

In a small bowl whisk 2 large eggs, 1/3 cup milk, 1 tsp. Dijon mustard (You can add up to 1 Tbs. of mustard if you like.) and several shakes of hot sauce. Add the liquid to the dry mixture. Stir with a large spoon ONLY UNTIL the dough is moistened. (The dough will be very sticky…)

++ UPDATE  My friend Liz, who blogs on “My Favorite Pastime” recently posted a recipe very much like mine, and Liz recommends “Knead the dough very briefly and lightly, folding it back over itself and pressing down (about 10 seconds). It should just lose its stickiness.” THANKS LIZ !! To see Liz’s recipe for Cheese and Chive Scones, click here!

Scrape dough onto a well-floured area of the counter top. OR (and I recommend this) use either a well-floured sheet of waxed paper or parchment. (I usually use a well-floured dishtowel BUT this dough was so sticky that ended up not being a good idea…)

Flour your hands – and flour them often. Also, feel free to sprinkle on a bit of flour while working with the dough. Pat dough into a 10″ by 3″ rectangle.

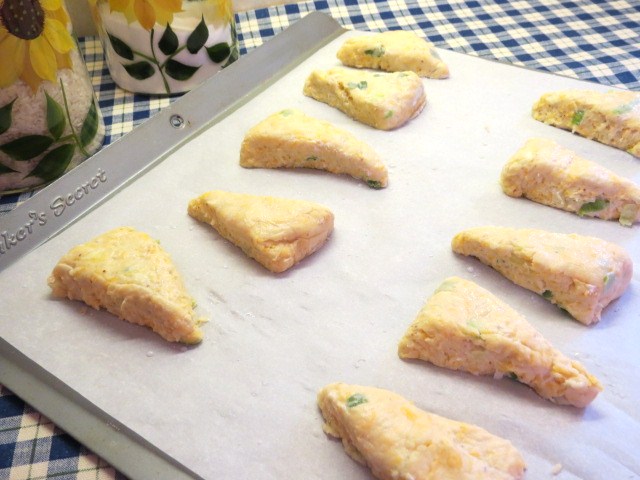
Cut into five squares. (I found cutting every 2″ worked out perfectly.) Then cut each square diagonally to form 10 triangles

Savory Cheese and Scallion Scones - My Yellow Farmhouse.com (5)

++ This dough can be a bit hard to work with. If you like, scoop out large dollops of dough to make 9 – 10 ‘free form’ scones. If you do choose to have triangular scones, don’t worry too much about them getting out of shape when you’re transferring the scones to the baking sheet. You can always ‘fix them up’ a bit with your hands.

Place scones on a greased baking sheet a least 1″ apart – OR – (I recommend this) place a sheet of parchment paper on the baking sheet.

Savory Cheese and Scallion Scones - My Yellow Farmhouse.com (6)

Bake scones for 20 – 23 minutes, until they’re nicely browned. (I’d ‘err’ on the side of ‘less brown’ rather than ‘more brown’ because you don’t want your scones to dry out.)

Remove scones from oven and sprinkle each with a bit of shredded. Return scones to oven for 10 seconds, which is just long enough to slightly melt the sprinkled cheese!

These Cheddar Cheese and Scallion Scones are best eaten right out of the oven and slathered with lots of butter. Any leftovers should be placed in a plastic food storage bag.    Enjoy!!

Savory Cheese and Scallion Scones - My Yellow Farmhouse.comOriginal Recipe from “King Arthur Flour’ – click here to see it.

Always Moist Barbequed Chicken, Corny Bread and Easy-Cheesy New Potatoes

“Always Moist Barbequed Chicken”

Corny Bread - Made in a Bread Machine - My Yellow Farmhouse.com

“Corny Bread – Made in Bread Machine”

Easy-Cheesy New Potatoes - My Yellow Farmhouse. com

Easy Cheesy New Potatoes”

Easy-Cheesy New Potatoes - Brooklyn Farmgirl's version of my recipe

Easy Cheesy New Potatoes” – – –  Brooklyn Farm Girl’s’ version – – – prepared with fresh radishes and broccoli straight from her rooftop garden.  Check out Pamela’s blog at brooklynfarmgirl.com!!

Some friends came over tonight to help take my outdoor furniture out of the barn – and into the yard, where it belongs! The weather today was amazing – mild with no humidity…. the kind of day that just screams – BAR–B– QUE !!

I haven’t made my Always Moist Barbequed Chicken in a while, although it’s always a real favorite whenever I make it. (And it was a big hit tonight.) The secret lies in the marinade, and, in cooking the chicken in a  250 F oven for 1 1/2 to 2 hours so the meat is partly cooked before it goes on the grill. So you can say goodbye to slightly raw – or dried out – barbequed chicken!

The Easy-Cheesy New Potatoes is something I “invented” tonight – and the Corny Bread recipe is from a cookbook that came with my bread maker. Even though there’s a half cup of cornmeal in the ingredients, it doesn’t taste like cornbread. It’s just incredibly moist and light! .

“Always Moist Barbequed Chicken”     Oven 'Barbequed' Chicken - My Yellow Farmhouse.com

The “Always Moist Barbequed Chicken” is marinated for several hours – or overnight – so I’m giving you those directions first.

Ingredients   – (Uses 4 Large Chicken Breast Halves – bone-in and with skin.)

  • 4 bone-in chicken breast halves with skin
  • 3/4 cup Italian salad dressing
  • 2 Tbs. soy sauce
  • 1/4 tsp. garlic powder
  • dash of pepper

Combine the Italian salad dressing with 2 Tbs. soy sauce, 1/4 tsp. garlic powder and a dash of pepper. If you like, you can add some other ingredients to your marinade, such as a bit of cayenne pepper are some cumin, for example.

Place the chicken in a bowl, a pan or a large zip lock bag, and pour the marinade over it. Marinate overnight – or for several hours, turning occasionally.

About 1 1/2 to 2 hours before you plan to barbeque (depending on the size of the chicken breasts) set your oven at 250 F, drain away the marinade and place the chicken in a low sided casserole or pan. (You can turn the chicken a few times but it’s not necessary.)

At the end of the cooking time, the chicken will look like this – all ready to be barbequed!

Always Moist chicken - Cooked in Oven

OK – you’re all set!  Set your gas grill at medium. Slather chicken breasts with your favorite sauce, grill until the skin as brown as you like and enjoy!  (If fat from the chicken makes your grill flame up – lower heat a bit.)

++ Tip from Emril Legasse – spread on your barbeque sauce at the last-minute or it might crystallize and char!  My chicken breasts charred a bit because I turned up the heat when the skin wasn’t browning quickly enough for me…. and the next thing I knew, it had gotten slightly charred.    Oh well, we live & learn !

'Corny Bread' - made in a bread machine - My Yellow Farmhouse.comCorny Bread – Made in the Bread Machine

The “Corny Bread” takes several hours, so allow yourself enough time. (Not that you have to do any of the kneading etc.!)

Ingredients 

  • 2 Tbs. milk. . . .and add lukewarm  water to make 1 cup
  • 1/4 cup honey
  • 3 Tbs. butter, softened a bit
  • 1 tsp. salt
  • 3 cups flour
  • 1/2 cup cornmeal
  • 1 1/4 tsp. yeast – bread machine yeast !
  •  ++ OPTIONAL – 1/2 cup canned corn – drained  OR  1/2 cup frozen corn – ADDED LATER!

Place all the ingredients – EXCEPT THE CORN – in your bread machine’s baking pan    in the order listed above.  Select the “Basic” and “Regular Crust” settings.  My bread machine lets me know when I should add ingredients such as nuts – or corn. If you’re bread maker doesn’t have this feature, you can add the corn towards the end of the kneading cycle.  (My machine takes 3 hours and 50 minutes to knead and bake the bread.)

Easy-Cheesy New Potatoes - My Yellow Farmhouse. com“Easy Cheesy New Potatoes”

My sister-in-law says I could make a delicious meal out of mud. And by that she means I can take a bit of this and a bit of that and – voila – some good eatin’ !  I take that as a very nice complement – thanks Sue !!  These “Easy Cheesy New potatoes” were NOT made out of mud but out of what I happened to have on hand. I love the flavor and texture of new potatoes – like strawberries, they taste like spring or early summer.

Ingredients

  • 6 – 7 medium new potatoes – unpeeled
  • 1/2 tsp. salt
  • 2 Tbs. olive oil
  • 2 Tbs. butter
  • 5 shakes of Tabasco sauce
  • 1/4 tsp. salt – or to taste
  • 2 Tbs. fresh parsley, chopped
  • some sliced cheese to place on the top – about 1/2 cup – as much as you want
  • (I happened to have Marble Jack cheese, which is a combination of Colby and Monterey Jack)

Scrub potatoes a bit under running water, then cut into chunks of about 1″. Place in a saucepan and cover with water. Bring water to a boil. Lower heat to a simmer and cook potatoes until they are fork tender. (According to my brother-in-law, I didn’t cook them enough. According to his wife, they were fine…)

Easy - Cheesy New PotatoesOnce potatoes are cooked, drain and set aside. With the heat off, mix 2 Tbs butter, 2 Tbs. olive oil, 5 shakes Tabasco sauce, 2 Tbs. parsley and 1/4 tsp. salt in the pan. Add in the potatoes and mix well. (If the potatoes begin to break up a bit… that’s fine.)

Place potatoes in a casserole. Put some sliced cheese on top and broil until the cheese is melted – that’s it ! (The cheese tends to melt quickly because the potatoes are already hot!)    Enjoy !

Oven 'Barbequed' Chicken - My Yellow Farmhouse.com'Corny Bread' - made in a bread machine - My Yellow Farmhouse.com

Easy-Cheesy New Potatoes - My Yellow Farmhouse. com


Quick Lunch or Dinner – Hot Open-Faced Sandwiches

Hot Open-Faced Sandwiches – version 1 –  Tomato, Bacon & Cheese

Use for 2nd photo

Hot Open-Faced Sandwiches – Version 2 – Warm & Puffy Open-Faced Cheese Sandwiches

+++ Update – I bet “Version 2” would really be good with bits of cooked bacon or ham mixed in!  Actually, so would a bit tuna,, salami or turkey etc. 

Any time of day is a good time for an open-faced sandwich. And a sandwich is particularly good when it’s adorned with melted cheese! These Melted Cheese,Tomato and Bacon Open-Faced Sandwiches – and the Warm & Puffy Open-Faced Cheese Sandwiches – are super easy and yummy.

With the addition of a green salad, cold slaw, potato salad or sliced avocado drizzled with balsamic vinaigrette, both the Melted Cheese,Tomato and Bacon Open-Faced Sandwiches and the Warm & Puffy Open-Faced Cheese Sandwiches are perfect for an easy dinner.

(1) Melted Cheese, Tomato and Bacon Open-Faced Sandwiches – Uses toaster oven  – or toaster and broiler

Recently I went through I time where I was kind of “addicted” to these sandwiches.  I like to spread a bit of mayonnaise on these babies once they’re heated up. And that’s part of why my cholesterol is so high – my total fascination with all things mayonnaise.

HOW TO —  Lightly toast two English Muffins – cut in half. Place a ripe & juicy tomato slice on top of each of the halves of English muffin. On top of the tomato, place a few slices of cooked bacon. Place a slice of Swiss cheese – or any cheese of your choice – on top of the bacon.  (I like to sprinkle on a bit of oregano on top of the cheese but you can sprinkle on anything you like.)

Turn toaster oven to BROIL and broil until cheese is melted.   ++ Make sure you keep your eye on your sandwiches, broilers seem to wait until your back is turned, then they immediately burn your lunch! Recipe makes 4 sandwiches.

2 – Warm & Puffy Open-Faced Cheese Sandwiches – OR – Appetizers  Uses toaster oven – or toaster and broiler

use as first photo

++ UPDATE – – – I highly recommend grating the cheese using a block of cheese. The pre-shredded cheese sold in the diary section doesn’t have the same taste as freshly grated cheese & the sandwiches don’t ‘puff up’ in the same way.

++ For Sandwiches – These sandwiches are rich and filling – and would be great for a brunch as well as lunch. If you add a salad, you’ve got a quick dinner idea! It’s pretty cool how the filling puffs up a bit as it heats up.  Recipe makes 6 open-faced sandwiches.

++ For Appetizers  Prepare as usual. Once they come out of the broiler, cut each English muffin into 1/4’s and there you go – a delicious hot appetizer!!

  Ingredients

  • 1 egg
  • 2 cups hard cheese, grated – such as Cheddar   (You can use pretty much any time of hard cheese, except for cheeses with a very strong flavor. Mozzarella – or any other type of soft cheese – is not recommended.)
  • 1/8 cup mayonnaise
  • a few sprinkles of Mrs. Dash
  • sprinkle on a little Paprika – for color
  • 3 English Muffins, cut in half to give you 6  halves – toasted

In a bowl, mix until well-blended; 1 egg, 2 cups grated hard cheese, 1/8 cup mayonnaise and a few sprinkles of Mrs. Dash & Italian Seasonings – or any seasonings you like.

Lightly toast 6 English Muffin halves. Spread egg/cheese mixture evenly on top of the toasted English muffins or toast. Broil until cheese mixture is hot and bubbling. It doesn’t get much easier than that!   Enjoy!