Pull-Apart Breakfast Biscuits with Caramel Sauce, Pecans and Maraschino Cherries

Pull-Apart Breakfast Biscuits with Caramel Sauce, Pecans and Maraschino Cherries could be called Deconstructed Monkey Bread with Caramel Sauce, Pecans and Maraschino Cherries but that seemed pretty pretentious for this simple re-working of good old Monkey Bread.

Because I’m endlessly curious, I did a quick check on the meaning of a ‘deconstructed dish’.  “Deconstructed dishes may take foods that are normally combined in the dish, change their forms, and then plate them together in a different way. It’s not just about taking the dish apart, but putting its elements back together.”  So, I guess I did deconstruct what we usually think of as Monkey Bread… how about that?!

I had fun making this and I had even more fun sharing it with my neighbors.  I actually took the last two photos at their house – and even talked Lad into being my ‘hand model’!!

Monkey Bread - My Yellow Farmhouse.com

Ingredients & Method

Oven at 350F       Bake for about 35 minutes, or until biscuits in middle are fully cooked

Lightly grease a 10″ x 13″ pan with shortening or cooking spray

Two 9′ round or square cake pans can be used.  Just divide sugared biscuit quarters, pecans, cherries and sauce evenly between each pan.  Bake about 25 minutes, or until biscuits in middle are fully cooked.

– – – –

  • 2 cans (16.3 oz.) Pillsbury Grands Homestyle refrigerated buttermilk biscuits
  • 1/2 cup granulated sugar
  • 2 tsp. cinnamon
  • 1 cup packed brown sugar
  • 3/4 cup butter or margarine  ++  I recommend butter !!
  • 1/2 cup chopped pecans – – or walnuts   ++  I used pecans
  • 1/2 cup chopped maraschino cherries    ++  I chopped the cherries pretty small.  However, when I make this again, I’ll roughly chop the cherries.   ++  For Christmas you may want to use both red & green maraschino cherries!

Arrange 1/2 cup chopped pecans and 1/2 cup chopped maraschino cherries evenly on the bottom of a greased 10″ by 13″ pan.

Open both cans of biscuits.  Separate biscuits.  Cut each biscuit into quarters.  ++ I found it went faster if I stacked two biscuits together and then cut them into quarters.

Place 1/2 cup granulated sugar and 2 tsp. cinnamon in a gallon food storage bag.  Shake to mix.

Place biscuit quarters in the bag and shake to coat.  ++  I found it worked well if I shook about 1/4 of the biscuit pieces at a time.  Repeat until all pieces are coated with sugar/cinnamon mixture.

Arrange the biscuit quarters on top of the pecans and cherries, squeezing them together a bit to fit in one layer.  ++  As I went along, I added a bit more cinnamon to the bag because the first biscuit pieces seemed to have picked up all the cinnamon. 

Monkey Bread - My Yellow Farmhouse.com (4)

Now it’s time for the caramel sauce. Place 1 cup packed brown sugar and 3/4 cup butter or margarine in a small microwavable bowlHeat in microwave just until butter melts.  Using a fork or whisk, mix butter and brown sugar together well.  Pour over the biscuits.    ++  Don’t worry if the sauce isn’t poured evenly over the biscuits  – it’s going to end up at the bottom of the pan, where it’ll blend with the pecans and cherries to form a yummy, sticky topping for the biscuits.

Monkey Bread - My Yellow Farmhouse.com1

Bake 350F for 35 to 37 minutes – or until biscuits in middle are fully cooked.  ++  To check for doneness, lift up the top of a middle biscuit to see if it’s cooked.  If not, continue to bake a few minutes longer.

Monkey Bread - My Yellow Farmhouse.com (2)

Allow to cool in pan for 5 minutes, then turn upside down onto a large serving platter. ++ If you don’t have large enough platter, cover a cookie sheet with aluminum foil and serve from there.  Enjoy!

++ Quote  http://www.cheftalk.com/

Monkey Bread - My Yellow Farmhouse.com (6)

  Monkey Bread - My Yellow Farmhouse.com (7)

Banana Nut Pancakes

banana nut pancakes - my yellow farmhouse

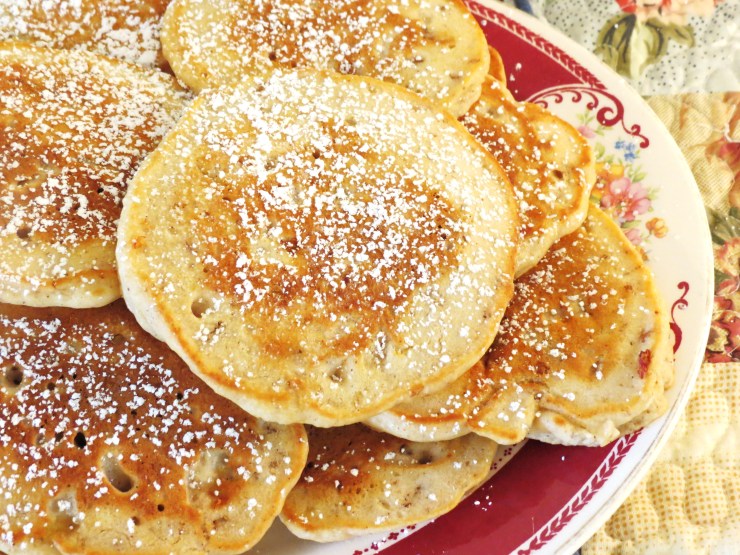
Banana Nut Pancakes were always a BIG favorite in our house when my boys were growing up. Unlike regular pancakes, which can be very dry when reheated, these pancakes are always dense and moist. And, they can be frozen, so you can enjoy them whenever you wish. As you may know, I’m a big believer in “Everything’s Better with Chocolate”, so I usually add chocolate chips to the batter, although I didn’t add them this time. (Perhaps I’m considering the fact that my high school reunion is only a month away….)

My friend Katie recently told me she could imagine these pancakes with a scoop of ice cream, with chocolate syrup drizzled on top. I told her, “Katie, I like the way you think!” Then, I added, how about imagining these pancakes with some slices bananas and chopped walnuts, along with the ice cream and chocolate syrup.    “Overkill”…. nah !!!

Totally off the subject of pancakes…. recently I hosted a pretty good-sized party but, due to problems with my separated left shoulder, I ended up ordering some fabulous Italian food from a local eatery. I did make a few items though. One was a green bean salad. But I was not happy with the results of my efforts, which doesn’t often happen…  Recently, Rufus, of Rufus’ Food and Spirits Guide, posted a lovely recipe for a green bean salad. I told him I’m going to provide the link because it looks so delicious. – so here it is.  http://rufusguide.wordpress.com/2013/09/13/green-bean-salad-2/

BANANA NUT PANCAKES  

Ingredients       Makes about 17      Recipe can easily be cut in half…

(I really believe a griddle or an electric skillet cooks pancakes or French toast much better than a ordinary skillet because the heat is even – right to the edge of the pan.)

  • 2 1/2 cups buttermilk pancake mix (I like Aunt Jemima)
  • 1 1/4 cups milk or water (I didn’t have any milk, so I used water & they were fine.) If you like your pancakes thicker, add less water. It you think the batter’s too thin, add more pancake mix.)
  • 2 eggs
  • 2 Tbs. oil
  • 1 banana  (Doesn’t have to be  super “ripe”.  Just mash it up a bit.  “Chunks” are OK !)         
  • 1/4 tsp. cinnamon
  • 1 Tbs. brown sugar, packed
  • 1/2 cup chopped walnuts
  •  1/4 – 1/2 cup chocolate chips – – optional
  • oil or butter – to grease the pan/griddle/electric skillet

In a good-sized bowl, mix 2 1/2 cups buttermilk pancake mix, 1 1/4 cup milk or water, 2 eggs, 2 Tbs. oil, 1 “mashed” banana, 1/4 tsp. cinnamon & 1 Tbs. packed brown sugar. thoroughly with a wooden spoon. (I prefer to hand-mix pancakes. Just like muffins, pancakes come out fluffier when mixed by hand.) Add 1/2 cup walnuts and 1/4 to 1/2 cup chocolate chips, if you so desire but it’s certainly not necessary.

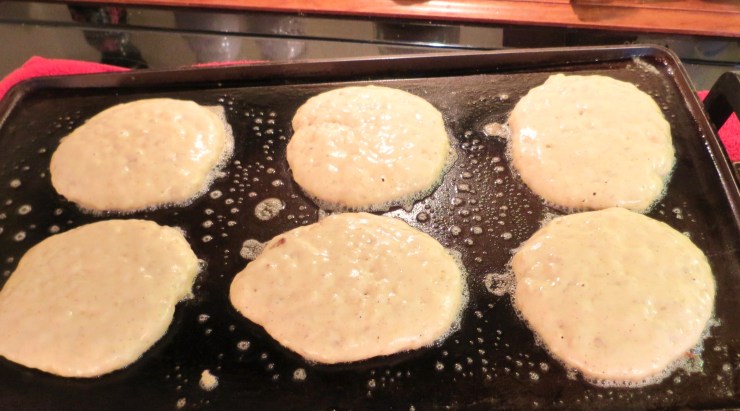
Begin heating your pan/griddle to 275 F – 300 F. Use a generous amount of butter or oil (I prefer butter) to grease your pan. Using a 1/4 measuring cup (or 1/3 measuring cup, depending upon how big your want your pancakes), pour out enough batter for each pancake, leaving a bit of room between each one.

Banana Nut Pancakes - cooking

Very soon bubbles will begin to appear on the top but it’ll take about a minute after the bubbles appear before the pancakes are ready to turn over. (If you’re not sure when to turn them over, use a spatula to peak at the bottom of one to see if it’s browned,.) The second side usually cooks faster than the first. Here’s how I check to see (especially with the first ones), I just open one up a bit with a knife so I can be sure the inside’s cooked. ) As I said previously, these Banana Nut Pancakes are moister than others – so they are far less likely to dry out.

Banana Nut Pancakes - Cooked

Now the rest is up to you. You can sprinkle these babies with confectionery (icing) sugar or brown sugar or, of course, drizzle on some maple syrup. OR – you can go crazy and add ice cream, whipped cream etc. It’s your Breakfast Party !!

++  To reheat frozen pancakes – place a paper towel on a plate, then place three pancakes on top. Cover pancakes with a second paper towel. Heat on HIGH for 1 minute & 20 seconds…. of course, it depends on your microwave.                      Enjoy !!

possible - last photo

Maple Pecan Scones

I actually made, and photographed, these scones last night but I decided to make them again today because I wasn’t 100% satisfied with yesterday’s results. (Luckily I only had to re-photograph the final product.)

I have always liked this recipe but I decided it just to change the recipe just a bit – and I’m really pleased with “My Second Attempt” as these scones are g.o.o.d. !!  (Last night the dough was too sticky to work with, and I thought the scones had too much salt and not enough sugar.)

Actually, scones aren’t meant to be overly sweet. Usually the sweetness comes from the jam & clotted cream the British like to spread on their scones. I LOVE British High Tea. Here’s a typical High Tea menu – finger sandwiches, scones with clotted cream and preserves, plus cakes and pastries. All accompanied, of course, by a variety of teas.

Here’s a true story concerning scones. On one of my trips to London I stopped at a lovely but very casual tea room. While I was perusing a case full of various types of scones, I mentioned to the gentleman helping me, “There’s a fly in the case”. “Excuse me madam, those are raisins”. “OK”, says I, “Well then, one of your “raisins” is flying”.

Oven at 400F     Bake for 14 – 16 minutes

Ingredients  

Feel free to add some chocolate chips or raisins…. but I wouldn’t recommend adding any “flying” raisins !!

  • 1 cup chopped pecans – or walnuts   (You’ll need a bit of  chopped nuts to sprinkle on top once the scones are cooked.)
  • 1/4 cup maple syrup – or maple-flavored syrup
  • 2 cups …..PLUS 2 Tbs. flour    ++ The amount of flour used depends on many factors. You many not need the extra 2 Tbs.
  • 1/4 cup sugar
  • 2 tsp. baking POWDER
  • 3/4 tsp. salt
  • 1/2 tsp. baking SODA
  • 1/3 cup butter, softened just a bit
  • 3 Tb. milk
  • 2 large eggs
  • 1 Tb. distilled white vinegar – Don’t skip the vinegar !!
  • 1 cup confectionary sugar
  • 2 Tb. milk

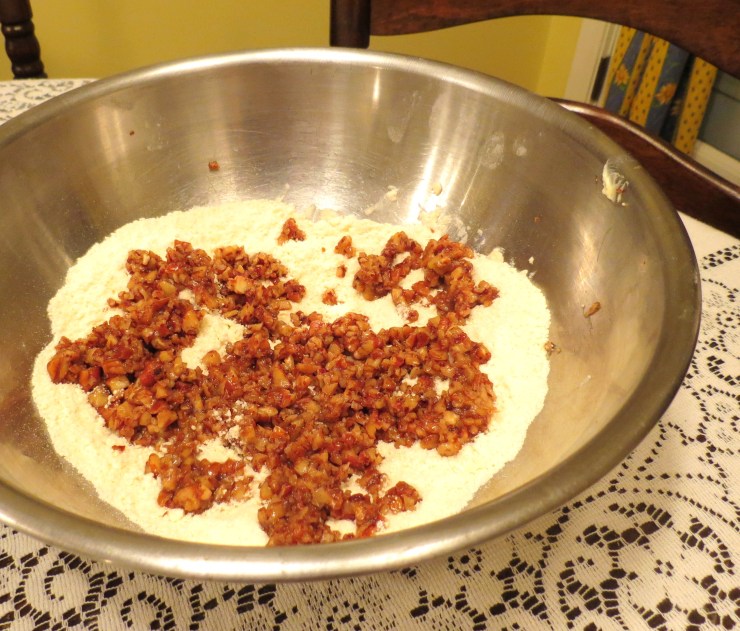
Mix 1 cup chopped pecans with 1/4 cup maple syrup in a small bowl, and set aside. In a large bowl mix 2 cups PLUS 2 Tbs. flour, 1/4 cup sugar, 2 tsp. baking POWDER, 3/4 tsp. salt and 1/2 tsp. baking SODA. With a pastry blender – or two knives used scissor fashion – cut in butter until the flour mixture resembles tiny crumbs.

Add the pecan/maple syrup mixture to the bowl and throughly mix in.

Maple Syrup, Pecans and Flour Mixture

In a small bowl, mix 3 Tb. milk, 2 large eggs and 1 Tb. distilled white vinegar.

Egg, Vinegar and Milk Mixture

Stir milk/eggs/vinegar into flour/pecan mixture until ingredients are just blended. You don’t want to over mix and have the scones come out tough.

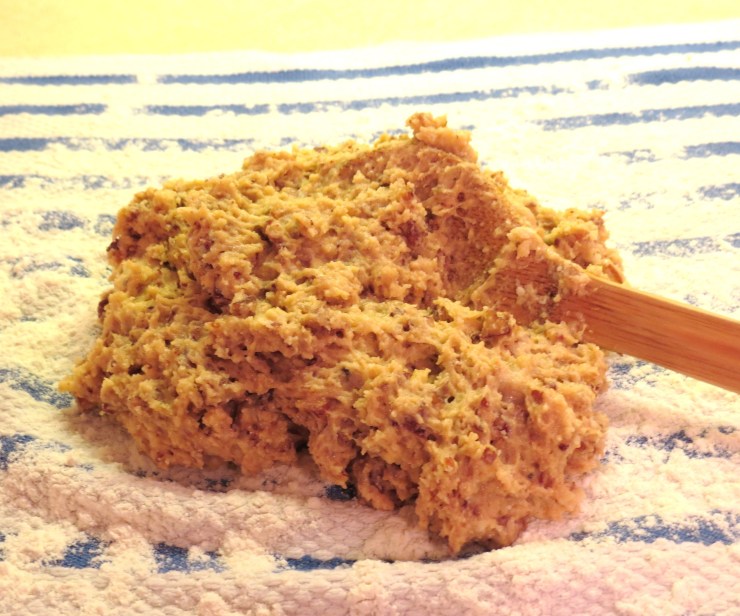
Preheat oven to 400 F. Turn out dough onto a dish towel which has been sprinkled with about 3 Tbs. of flour. Ready to Be Kneaded

Sprinkle a bit of extra flour on the dough. Gently knead the dough about 10 times. (To knead, push dough with the palm of your hand, turn dough a 1/4 turn and continue.)

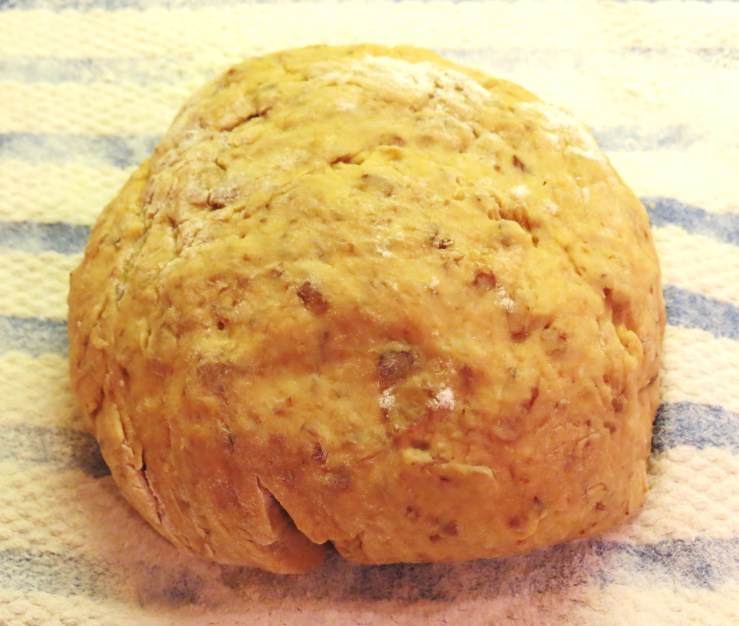
Form dough into a ball.

Dough

Pat dough into a circle of between 6 1/2″ to 7″. The circle should be about 3/4″ high. Using a large, sharp knife, cut the circle into 8 equal pieces. If the knife sticks a bit, just CAREFULLY rub a bit of flour on it between cuts.

Cut Dough

Place the triangles on an ungreased cookie sheet. Don’t worry if they get slightly out of shape…

USE - Ready to Bake

Place the cookie sheet in the center of your oven. Bake for 14 – 16 minutes.

++ If you’re not sure the scones are done, here’s what I did…. I took the cookie sheet out of the oven, cut into one, saw it was still “doughy” inside and put the scones back into the oven for 3 more minutes.

Remove scones from cookie sheet and allow to cool on a cooking rack.

Glaze   – it’s not necessary to make a glaze – or to sprinkle on some chopped pecans, but the scones not only look prettier – I think they actually taste better!!

In a small bowl mix 1 cup confectionary sugar with 2 Tb. milk. If the glaze is too runny, add a bit more sugar….. if it’s too thick  – add a teeny, teeny bit of milk until you reach a good consistency. You can drizzle the glaze over the scones with a spoon OR you can fill a small baggie with the glaze, cut of a VERY TINY hole in one corner and then squeeze the glaze out just like a pastry chef!    Sprinkle on some chopped pecans, make a cup of tea – or a have a big glass of milk and …….  Enjoy !

Maple Pecan Scones - finished - last photo

“Eggs in a Frame” a.k.a. “Eggs in a Blanket”

Eggs in a Frame - cooked - FOR END OF POST

Whether you call these ‘Peek-a-Boo Eggs’, ‘Eggs in a Hole’, ‘Eggs in a Frame” or ‘Eggs on the Island’   – – – – they’re “good eats”!!

My sons used to love these!! The taste is truly (as the old expression goes) “more than the sum of its parts”, meaning eggs and toast prepared this way are so much tastier than eggs and toast cooked the usual way.

++ Someone recently asked, “When to flip over ‘Eggs in a Frame?’  I would say, ‘Use the above photo as your guide.” When the eggs are ‘almost set’ – as above – flip them over for just a few seconds. That is, unless you prefer your yolks very, very set – then let them cook a few seconds longer.

++ Be sure to fry one side of the bread first – THEN break the egg into the hole.  That way both sides of the bread are buttery and toasted, even if you don’t flip them over!

    Ingredients…. (I’m not even sure that a list this short can even be called “ingredients”!!)

  • eggs – allow 2 per person
  • bread – allow 2 slices per person
  • butter or margarine
  • salt & pepper
  • OPTIONAL – cayenne pepper, red pepper flakes etc.
  • OPTIONAL – sliced cheese

Eggs in a Frame - ingredients

If you’re making these for more than 2 people, then it’s really wonderful if you happen to have some sort of griddle. Otherwise just use 2 large nonstick skillets.

Butter one side of the bread. Using a biscuit cutter, if you have one (or a small glass which has an opening of about 2 1/2″), cut a hole in the center of each piece of bread. Don’t discard the centers – you’re going to fry those as well – actually, the centers might end up being your favorite part!!

On medium heat, warm up a large nonstick skillet. Add about 2 tsp. butter. Once the butter has melted, place the bread slices, butter side up, in the skillet.  Cook JUST THE BREAD until the bottoms of the bread are toasted.

Eggs in a Frame - bread in panFlip the toast over. Lower the heat a bit and gently break an egg into each ready-made hole. Sprinkle with a bit of salt & pepper – plus a bit of cayenne pepper etc if you choose.

Cook the eggs/toast until almost cooked through if you want “Sunnyside” eggs. Or, you can flip the “Eggs in a Frame” over to give you “Over Easy” eggs.

You can also place a slice of cheese on top once the eggs seem a few minutes away from being ready. I recommend covering the pan, if you’re adding cheese, so that the cheese melts without overcooking the eggs.   Enjoy !!

Eggs in a Frame - cooked

Mini Banana Chocolate Chip Muffins

I used to make these Mini Banana Chocolate Chip Muffins for breakfast when my sons were young. However, at that time I wasn’t topping the muffins with melted chocolate and nuts. A person only has some much time in the morning!

Breakfast has always been one of my favorite meals, so I used to love to cook all kinds of great things for breakfast, such as a really delicious breakfast custard. Or we used to have cornmeal pancakes, banana nut pancakes, apple pancakes, waffles, Egg Benedict, Eggs in a Frame and Goldenrod Eggs on toast etc.  Was I always on time for my job as a teacher….. nope. But I always arrived with a Happy Tummy!!

The original recipe didn’t call for chocolate chips – or melted chocolate on top – but I believe you can never have too much of a good thing.

Oven at 400 F     Makes 16 mini muffins      Makes 12 regular muffins

13 (or so) minutes for “mini” muffins – – – For the mini muffins, grease both the bottom & the sides of the muffin cups.

15 minutes (or so) for regular-sized muffins   You can use cupcake liners – or – grease the bottoms only.

Ingredients     I checked online and the recipe has been changed a bit since “way back when”, so I’m posting the latest amounts because I think the changes are good. There’s a bit more mashed banana, plus a little more sugar.

  • 1 egg
  • 3 Tbs. melted butter – microwave for 10 seconds — OR — 3 Tbs. oil
  • 1/3 cup sugar
  • 2 cups Bisquick
  • 1 1/4 cups mashed VERY RIPE banana
  • 1/4 cup chopped walnuts
  • 1/4 cup chocolate chips
  • 1/2 cup chocolate chips – for top of muffins
  • 1 tsp. Crisco
  • some chopped walnuts, to sprinkle on top of muffins

In a medium bowl, mix egg slightly with a fork. Add the 3 Tbs. melted butter, 1/3 cup sugar, 2 cups Bisquick and 1 1/4 cups mashed banana. Mix with large spoon until just combined.

Add 1/4 cup chopped walnuts and 1/4 cup chocolate chips. Fill muffin cups to 1/2 full. Bake according to the above directions, depending upon the size of your muffin pans. Check for doneness by inserting a toothpick or a knife into the center of a muffin. If it comes out clean, then your muffins are done. (Don’t get confused by the melted chocolate sticking to either the toothpick or the knife. As long as the batter’s cooked, then the muffins are done!)

Allow muffins to cool for a few minutes, then remove to a cooling rack. While muffins are cooling, melt 1/2 cup chocolate chips and 1 tsp. Crisco in the microwave for 1 minute. Stir. Return to microwave for another 20 – 35 seconds. Stir again, then, with a spoon, drizzle the melted chocolate over the muffins. Sprinkle with chopped walnuts.  Enjoy!!

Mini Banana Chocolate Chip Muffins - bottom photo

Bacon and Egg Cups

These are easy and fun to make – in fact, the kids or grandchildren might want to help make them!

Don’t worry if you don’t have maple syrup. They’ll still be excellent but I do highly recommend making these Bacon and Egg cups with maple syrup ’cause it gives the bacon a real flavor boost. I know I always included the maple syrup when we had our own “maple sugar shack” on our farm in Quebec, Canada. (I’ll have to post a photo of it someday…)

This recipe makes six but you can make 12 just as quickly, which is great when cooking for a crowd. Plus the Bacon and Egg Cups are baked in the oven, so you can enjoy your coffee – or Bloody Mary – while they’re cooking!!

PS – The next morning I heated a few up in my microwave for about 30 seconds – they were still delicious!!

Makes 6                 Oven at 400 F                     15 – 20 minutes – keep an eye on them! 

May 2013  —  I made these with my grandchildren at our home in the Pocono Mountains and decided that 3 Tbs. of butter and 3 Tbs. of syrup was just tooo much.  Of course, as always – it’s up to you. Add as little or as much as you like!

My son asked us to make these using SPAM and, because it was his birthday, his wish was granted. The “SPAM and Egg Cups” were really good with cut up and fried SPAM instead of bacon!!  (I know SPAM is sometimes laughed about but it’s basically just cut up pork with spices. It tastes like ham – what’s not to like?!)

Ingredients

  • 6 slices bread without crust  (Use thinly sliced bread.)
  • 1 1/2 Tbs.butter, melted – previously was 3 Tbs.
  • 1 1/2 Tbs. maple syrup – previously was 3 Tbs.
  • 3 strips bacon, cooked until crisp and then crumbled 
  • 6 eggs
  • salt & pepper

Grease 6 muffins tins or spray with Pam. Cut crusts off bread, flatten down a bit with your fingers. Press one piece of bread into each of the 6 muffin cups. Mix 1 1/2 Tbs. melted butter with 1 1/2 Tbs. maple syrup and brush the mixture onto the bread.  Sprinkle crumbled bacon into bread cups. Break an egg into each cup and sprinkle with salt and pepper. (Actually, I made these with one piece of crumbled bacon per serving – instead of a half a piece. A few of the eggs “overflowed” the muffins cups due to the extra bacon, so I just cleaned up the extra with some paper towel.)

Bake at 400 F for 15 to 20 minutes, until eggs are set and bread is toasted. After 15 minutes, keep an eye on them because you don’t want to over cook ’em the yolks should be a bit runny.  Enjoy!

Bacon and Egg Cups - Use for Blog